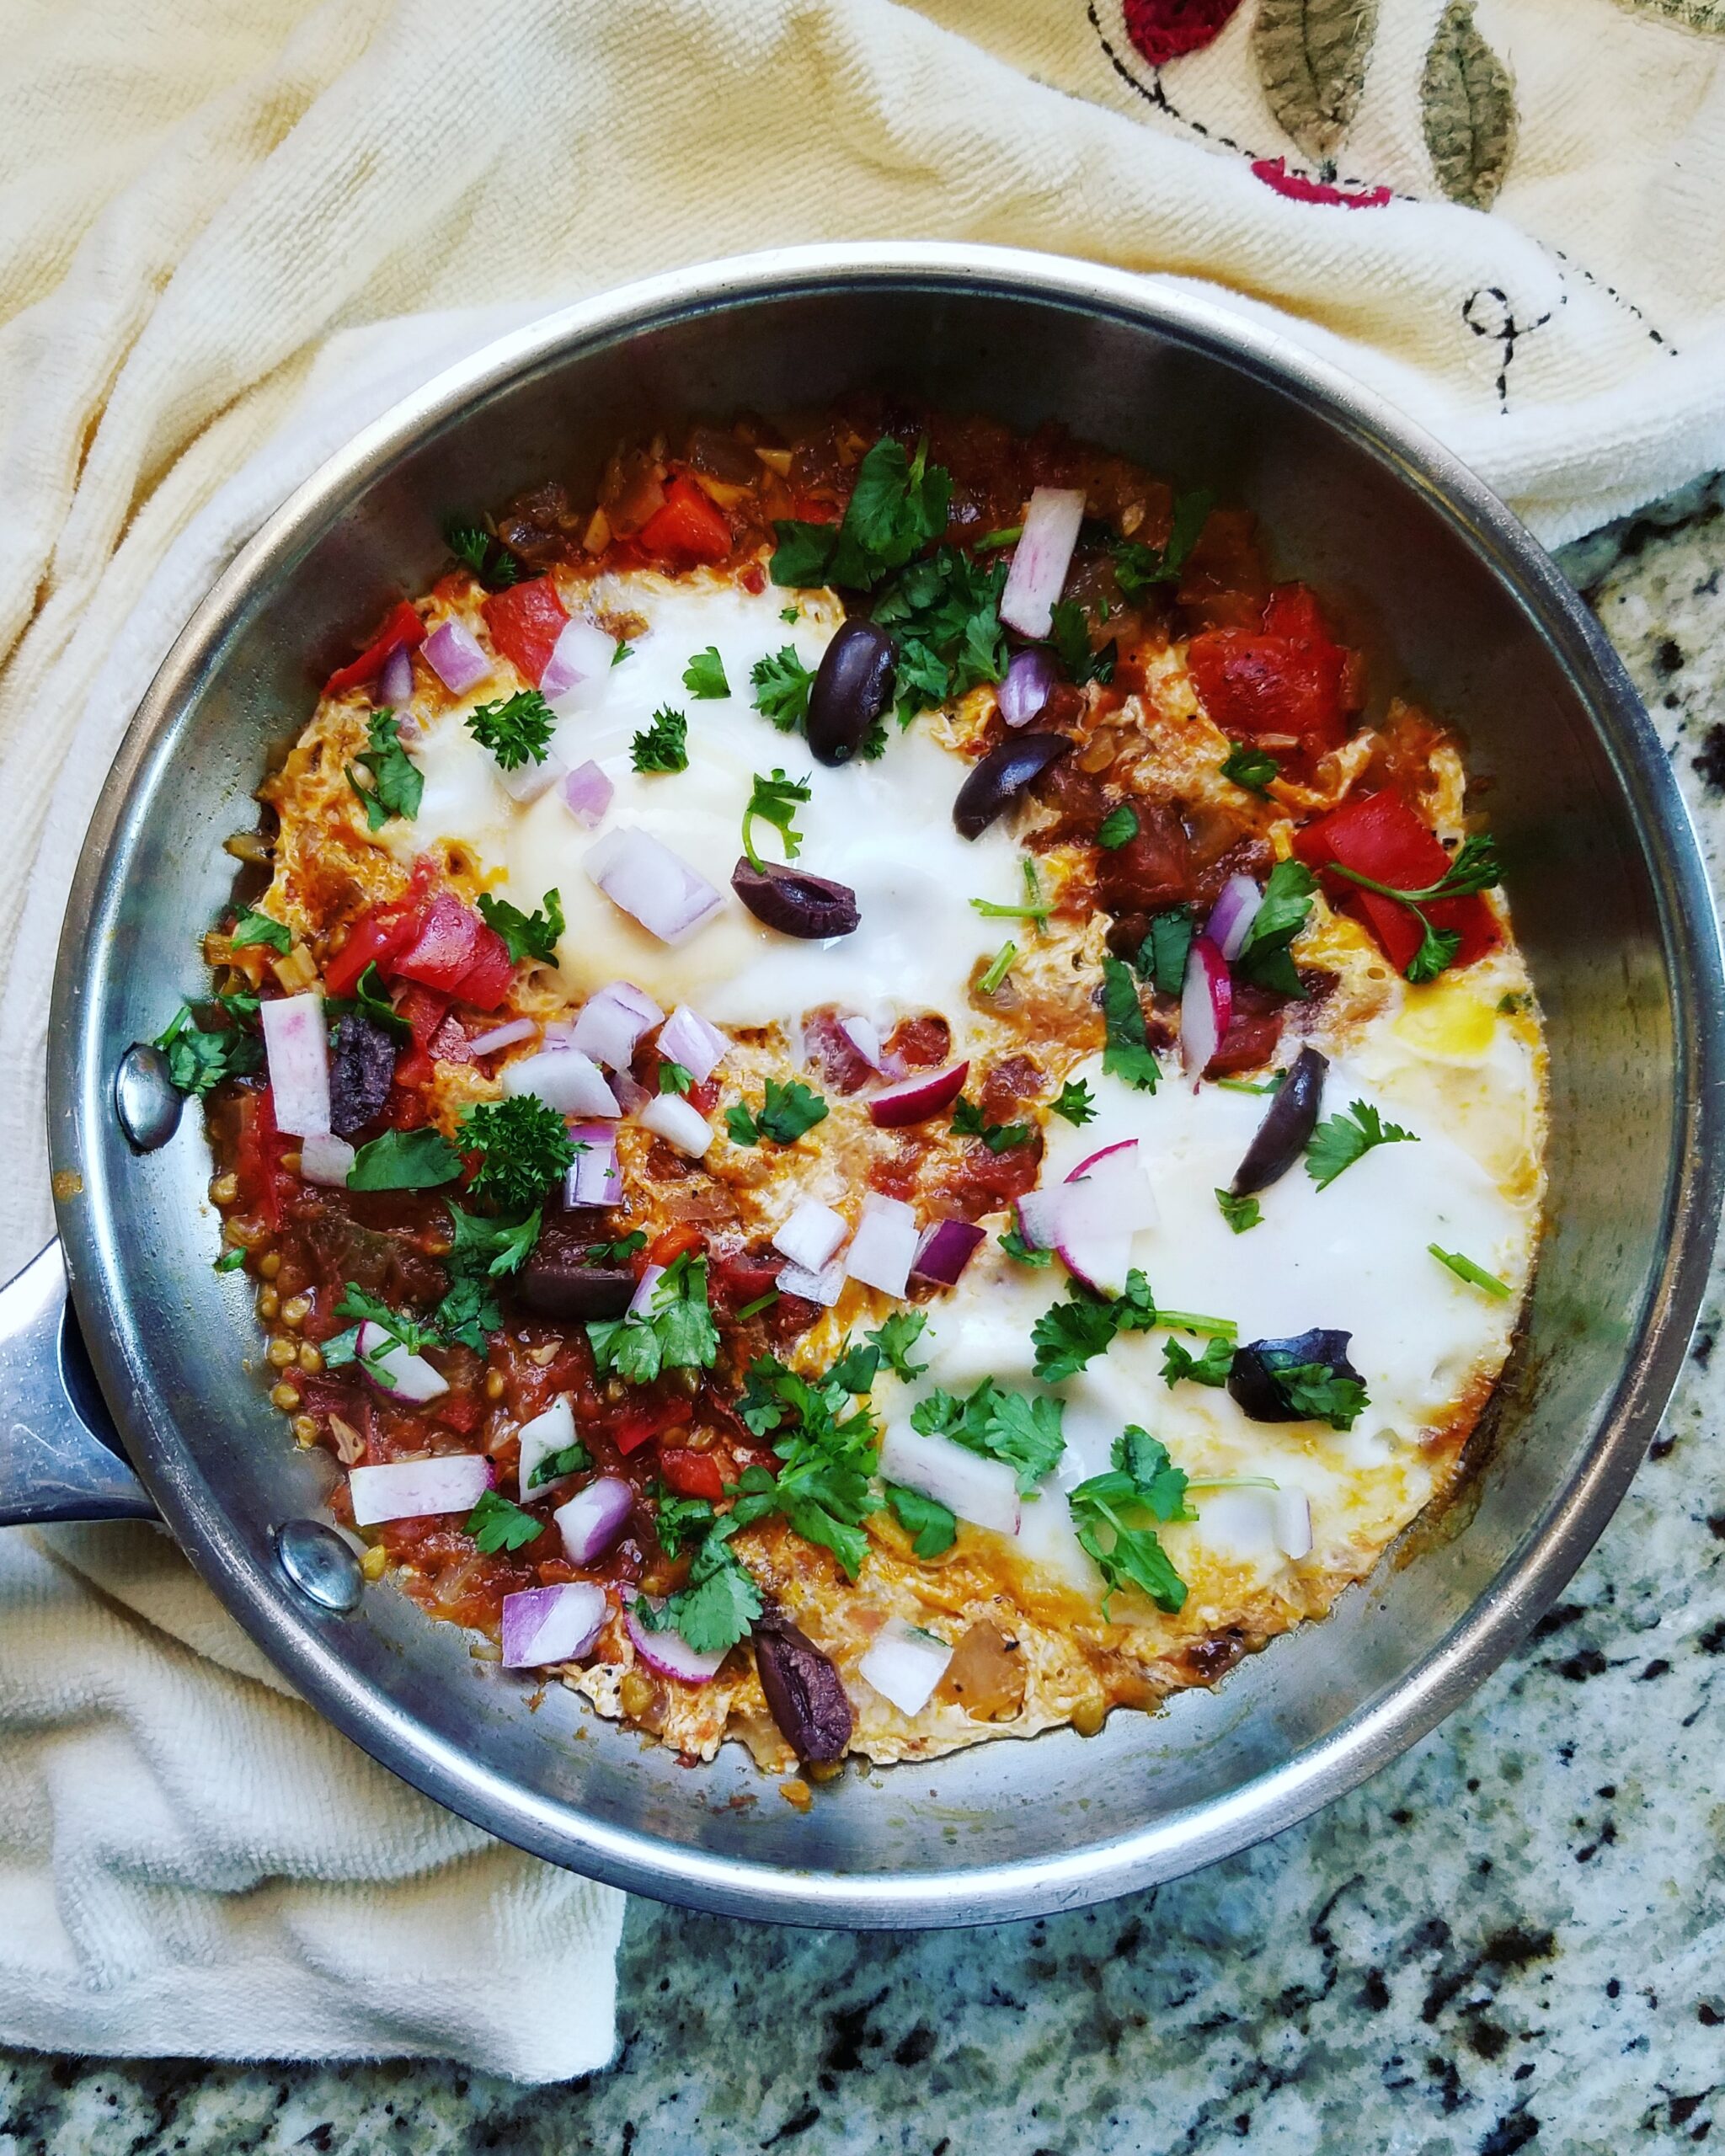
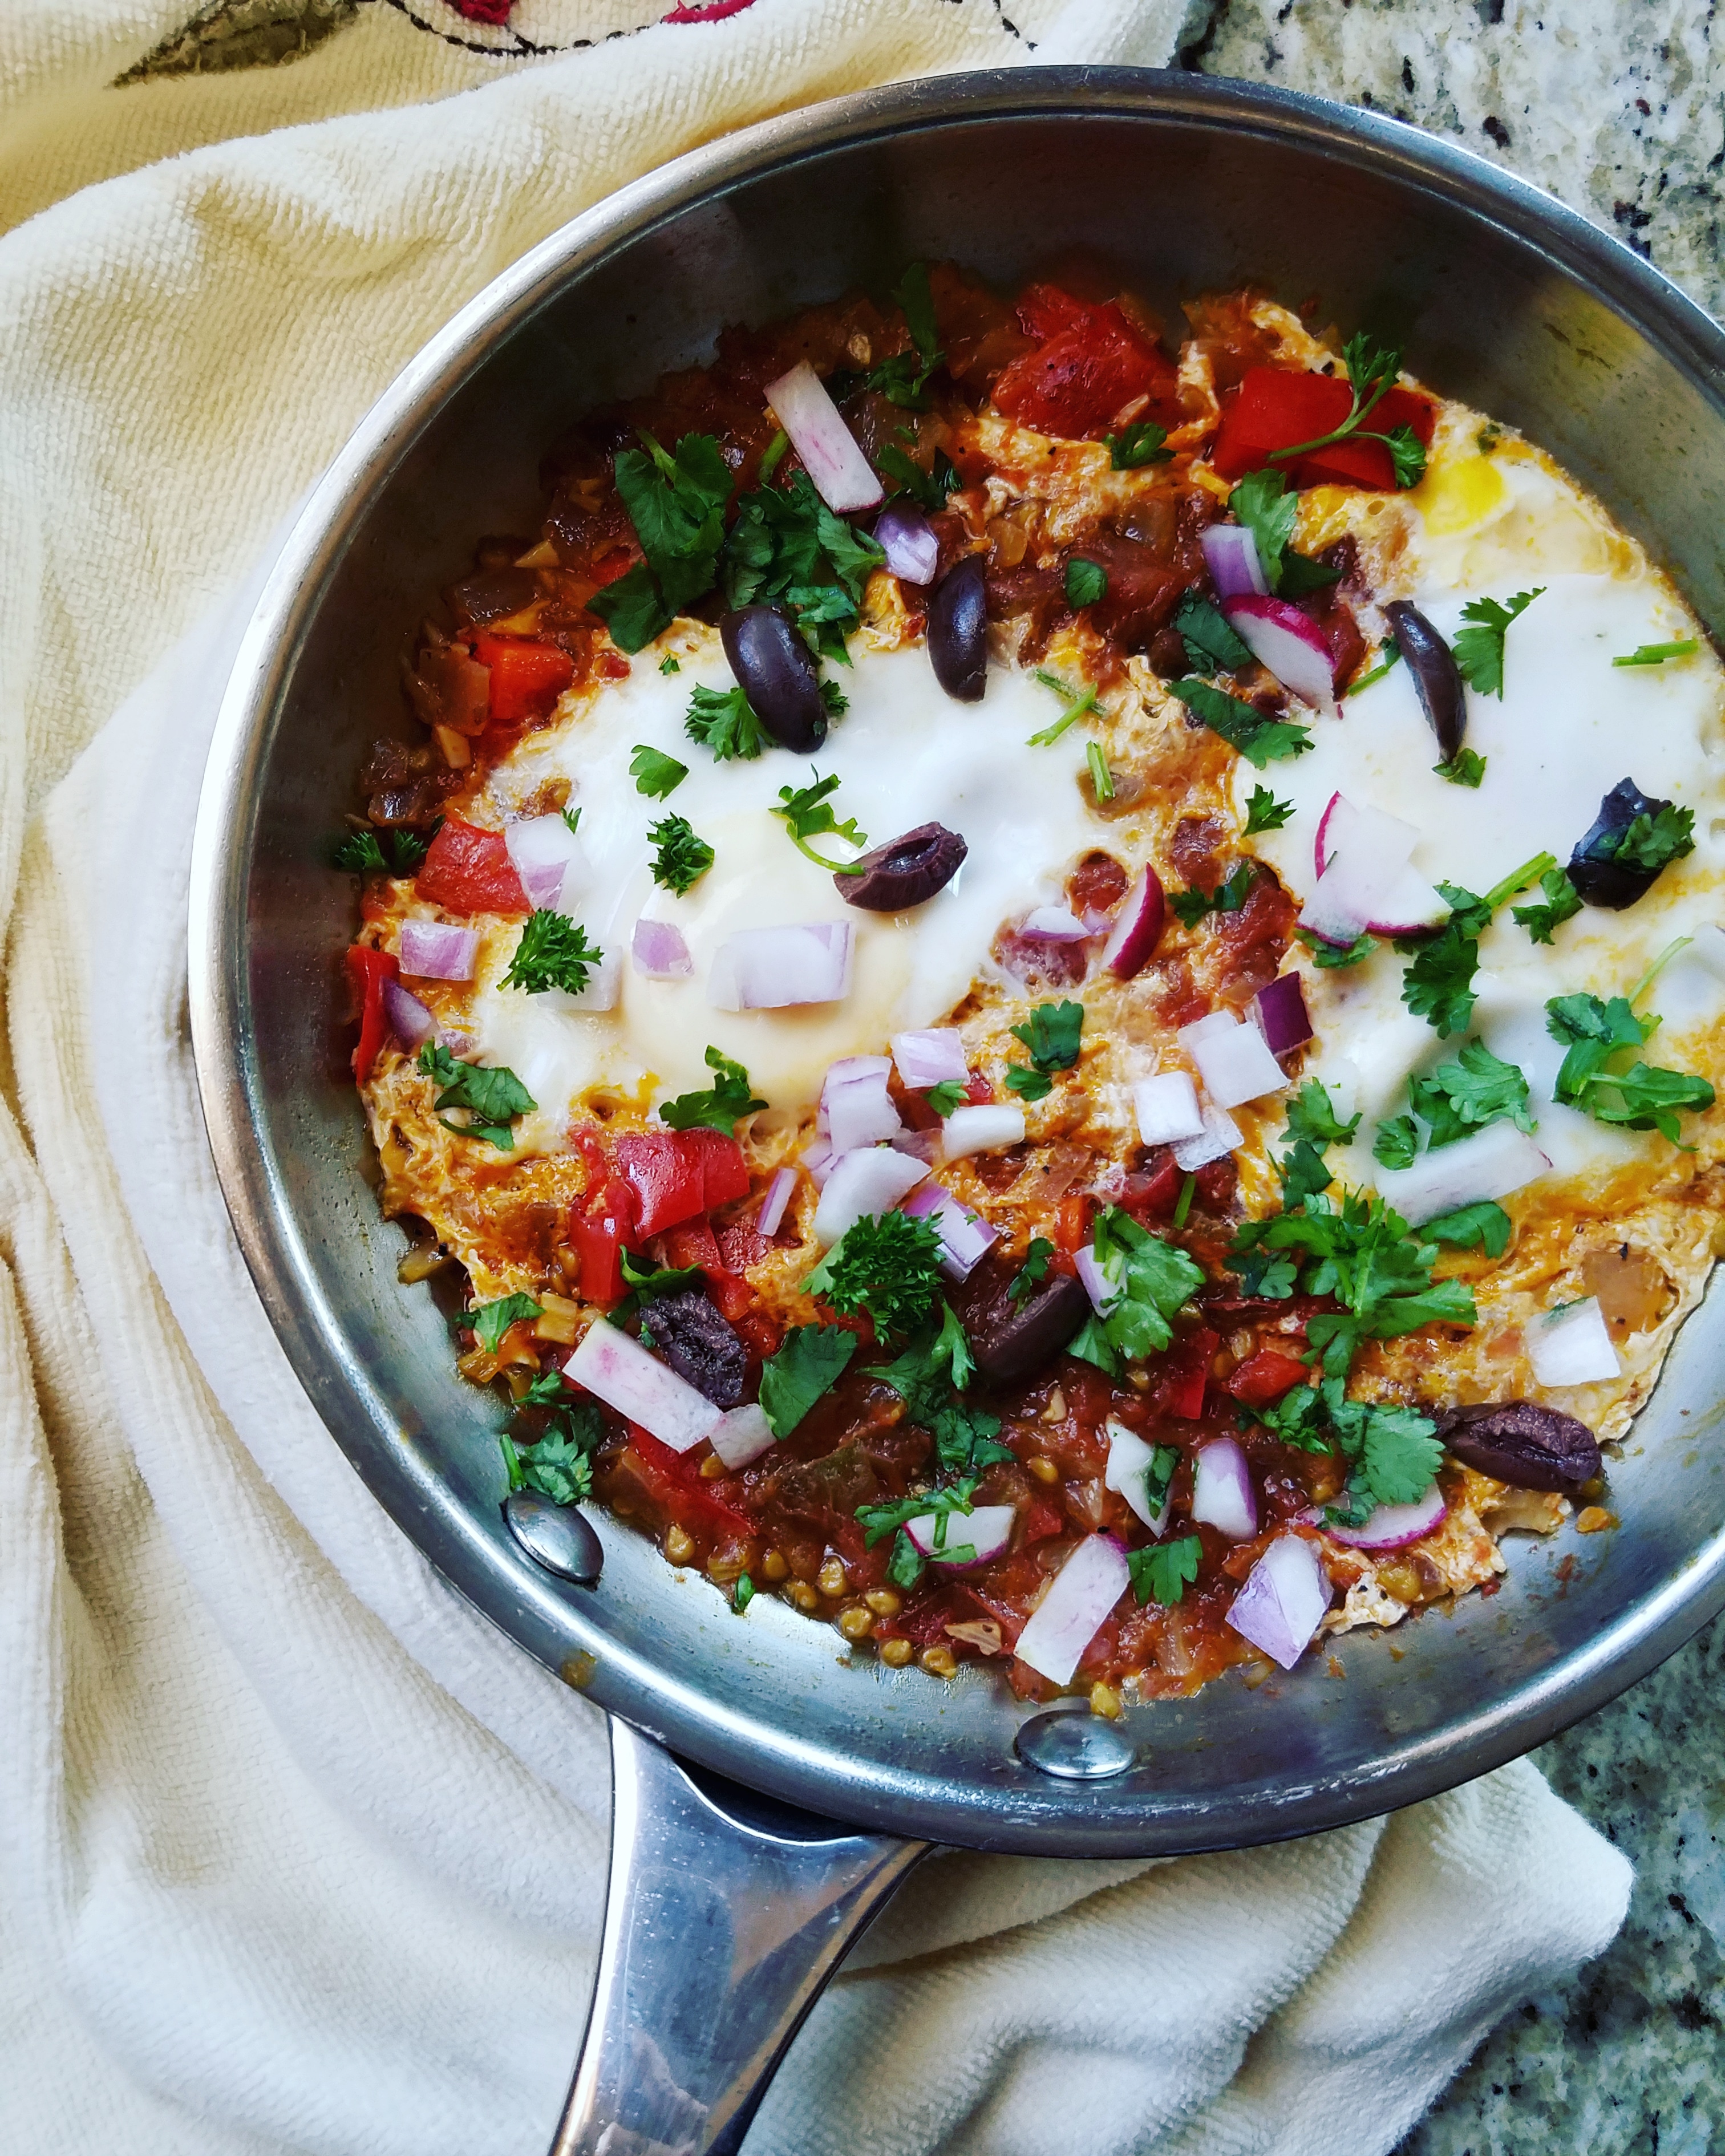
Have you ever tried Shakshuka? Basically, it is a sharing dish, usually served at breakfast or brunch with a slice of crusty bread if you know what’s good for ya.
I don’t have any Middle Eastern cuisine restaurants in my city but I have tried making variations of Shakshuka at home. Traditionally, Shakshuka involves tomatoes, chili peppers, onions, and cumin. I’ve seen recipes that call for anything and everything from potatoes to eggplant to bell peppers. The latter ingredient is how I first tried it. Bell peppers make for a zesty Shaksuka so I’m using them in today’s recipe!
As summer tomato season starts to roll in, you might also find yourself with extra tomatoes on hand. Typically, a can of diced or crushed tomatoes helps bring the ingredients together but I find this recipe to be an excellent use for those tomatoes that are past their prime.
#NoFoodWaste HOORAY!
I’m on an egg kick these days. If you missed my last post, click here to see my favorite Egg, Zucchini, and Pesto Tacos! It feels good to experiment in the kitchen so I hope you guys like these egg recipes as much as I do! Let me know if you give them a try! Comment below or tag me on Instagram @melaniemakesithappen!
Fresh Shakshuka for One
Recipe Type: Entree
Cuisine: Middle Eastern
Author: Melanie
Prep time:
Cook time:
Total time:
Serves: 1 serving
A fresher take on the classic Middle Eastern Shakshuka with ingredients you probably have in your fridge right now!
Ingredients
Olive oil
1 ripe medium-to-large heirloom tomato or two small romas, chopped*
¼ cup chopped red onion
¼ cup red bell pepper
1 clove of garlic
Salt and pepper
1 tbsp chopped parsley
1 tbsp cilantro (or more parsley)
5 Kalamata olives, sliced into fourths
2 eggs
Optional: tortillas or crusty bread, for serving
Instructions
In a stainless steel or metal pan, warm a tablespoon of olive oil over medium heat.
Add the onion, bell pepper, garlic, and a nice pinch of salt. Sauté until translucent and then add the chopped tomatoes. If your tomato/tomatoes are watery, go ahead and add that to the pan, too! Give the ingredients a good stir, mash, and another pinch of salt. Don’t skimp here! Cook for about 3 minutes until the ingredients thicken and combine.
When the mixture begins to boil, add in your eggs. If possible, try to create a little nest in the tomato sauce for the eggs to sit. Turn the heat to a medium-low temperature and cover with a lid.
The eggs are basically poaching in the tomato sauce so keep an eye on them! They cook to over-easy runniness in as little as two minutes.
When the eggs are done to your liking, use a spatula to slowly scoot or spoon the shakshuka into a serving bowl. Sprinkle with fresh herbs, Kalamata olives, and some freshly cracked black pepper.
Notes
*I haven’t tested this with firm tomatoes. Ripe tomatoes are juiciest and that extra liquid helps make the shakshuka sauce. Chop the tomato finely for best results.
3.5.3229
I feel like tomatoes are a staple in many dishes but few times do ripe tomatoes have value in recipes. How do you guys use tomatoes? I’d love to hear your recipe ideas in the comments 🙂
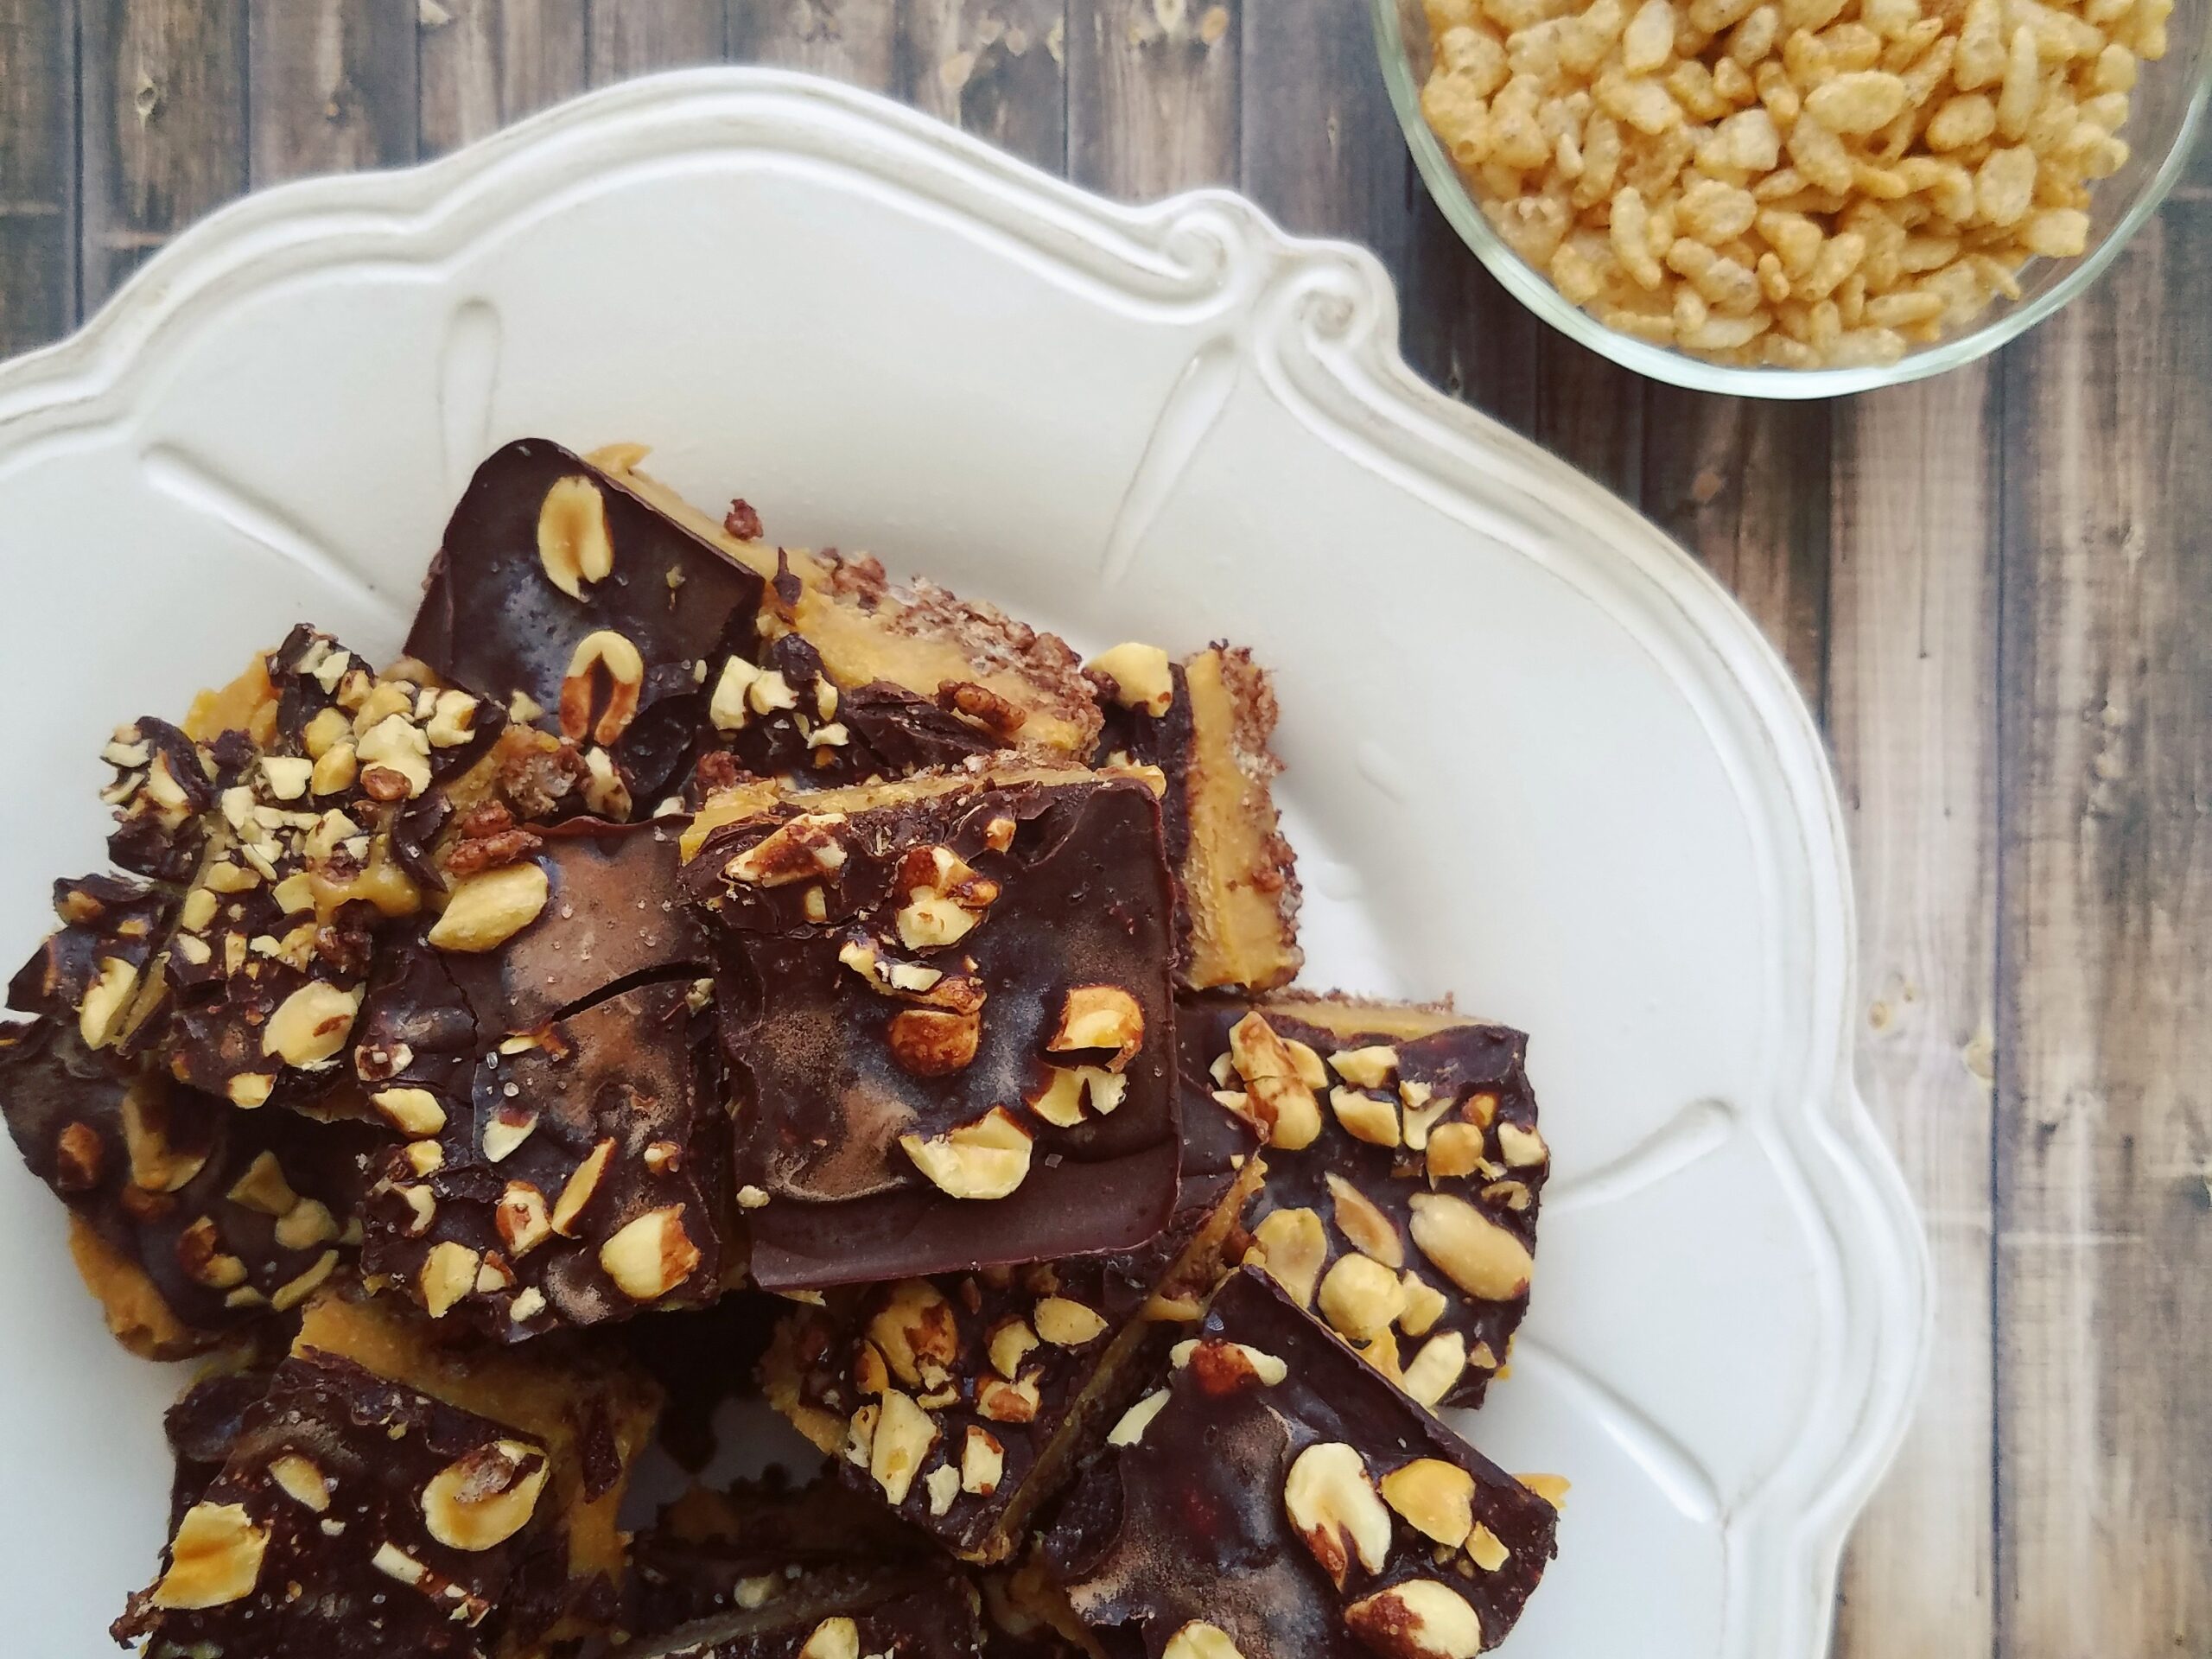
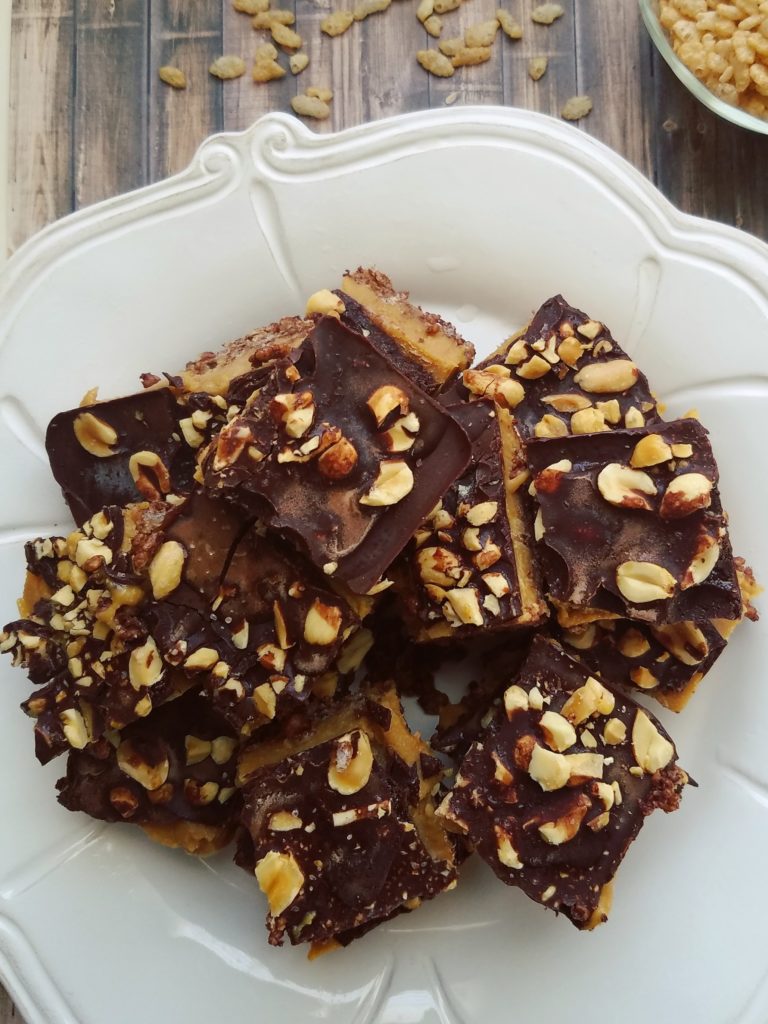
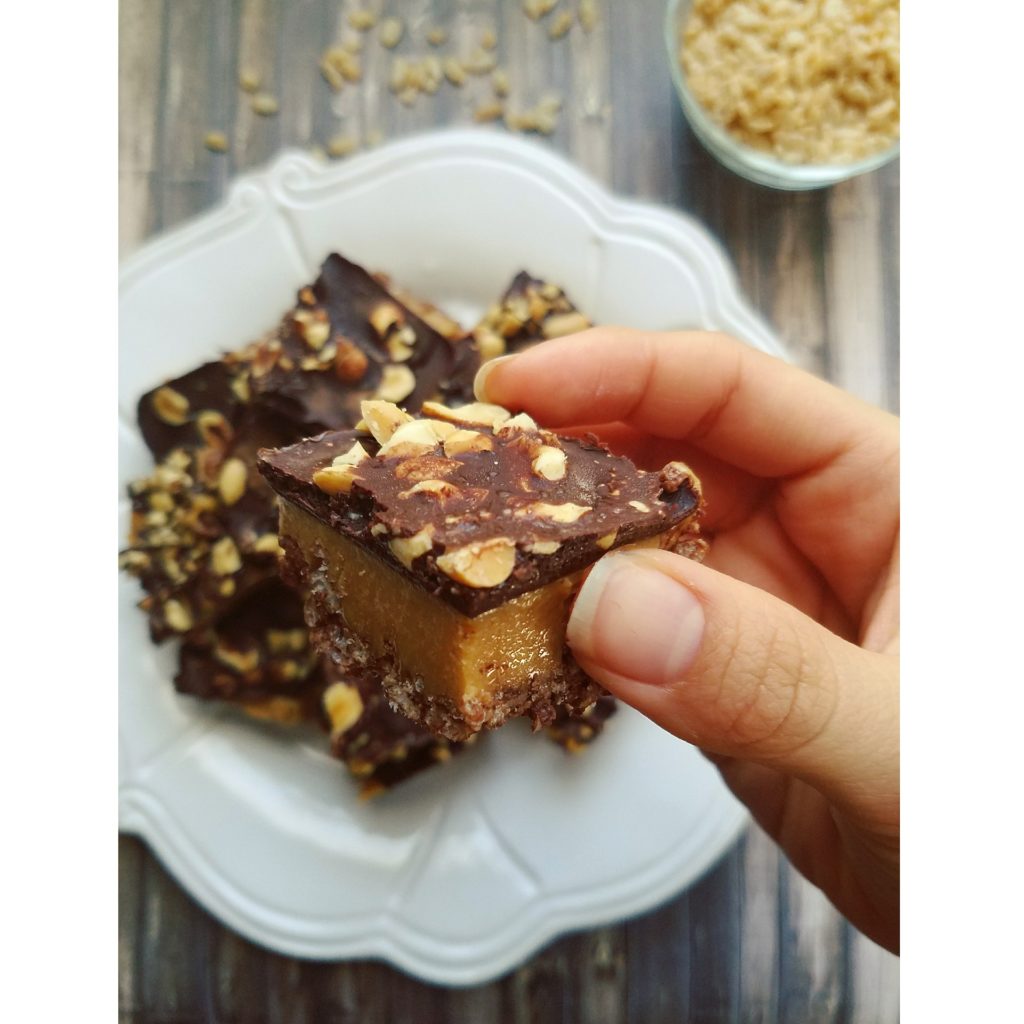
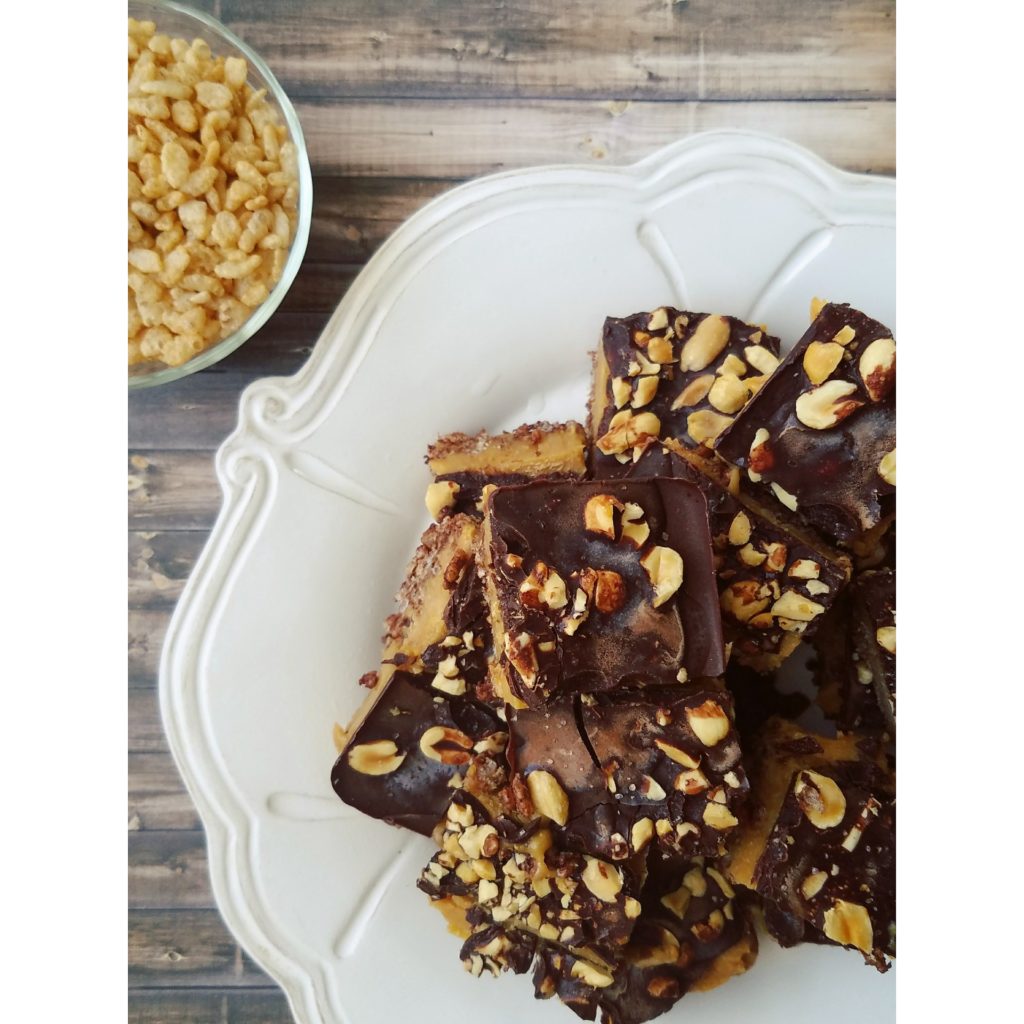
If you’ve been following my A Day of FLO Living posts, then you’ll know I enjoy eating food that is nourishing for me and my cycle. Now, I’m not going to sit here and tell you that chocolate-topped peanut butter crisp bars are “health food” but I’ll say they come close. During my ovulatory phase I was craving sweets LIKE CRAZY—specifically chocolate. Lucky for me, chocolate is on the list of WomanCode approved foods for ovulatory phase. Yippee!
So, I went into the kitchen, with a bit of guidance from Angela Liddons’ Oh She Glows Everyday Cookbook, and got experimenting. I used Angela’s recipe for Nut-Free Dream Bars as a base but I tinkered with the sweetener, salt, and, of course, the nut butter. For me, what makes these bars awesome is the pairing of protein and fat, both of which lessen the sugar punch and make these bars satiating. Of course, macronutrients aside, the chocolate-peanut butter combination is also a huge appeal!
They require a small amount of prep but NO BAKING. This is a freezer treat at its finest. Plus, once made, they will last forever in the freezer! Just let them defrost for a few minutes before biting into them. If you can exercise restraint, let them defrost for five to ten minutes and the peanut butter filling gets extra creamy and oozy. In fact, the filling contrasts so nicely in that state with the crisp crust and solid chocolate topping. Together, the three layers make for one delightfully decadent and delicious dessert or snack.
Let me know if you give these bars a try! Just writing this post makes me crave one so I’ll be at my freezer if you need me! 👋
Creamy Peanut Butter Chocolate Crisp Bars
Recipe Type: Dessert
Cuisine: American
Author: Melanie
Prep time:
Cook time:
Total time:
Serves: 18-20 bars
These rich and creamy no-bake bars, adapted from Angela Liddon’s recipe, make for a satisfying dessert or snack when those chocolate peanut butter cravings kick in! The combination of crispiness from the crust and creaminess from the bars just can’t be beat!
Ingredients
Crust Ingredients:
1 ½ tbsp melted virgin coconut oil
1 ½ cups Erewhon Organic Cinnamon Brown Rice Cereal
2 tbsp cacao powder or cocoa powder
2 tbsp maple syrup
a pinch of salt
Filling Ingredients:
1 cup natural peanut butter
¼ cup maple syrup
¼ cup melted virgin coconut oil
¼ to ½ tsp salt, depending on the saltiness of the peanut butter
1 tsp vanilla extract
Chocolate Topping Ingredients:
1/3 cup melted virgin coconut oil
1/3 cup cacao or cocoa powder
1 tbsp maple syrup
1/3 cup unsalted dry-roasted peanuts, chopped, for topping
Sea salt, for topping, optional
Instructions
Line a large loaf tin (see notes) with parchment paper and lightly grease with coconut oil.
In a bowl, combine the first 5 ingredients for the crust. With a rubber spatula, mash up the cereal until it looks crumby and thoroughly coated. Then, press the crust down into the bottom of the loaf tin. Place it in the freezer while you prepare the filling.
In the same bowl, rinsed and wiped clean, combine the next five ingredients. As a precaution, make sure the ingredients for the filling are all room temperature. If the maple syrup or peanut butter are cold then that will make the coconut oil seize up. The mixture should be smooth. Adjust salt to taste.
Remove the crust from the freezer and pour the filling on top. Gently swivel the pan so that the filling covers the crust completely and so that the top is flat and even. Now, the filling will set in the freezer for an hour before the final topping.
After waiting the appropriate amount of time for the filling to solidify, begin making the chocolate topping. Whisk together melted coconut oil, cacao powder, and maple syrup until no clumps remain. Chop the peanuts and keep them at the ready.
Remove the loaf tin from the freezer and pour the chocolate over the filling. Be warned: it freezes almost instantaneously! While the chocolate is still wet, throw on the peanuts and a sprinkle of sea salt. The chocolate layer will soon solidify from the cold from the loaf tin.
You may then remove the bars, using the parchment paper to lift them out. Move them to a cutting board and slowly cut into 18-20 squares. If the bars seem melty in any way, do put them back into the freezer for 10 minutes or so. They may fall apart if you try cutting them while soft.
The peanut butter chocolate dream bars are best stored in the freezer. Pull one out when you want to enjoy a bar and let it sit at room temperature for up to 3-5 minutes. They will soften to an easier-to-bite state. Wait a little longer and the peanut butter filling gets extra oozy and delicious!
Notes
My baking tin is 9.5 x 5 inches though Angela’s recipe uses a 10 x 6 inch pan. I believe that a standard 9 x 5 loaf tin could work, too but your bars will just be a bit thicker.[br]Cooking time also reflects freezing time in this recipe.
We use cookies on our website to give you the most relevant experience by remembering your preferences and repeat visits. By clicking “Accept”, you consent to the use of ALL the cookies.
This website uses cookies to improve your experience while you navigate through the website. Out of these, the cookies that are categorized as necessary are stored on your browser as they are essential for the working of basic functionalities of the website. We also use third-party cookies that help us analyze and understand how you use this website. These cookies will be stored in your browser only with your consent. You also have the option to opt-out of these cookies. But opting out of some of these cookies may affect your browsing experience.
Necessary cookies are absolutely essential for the website to function properly. These cookies ensure basic functionalities and security features of the website, anonymously.
Cookie
Duration
Description
cookielawinfo-checbox-analytics
11 months
This cookie is set by GDPR Cookie Consent plugin. The cookie is used to store the user consent for the cookies in the category "Analytics".
cookielawinfo-checbox-functional
11 months
The cookie is set by GDPR cookie consent to record the user consent for the cookies in the category "Functional".
cookielawinfo-checbox-others
11 months
This cookie is set by GDPR Cookie Consent plugin. The cookie is used to store the user consent for the cookies in the category "Other.
cookielawinfo-checkbox-necessary
11 months
This cookie is set by GDPR Cookie Consent plugin. The cookies is used to store the user consent for the cookies in the category "Necessary".
cookielawinfo-checkbox-performance
11 months
This cookie is set by GDPR Cookie Consent plugin. The cookie is used to store the user consent for the cookies in the category "Performance".
viewed_cookie_policy
11 months
The cookie is set by the GDPR Cookie Consent plugin and is used to store whether or not user has consented to the use of cookies. It does not store any personal data.
Functional cookies help to perform certain functionalities like sharing the content of the website on social media platforms, collect feedbacks, and other third-party features.
Performance cookies are used to understand and analyze the key performance indexes of the website which helps in delivering a better user experience for the visitors.
Analytical cookies are used to understand how visitors interact with the website. These cookies help provide information on metrics the number of visitors, bounce rate, traffic source, etc.
Advertisement cookies are used to provide visitors with relevant ads and marketing campaigns. These cookies track visitors across websites and collect information to provide customized ads.