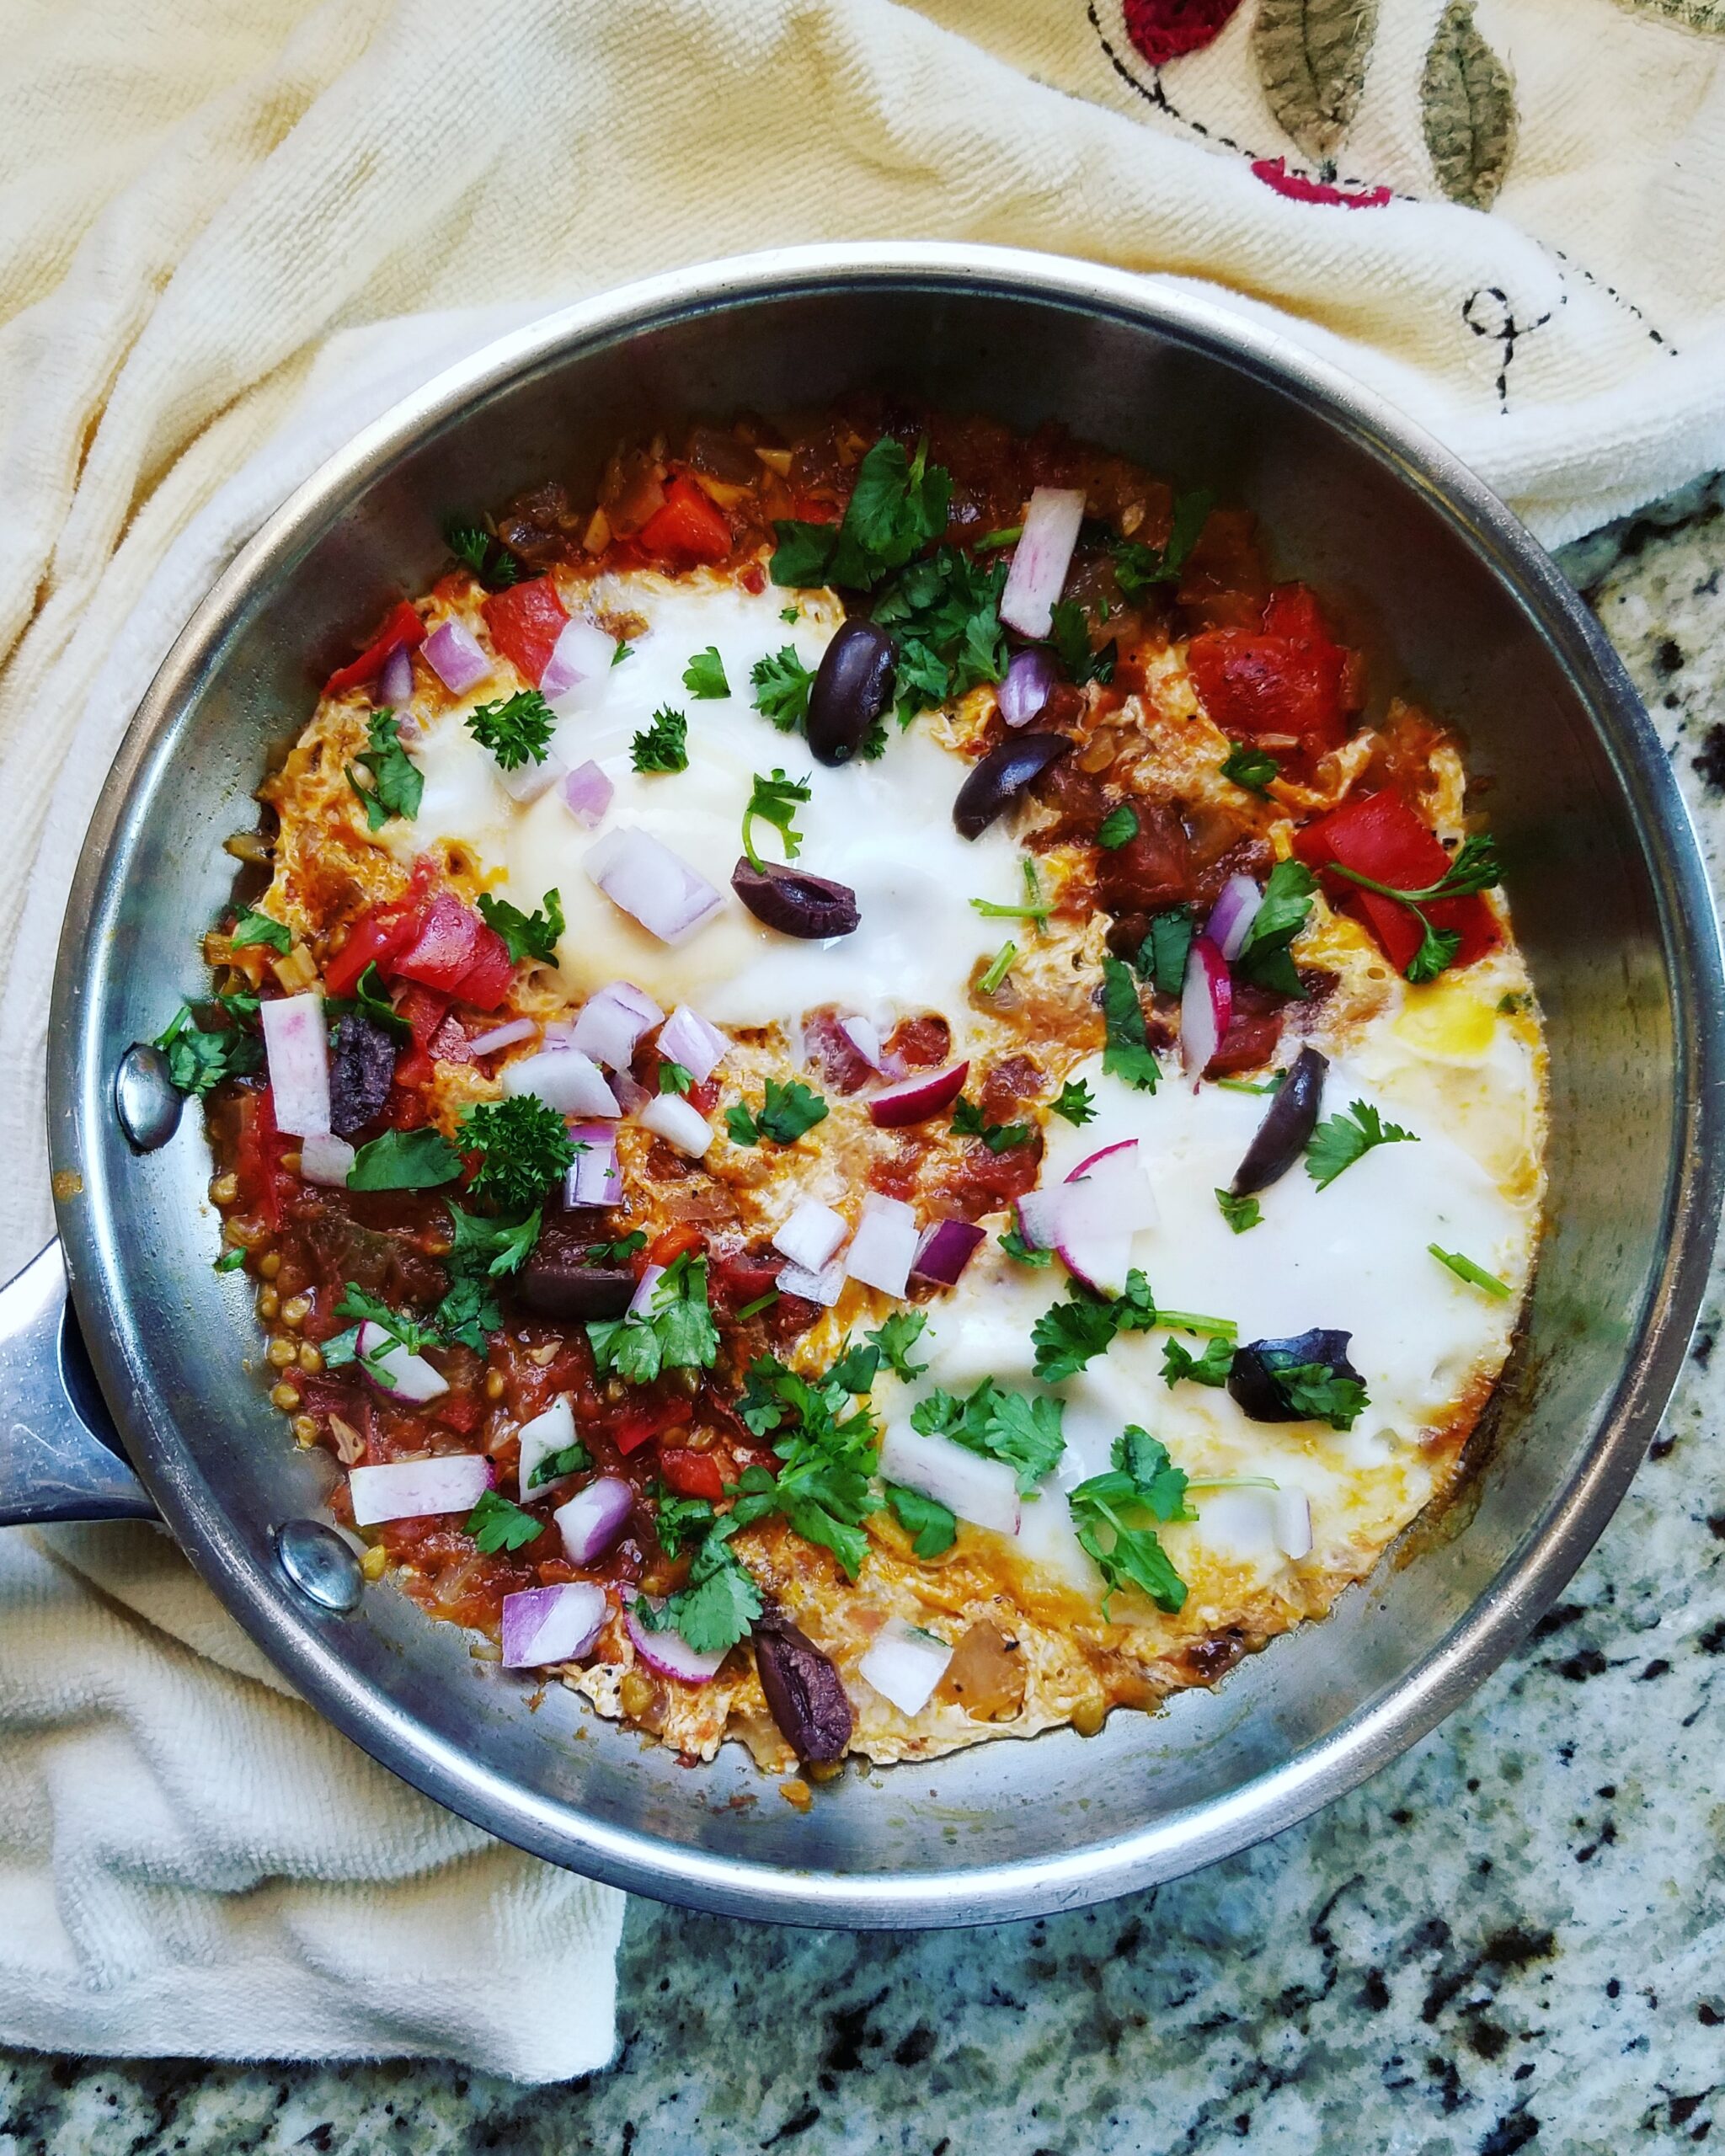
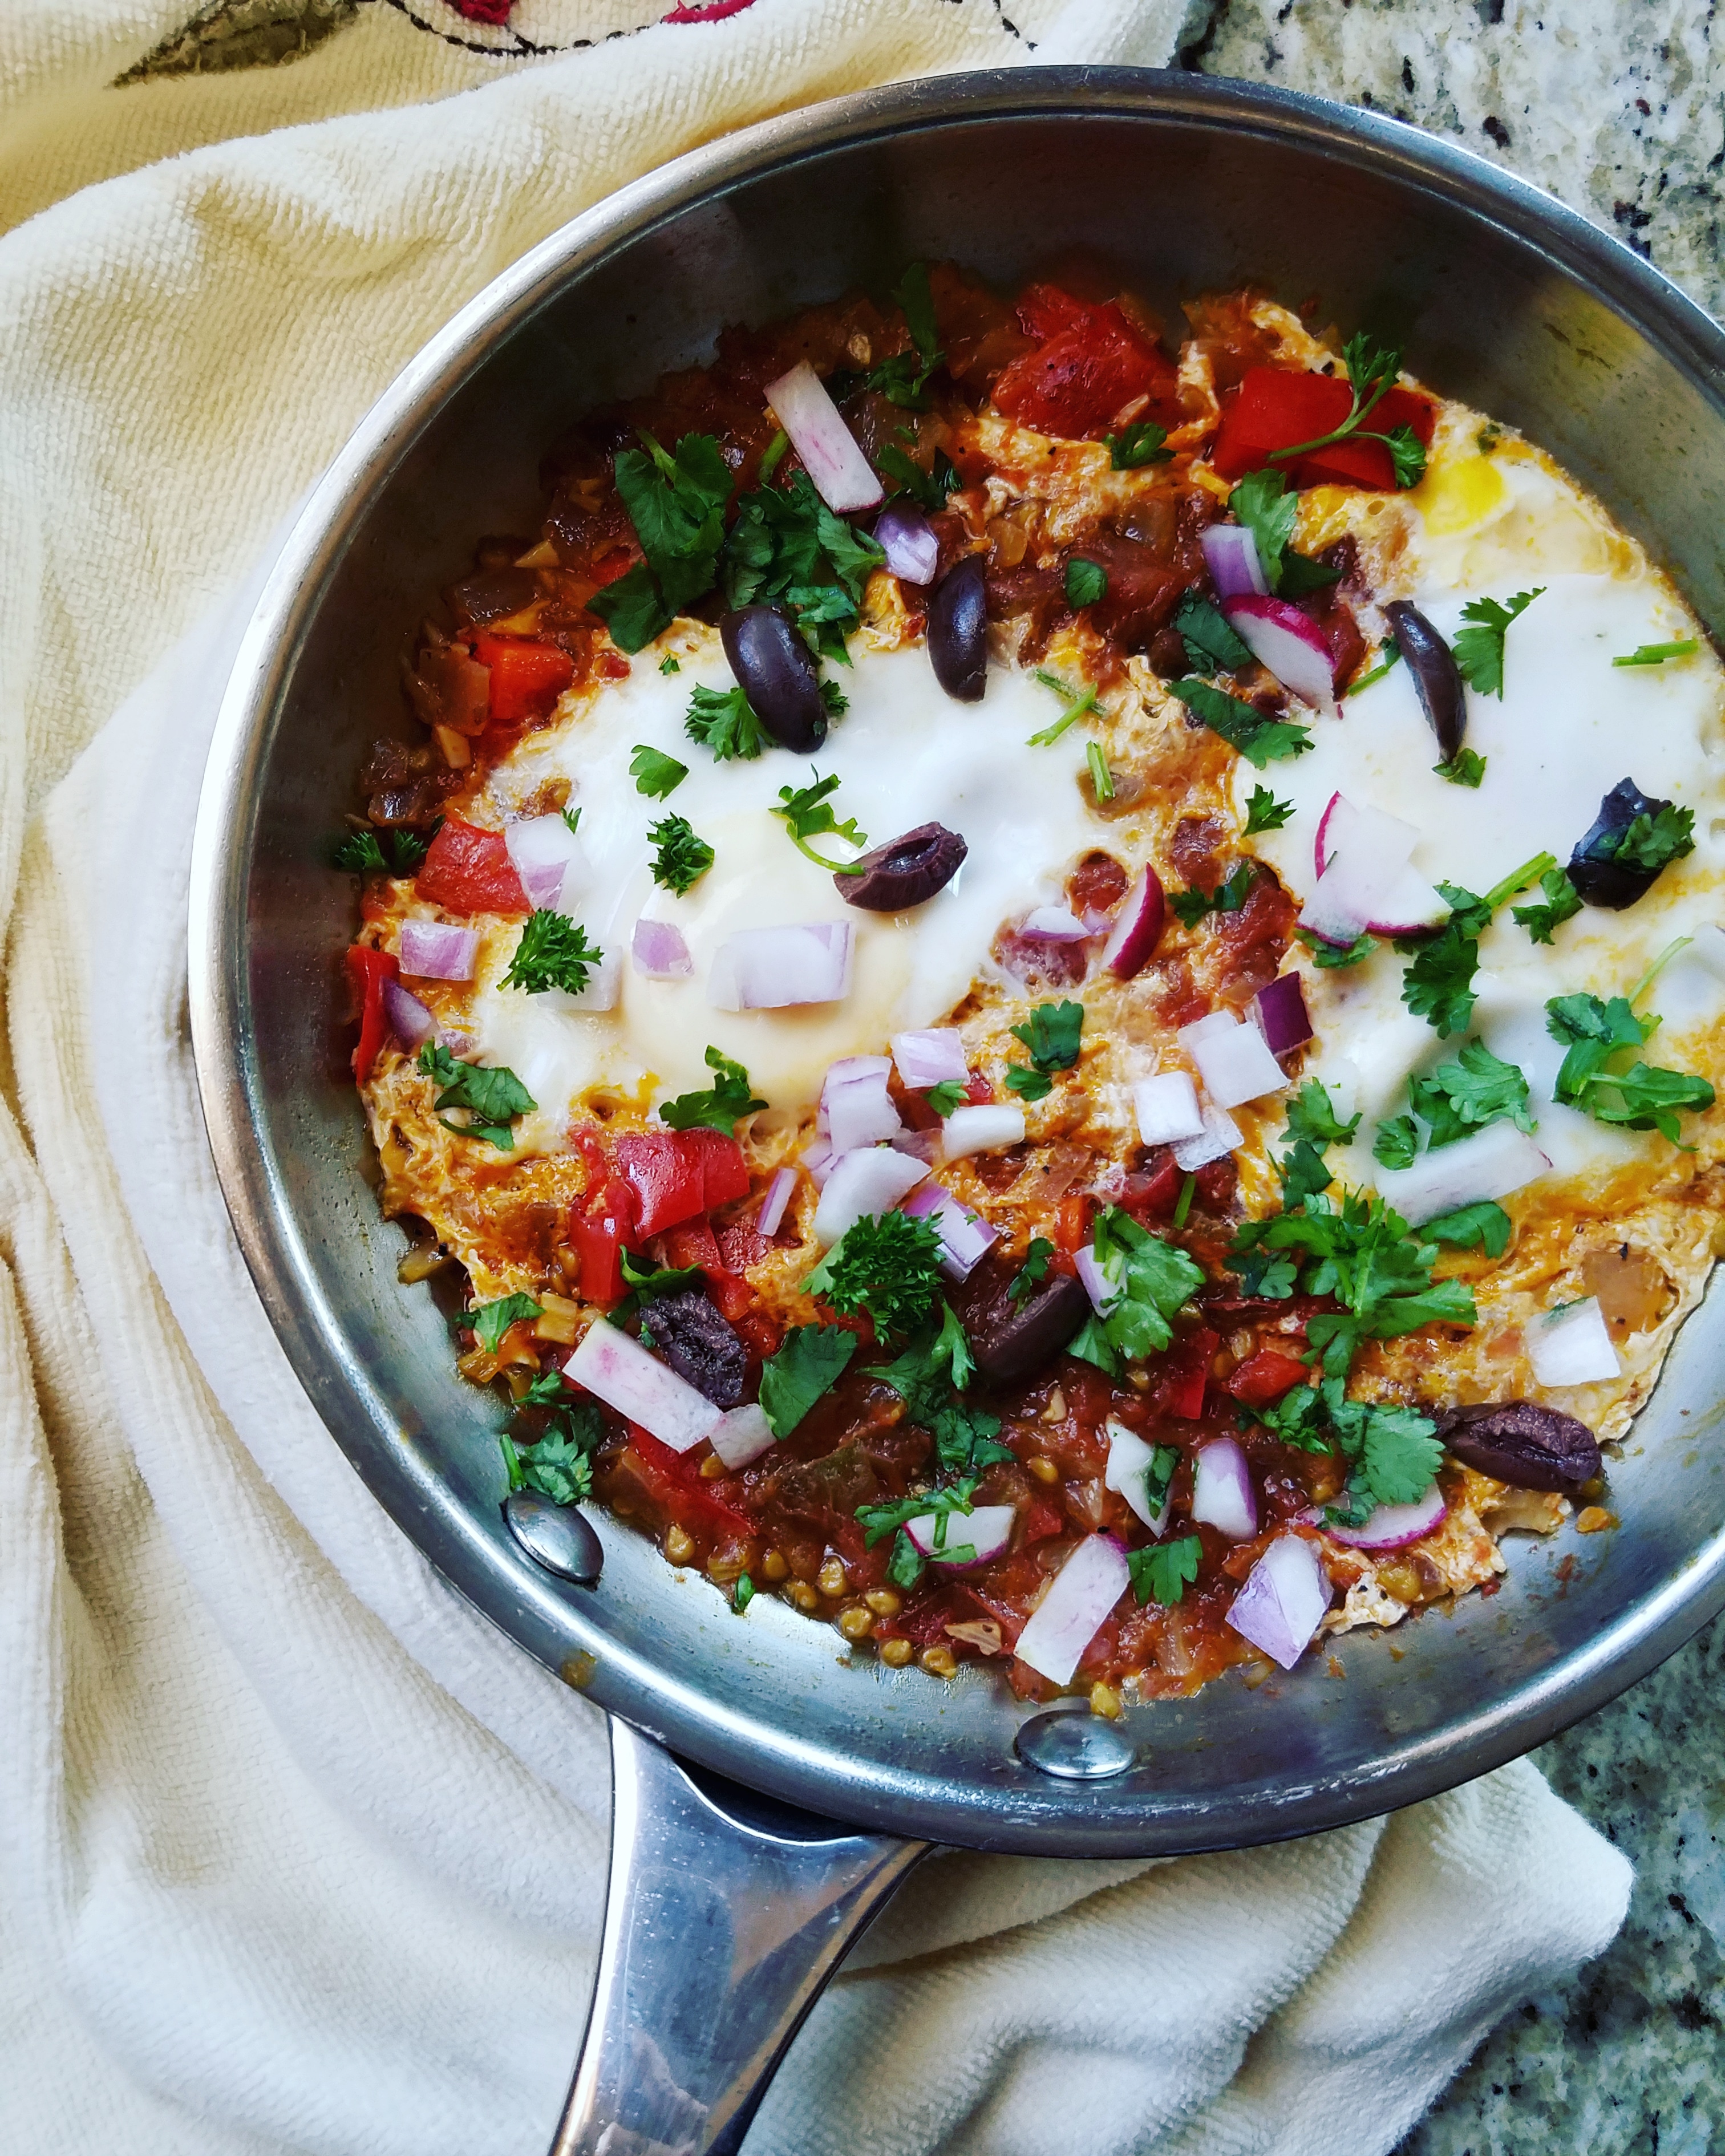
Have you ever tried Shakshuka? Basically, it is a sharing dish, usually served at breakfast or brunch with a slice of crusty bread if you know what’s good for ya.
I don’t have any Middle Eastern cuisine restaurants in my city but I have tried making variations of Shakshuka at home. Traditionally, Shakshuka involves tomatoes, chili peppers, onions, and cumin. I’ve seen recipes that call for anything and everything from potatoes to eggplant to bell peppers. The latter ingredient is how I first tried it. Bell peppers make for a zesty Shaksuka so I’m using them in today’s recipe!
As summer tomato season starts to roll in, you might also find yourself with extra tomatoes on hand. Typically, a can of diced or crushed tomatoes helps bring the ingredients together but I find this recipe to be an excellent use for those tomatoes that are past their prime.
#NoFoodWaste HOORAY!
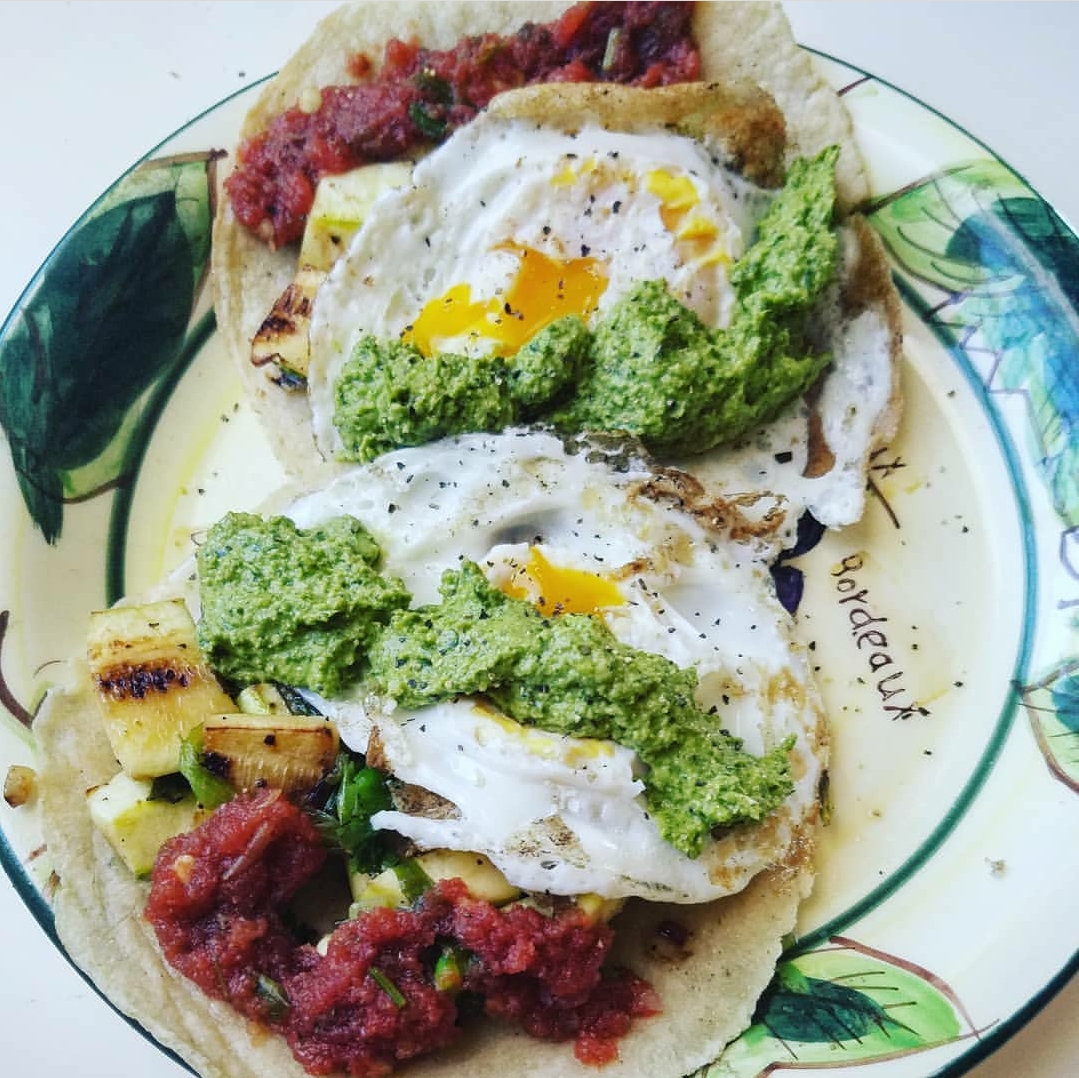
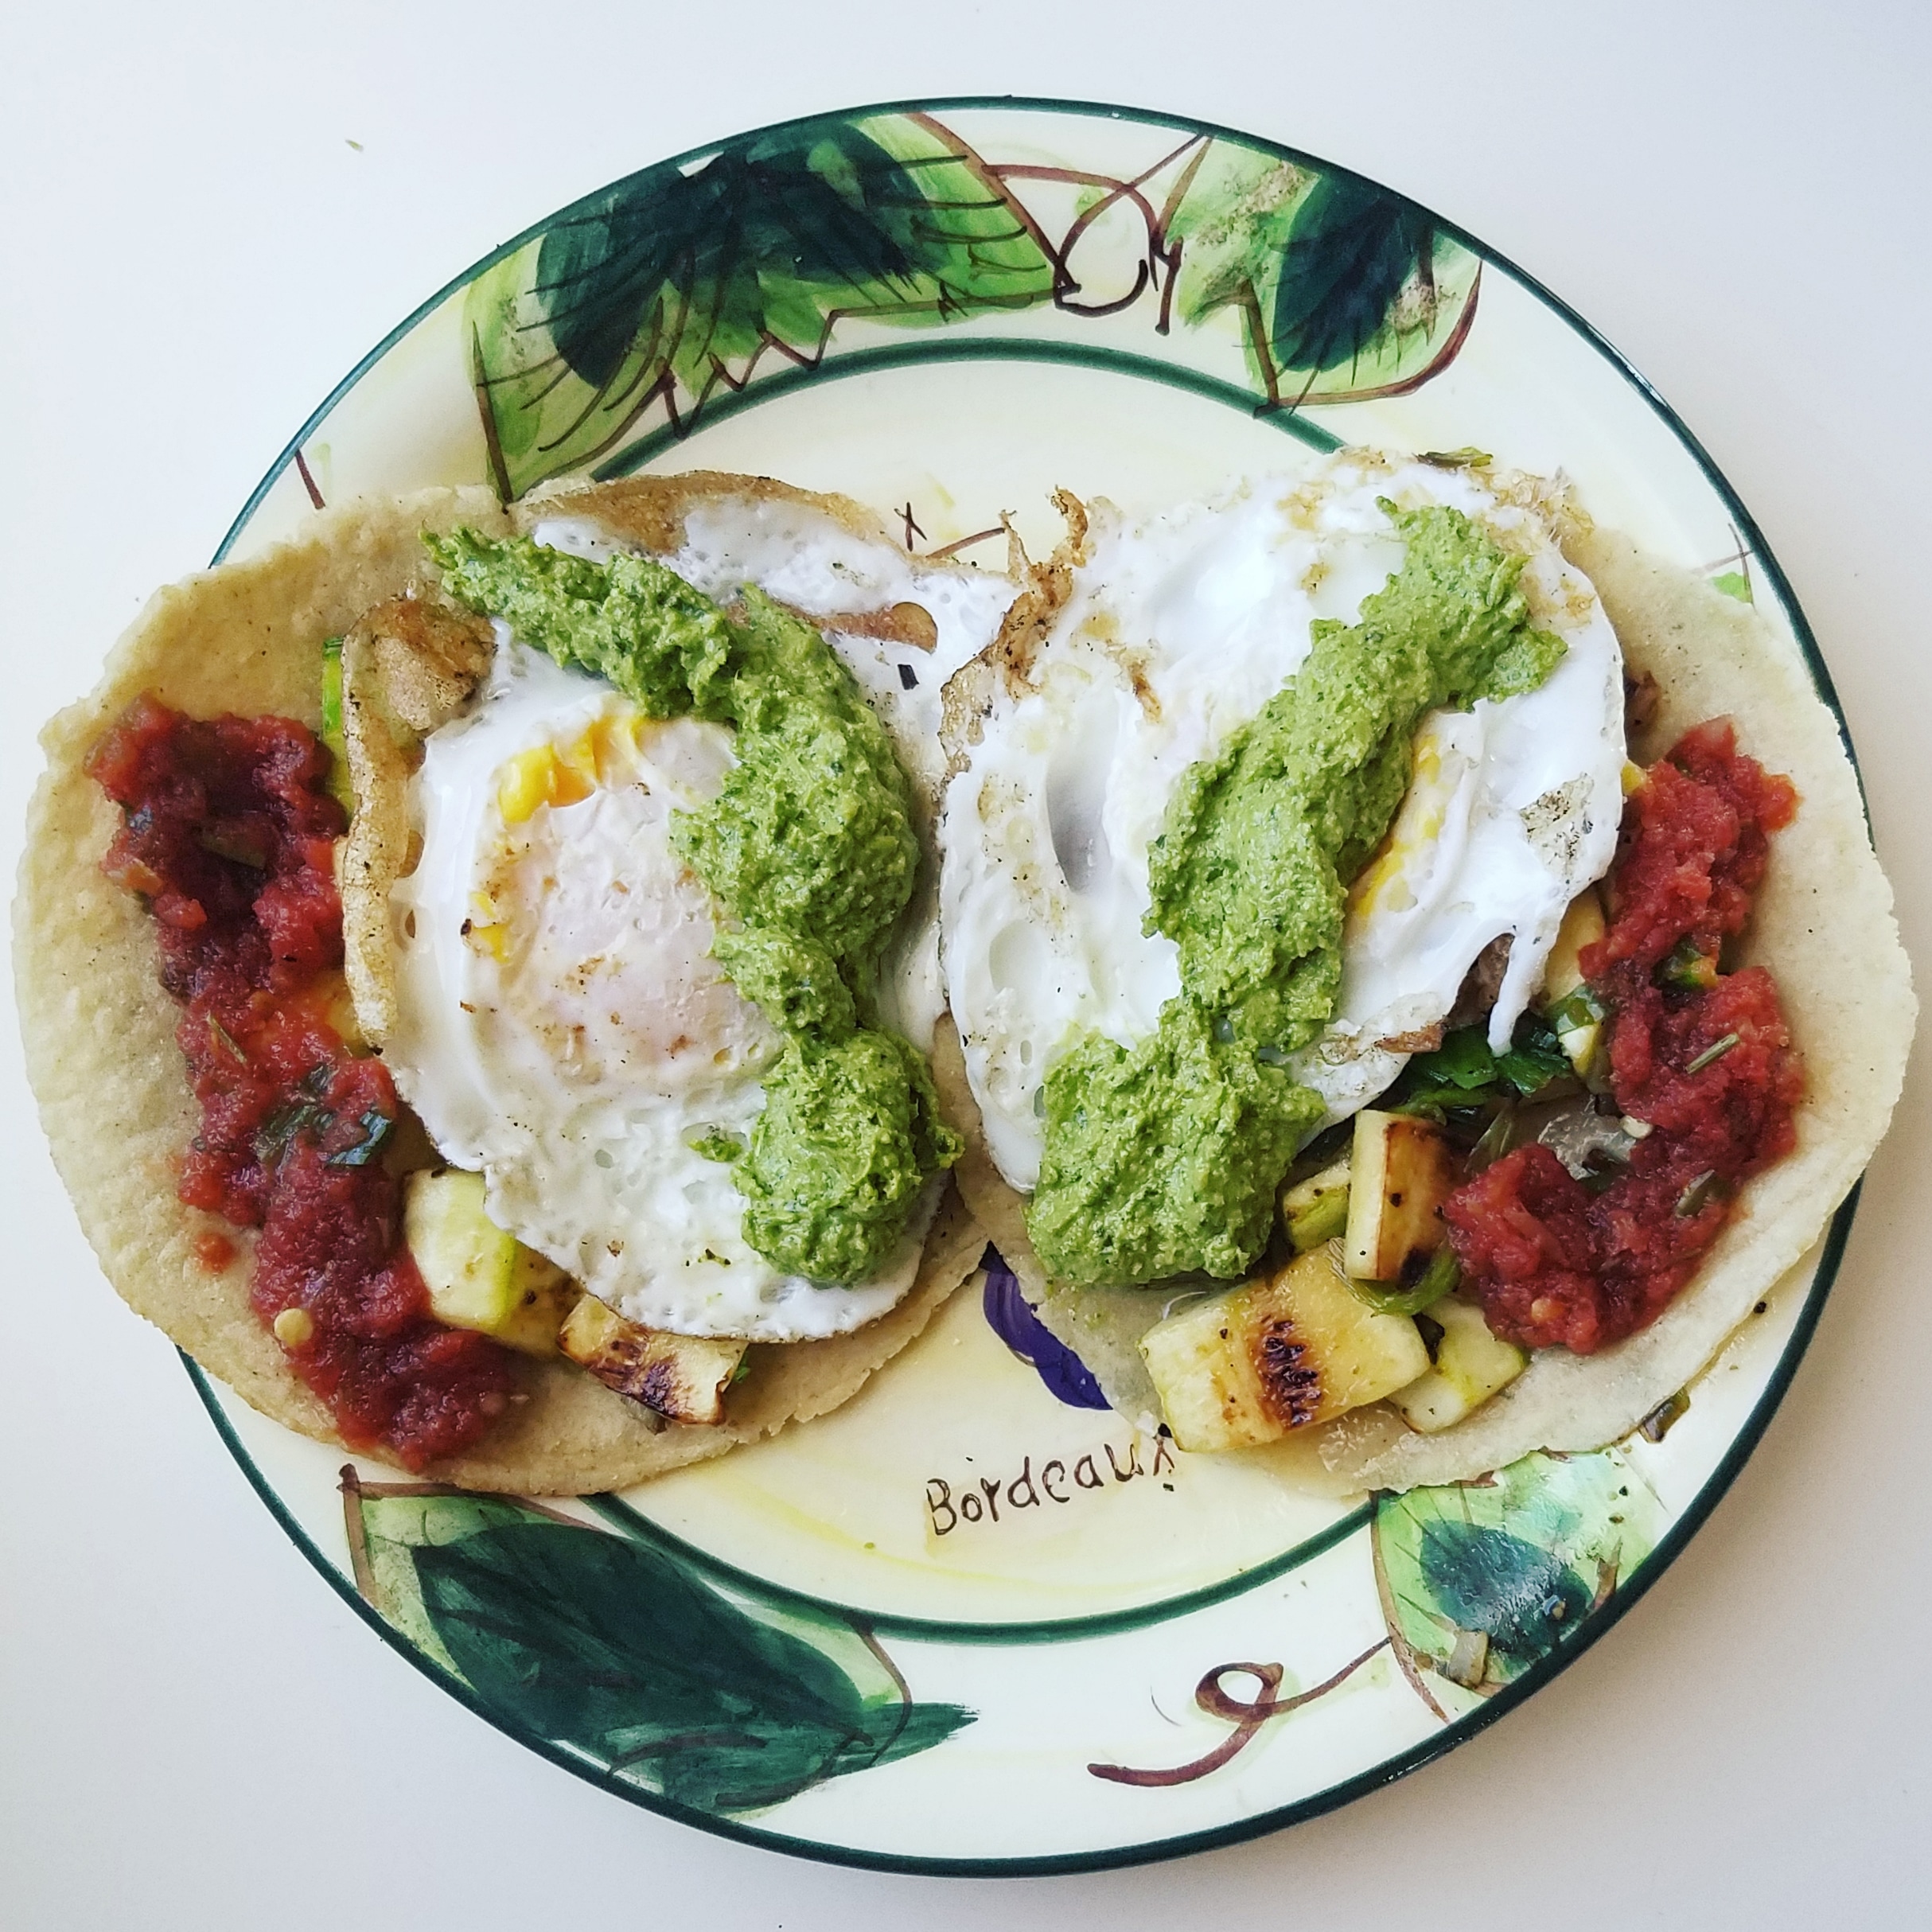
I’m on an egg kick these days. If you missed my last post, click here to see my favorite Egg, Zucchini, and Pesto Tacos! It feels good to experiment in the kitchen so I hope you guys like these egg recipes as much as I do! Let me know if you give them a try! Comment below or tag me on Instagram @melaniemakesithappen!
Fresh Shakshuka for One
Recipe Type: Entree
Cuisine: Middle Eastern
Author: Melanie
Prep time:
Cook time:
Total time:
Serves: 1 serving
A fresher take on the classic Middle Eastern Shakshuka with ingredients you probably have in your fridge right now!
Ingredients
Olive oil
1 ripe medium-to-large heirloom tomato or two small romas, chopped*
¼ cup chopped red onion
¼ cup red bell pepper
1 clove of garlic
Salt and pepper
1 tbsp chopped parsley
1 tbsp cilantro (or more parsley)
5 Kalamata olives, sliced into fourths
2 eggs
Optional: tortillas or crusty bread, for serving
Instructions
In a stainless steel or metal pan, warm a tablespoon of olive oil over medium heat.
Add the onion, bell pepper, garlic, and a nice pinch of salt. Sauté until translucent and then add the chopped tomatoes. If your tomato/tomatoes are watery, go ahead and add that to the pan, too! Give the ingredients a good stir, mash, and another pinch of salt. Don’t skimp here! Cook for about 3 minutes until the ingredients thicken and combine.
When the mixture begins to boil, add in your eggs. If possible, try to create a little nest in the tomato sauce for the eggs to sit. Turn the heat to a medium-low temperature and cover with a lid.
The eggs are basically poaching in the tomato sauce so keep an eye on them! They cook to over-easy runniness in as little as two minutes.
When the eggs are done to your liking, use a spatula to slowly scoot or spoon the shakshuka into a serving bowl. Sprinkle with fresh herbs, Kalamata olives, and some freshly cracked black pepper.
Notes
*I haven’t tested this with firm tomatoes. Ripe tomatoes are juiciest and that extra liquid helps make the shakshuka sauce. Chop the tomato finely for best results.
3.5.3229
I feel like tomatoes are a staple in many dishes but few times do ripe tomatoes have value in recipes. How do you guys use tomatoes? I’d love to hear your recipe ideas in the comments 🙂
Eggs aren’t just for breakfast anymore! My very favorite way to eat eggs is with a light veggie sauté, pesto, and soft corn tortillas for a hearty lunch or anytime meal!
For anyone else who has pet chickens, you’ll know that eggs are in season! Did you know that just like the plant produce we buy, eggs are also affected by the seasons? Think of how a butternut squash isn’t as accessible in summertime and therefore it is nearly three times more expensive if you want to buy it outside of its usual fall season. The same is similar for chickens and their eggs. As the winter eases out and spring starts up, chickens have more energy to dedicate to laying versus just trying to keep warm during the cold temperatures!
As for these tacos, the ingredients are super simple:
Onion, garlic, zucchini, eggs, and tortillas (non-negotiable)! Oh, and pesto! I highly recommend my cilantro-parsley pesto which is what I use when I make these tacos. Alternatively, use another kind of pesto and sprinkle some cilantro onto your tacos to give it that Mex flair! 😉
Egg, Zucchini, and Pesto Tacos
Recipe Type: Entree
Cuisine: Mexican
Author: Melanie
Prep time:
Cook time:
Total time:
Serves: 2 tacos
If you’re looking for a tasty way to change up eggs, try them in these tacos! The veggie and pesto combo might sound strange but they make for some super flavorful tacos!
Ingredients
Avocado oil, for cooking
2 green onions, chopped OR ¼ cup chopped white onion
1 large clove of garlic, minced
1 small zucchini, sliced (about a heaping ½ cup worth)
Salt and pepper
2 eggs
Pesto
Salsa
Optional: cilantro, radishes, or Everything Bagel seasoning
Instructions
In a cast iron skillet, add a tablespoon or two of oil and turn the pan to medium heat. Sauté the chopped onion and garlic for a minute, then add in the zucchini. Make sure to add a generous sprinkle of salt and pepper for maximum flavor!
Once the veggies are cooked, after about 5 minutes, transfer to a plate.
In the same pan, wipe away any crumbs and add another tablespoon or two of oil. The pan should still be on medium heat and carefully crack two eggs into the pan. Cook the eggs to your liking. I like to flip mine once the egg white starts to solidify. I do about 3 minutes, flip, and then 2 more minutes.
While the eggs cook, warm up your tortillas in the microwave. I also like to add my tortillas to the cast iron pan after the eggs cook (set them aside) so that the tortillas crisp up and absorb the pan flavors! This is an extra step but worthwhile.
For assembly, gently place an egg into each tortilla and distribute the veggie sauté amongst the two tacos. Add a generous scoop of salsa and pesto—I’m talking a good two tablespoons each—and optional toppings, if desired. Finish with an extra sprinkle of black pepper and enjoy!
3.5.3229
I’m legit salivating over the thought of eating these tacos. As I write out the step-by-step details I’m reminded of how flavorful these tacos are! I really hope you guys can give them a try. Drop me a comment or tag me on Instagram if you do!
Thank you all for reading! And stay tuned for ANOTHER fun egg recipe (YAS!) coming later this week to the melmakesithappen blog! 🙂
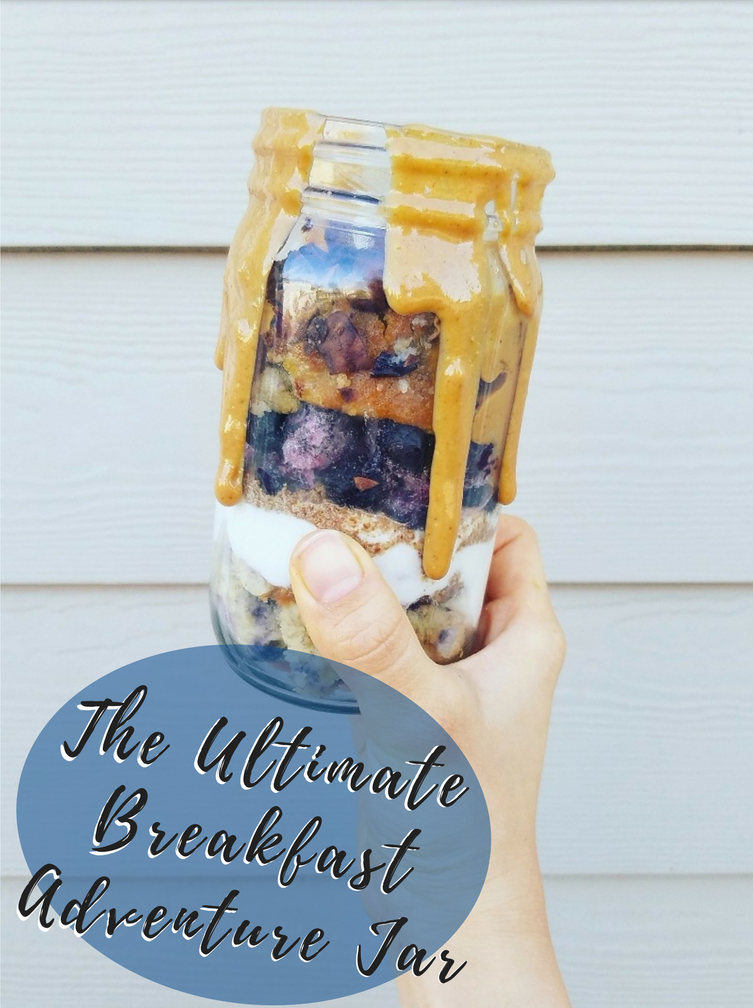
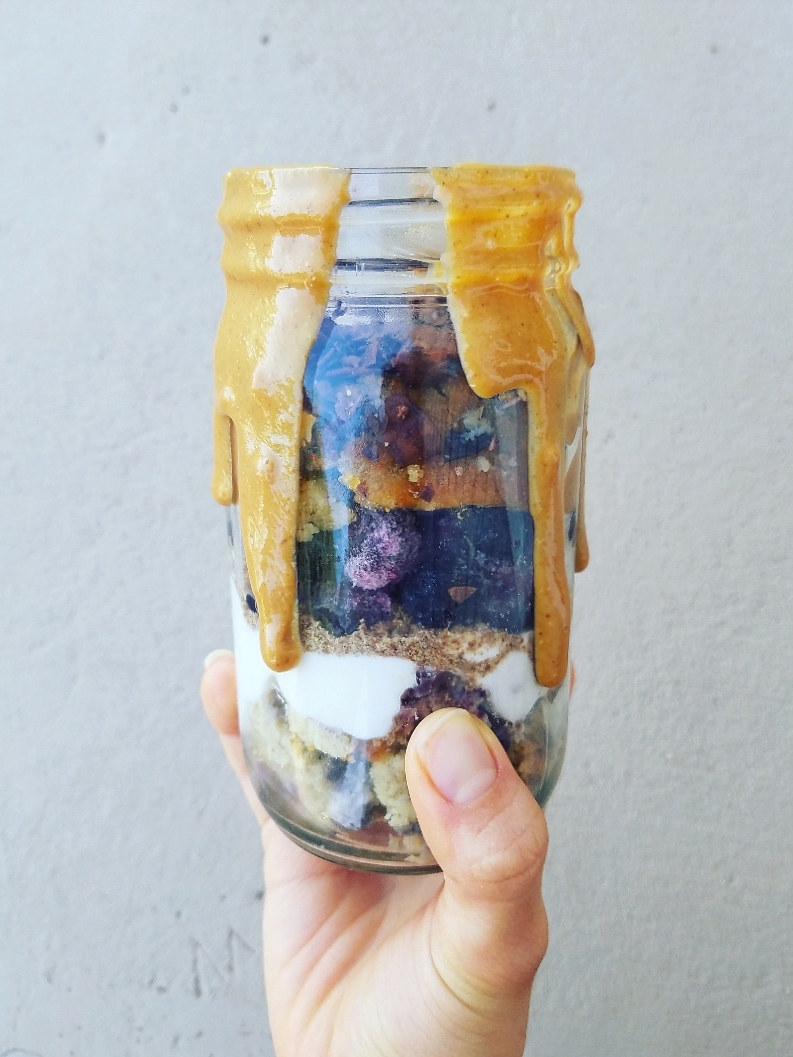
Hey, friends! How are you? Please tell me; I really want to know. Are you just here to see what the “Adventure” part of Breakfast Adventure Jar is? If so, that’s okay, too. See the recipe at the bottom of the page 🙂
I need to talk about some thoughts first. Just today, I was scrolling through Instagram and got to talking with a friend about passions. I started thinking of how we may dive into something as a follower but down the line it ignites a fire that motivates us to be a leader in that same field. For my friend, it was fitness. Following Tone it Up encouraged her to pursue personal training and nutrition coaching—both very different from her day job. Similarly, I started my fitness journey with Tone it Up and that transcended into an exploration of healthy eating and now I’m basically a nutrition fanatic.
I strongly believe in a whole foods way of eating. For me that is mostly vegan but, I recognize that for others, a whole foods way of eating could be varied. Plus, we all have to start somewhere. I try to keep my preferences to myself but the few times I do talk about food, I think it influences others. I get asked all sorts of things about what I eat, how to cook quinoa, and how to de-bloat.
Of course, I’m not a dietician so I can only offer my personal experience and knowledge from reading but I wish to do more. Here on the internet, especially in the health and wellness community, there isn’t a question about how to use kale. Though, offline, I need to remind myself that many people still have trouble formulating a plate of nutritious food.
I thought of a quote I’ve seen floating around but I haven’t ever resonated with until now:Right now, my ability to influence the community or public’s view of nutrition is limited as my day job is an office assistant. Though, I do hope that if someone has questions, they can have the courage to seek out answers. I enjoy helping steer people on the right path but fully want them to create their own healthy relationship with food. I don’t yet know how I can further advocate for this subject which I feel strongly about IRL but I know it isn’t going away soon.
In the meantime, let’s get to the Breakfast Adventure Jar.
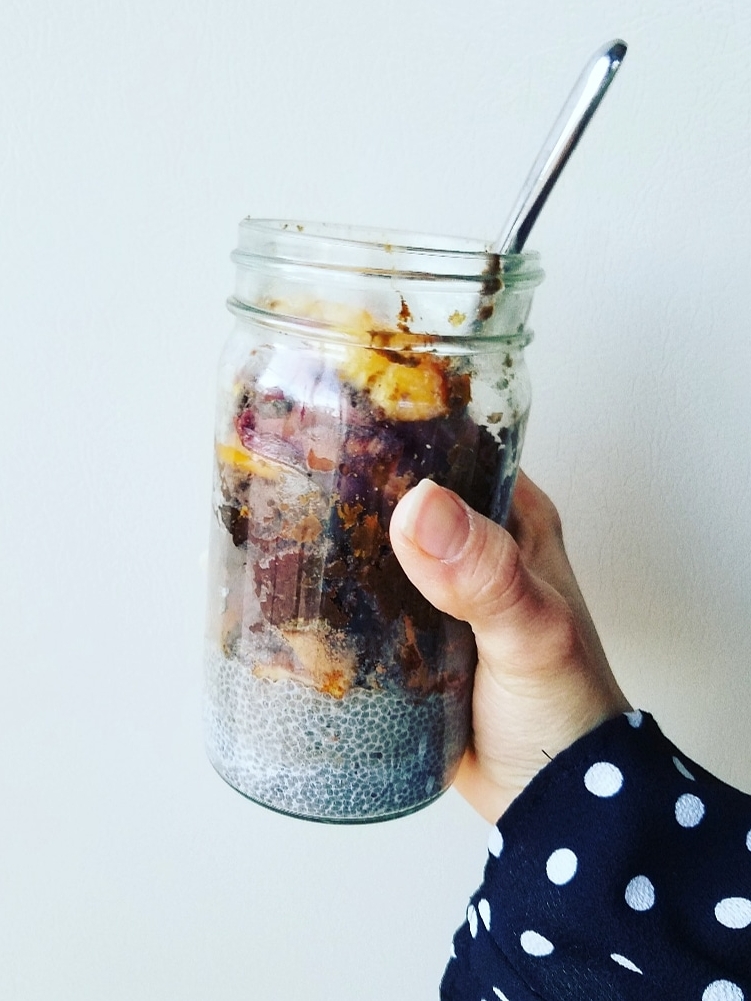
The adventure part of the name comes from a few different places. One, it stems from the fact that your jar is never going to look or taste the same way twice. It is a complete mystery based on whatever fridge or pantry goods you’ve got to use up. The idea for the Breakfast Adventure Jar came one day when I had baked a gingerbread loaf that wasn’t terrible but just wasn’t that great for snacking. I turned it into a parfait with some chia pudding, peanut butter, sliced nectarine, and cocoa coconut chips. That was the moment I knew.
Second, the adventure comes from looking around for goodies to put in your jar. Half of an apple? Throw it in! Mostly empty coconut butter jar? Use that to build the mish-mash concoction!
So, I guess I should say, this isn’t so much of a recipe as it is a guideline to make a bomb, texture-filled, parfait! (Keep reading for my suggestions.) Lastly, the jar is the vehicle for a delicious set of ingredients that you may have otherwise lain out on a plate at home. Now the goods are all conveniently packed into a jar for the ease of portability for you to take on YOUR adventures. 🙂
The idea for the Breakfast Adventure Jar came one day when I had baked a gingerbread loaf that wasn’t terrible but just wasn’t that great for snacking. I turned it into a parfait with some chia pudding, peanut butter, sliced nectarine, and cocoa coconut chips. 👌
Be sure to tell me what adventures you go on with your delicious on-the-go breakfast parfait!
Breakfast Adventure Jar
Recipe Type: Breakfast
Cuisine: American
Author: Melanie
Prep time:
Total time:
Serves: 1 parfait
Ingredients
1-2 homemade loaf slices or muffins* (I use 2)
Chia pudding, yogurt of choice, or leftover protein smoothie
A bit of whatever fruit you like: berries, sliced stone fruit, or good ol’ banana
Granola, crushed up nuts, toasted coconut chips, and/or cacao nibs
Peanut butter or other nut butter for drizzling
Instructions
If making chia pudding for your Breakfast Adventure Jar, start with that. Add the chia seeds and milk to the jar and let set at room temperature for 10 minutes or so until thickened. If using yogurt or smoothie, save that for after the loaf/muffins.
Next, you can top the set chia pudding with crumbled up loaf slices or muffins OR, use them as the base of the parfait and top with yogurt/smoothie. Personally, I like adding the loaf to the base of the jar but the chia pudding wouldn’t be able to set properly that way—and we want to keep this a 1 jar recipe!
For the third layer, add chopped fruit or omit if your loaf, yogurt, smoothies, etc. have fruit already.
Finally, top it all off with crunchy goodies of choice and perhaps a hefty drizzle of nut butter.
Notes
*There is no science to this. Literally use whatever bread you have and just add flavor pairings that you like. Banana bread, zucchini bread, or protein muffins are just A FEW possibilities. I’ve even used brownies once before 😊
If you liked this post, then be sure to also check out my Yogurt Pro Bowl post where I share how to make a great yogurt bowl with unique topping ideas!
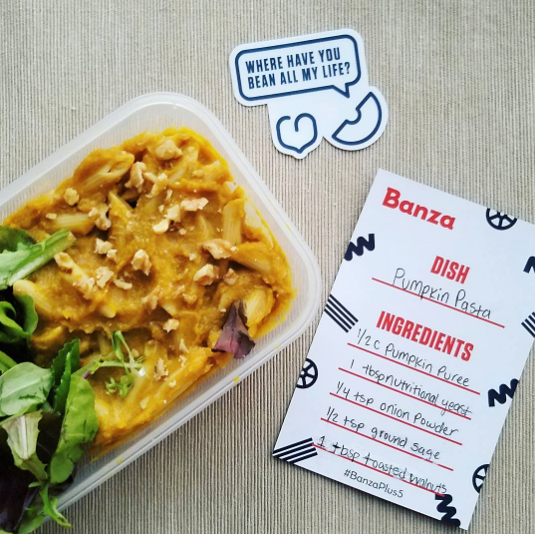
Y’all know I’m hardcore into pumpkin these days. I just love my orange vegetables and fall produce is chock full of them. Sweet potatoes, acorn squash, pumpkin, butternut squash—I like them all.
Fun fact: at a recent doctor’s appointment, I was told that my skin color looked a bit orange. The doctor asked if I drink a lot of carrot juice. I haven’t had carrot juice in years but I do eat A LOT of orangey fruit and veg. I tried abstaining from beta carotene rich plants for, like, a week and then luteal phase happened. Soooo I’m in squash heaven right now and will get back to human civilization (aka skin color) sometime in the future.
For now, we have pumpkin pasta to enjoy!
Just like my Broccoli and Carrot Pasta with Parlsey-Cilantro Pesto, this pasta recipe is also adaptable. I like using sage or thyme in this recipe but italian seasoning or curry powder would probably taste really good, as well!
I served mine with some fresh salad greens (as shown) but try mixing in 2 handfuls of spinach! The greens wilt slightly from the heat of the pasta and there is definitely enough pumpkin sauce to go around. It’s super creamy without any milk!
As a finishing touch, I like to toast some walnuts to add a bit of a savory crumble to the dish. You could also just sprinkle more nutritional yeast or some hemp seeds to pump up the protein. Whatever spin you take on this, let me know by tagging me on Instagram or leaving a comment down below. I greatly value your feedback 🙂
Recipe time!
Pumpkin Pasta
Recipe Type: Entree
Cuisine: American
Author: Melanie
Prep time:
Cook time:
Total time:
Serves: 1 serving
Ingredients
A 2 or 3 oz serving of pasta
1 ½ cup pumpkin puree
1 tbsp nutritional yeast
¼ tsp onion powder
½ tsp ground sage or thyme
¼ to ½ tsp salt
1 tbsp toasted walnuts, for topping
Instructions
Boil a serving of pasta (2 or 3 oz works) until al dente.
In a bowl, mix up 1/2 cup pumpkin puree, 1 tbsp nutritional yeast, 1/4 tsp onion powder, 1/2 tsp ground sage, and salt (I like a scant 1/2 tsp).
When pasta is cooked, reserve half a cup of water before draining.
In the bowl, or the pot you boiled the pasta, add the pumpkin mixture to the pasta. Add 3-4 tbsp of reserved cooking water to create a saucey texture. And you’re finished!
I like to add toasted walnuts to the top but this pasta also tastes delish with spinach mixed in. Feel free to sprinkle extra nutritional yeast, too 😉
3.5.3228
This recipe is made in participation of the #Banzaplus5 recipe contest on Instagram. See my other entry here.
If you glance into my fridge, you’re almost guaranteed to see a jar of pesto sitting on the top shelf. I’m constantly making new jars of pesto and/or freezing pesto in an ice cube tray. I buy lots of fresh herbs and, when my stock runs high, I’ll toss them into the food processor with some olive oil for pesto. It’s perfect to have on hand for pasta, salads, and more!
I remember when I first started making pesto I thought it could only be made with basil leaves. Boy, has my mind changed. The classic basil pesto is delicious but I am equally enamored by my favorite parsley-cilantro pesto.
Pesto is super versatile in the sense that you can use any greens you have (hey, kale pesto!). Here are just a few things that make a difference for me when making pesto:
An absolute must for me is toasting the nuts. I know it’s an step you might want to be lazy and skip over. Though, whether you buy raw or pre-roasted nuts, toasting them on the skillet before adding to pesto sauce is the ultimate flavor enhancer.
Don’t skip out on the olive oil. A good quality olive oil really MAKES the pesto. Bad olive oil or all water in the pesto are not going to help it enhance your food.
Salt is a must. Taste as you go along but it’s better to have the pesto slightly salty than not enough salt. The pesto gets mixed into the rest of your food so the saltiness won’t stay so concentrated.
Onto the pasta recipe!
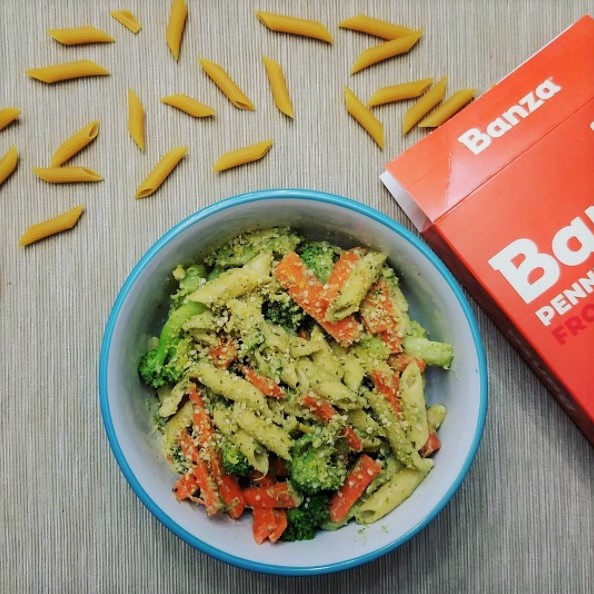
Broccoli and Carrot Penne Pasta with Parsley Cilantro Pesto
Recipe Type: Entree
Cuisine: American
Author: Melanie
Prep time:
Cook time:
Total time:
Serves: 1 serving
Ingredients
2 oz of short cut pasta (I used penne)
1 1/2 c chopped broccoli
1/2 c chopped carrot
3 heaping tbsp of homemade pesto (see notes)
Hemp seeds, for topping
Nutritional yeast, for topping
Lemon juice (optional)
Instructions
Boil water and add pasta.
Once cooked, add chopped broccoli and carrots, plus a sprinkle of salt and pepper, and cook for 2 minutes or until tender.
Drain pasta water. Stir in 3 tbsp pesto.
Pour pasta into a bowl and top with a nice sprinkle of hemp seeds, nutritional yeast, and a squeeze of lemon. Enjoy! <img draggable=”false” data-mce-resize=”false” data-mce-placeholder=”1″ data-wp-emoji=”1″ class=”emoji” alt=”💁” src=”https://s.w.org/images/core/emoji/2.3/svg/1f481.svg”>
Notes
Cilantro Parlsey Pesto Recipe:[br]2 cups of fresh cilantro and parsley (I do about 1 ½ cups cilantro, ½ cup parsley)[br]½ cup roasted/toasted mixed nuts (I used almonds and cashews)[br]1/3 cup extra virgin olive oil[br]1 tbsp lemon juice[br]2-4 tbsp water, as needed[br]1 small clove of garlic[br]¼-½ tsp salt[br]Black pepper, to taste[br]A small pinch of red pepper flakes[br]Add all ingredients to a food processor and combine until a smooth paste forms. Thin it out with a few extra tablespoons of water or oil as needed.
3.5.3229
This recipe was made as an entry into the #Banzaplus5 recipe contest on Instagram. Feel free to use your favorite pasta!
Pumpkin Spice and everything nice is what makes fall feel like FALL for me. Please, hold the eye roll. Evidently, the internet is all hyped about fall these days but let me tell you: I’ve been a fan of fall before it was trendy. Yes, I went there. Fall holds meaning for me even without the glamorized PSL which may actually have a new flavor competitor around—see here. Basically, winter and spring are almost nonexistent in southern California. And summer? No thank you, 120 degree weather.
My dear fall, you are what I look forward to each year. All I need are some breezy cool days where I can wear my cardigan and scarf and sip on my eat my pumpkin coconut treats. HOORAY!
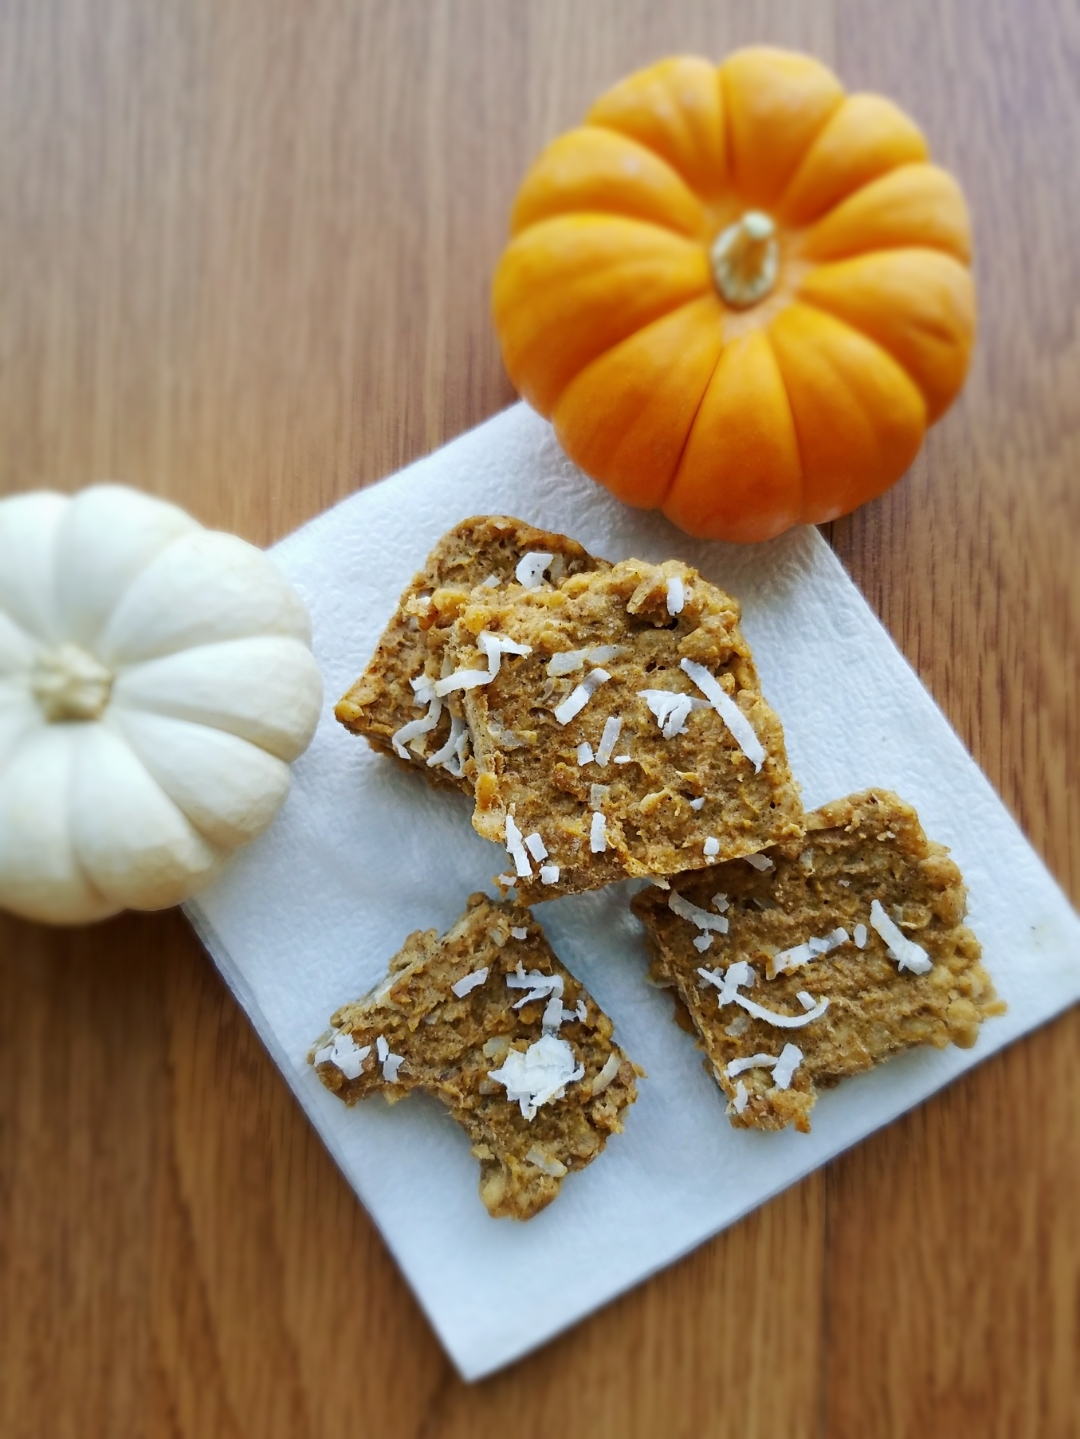
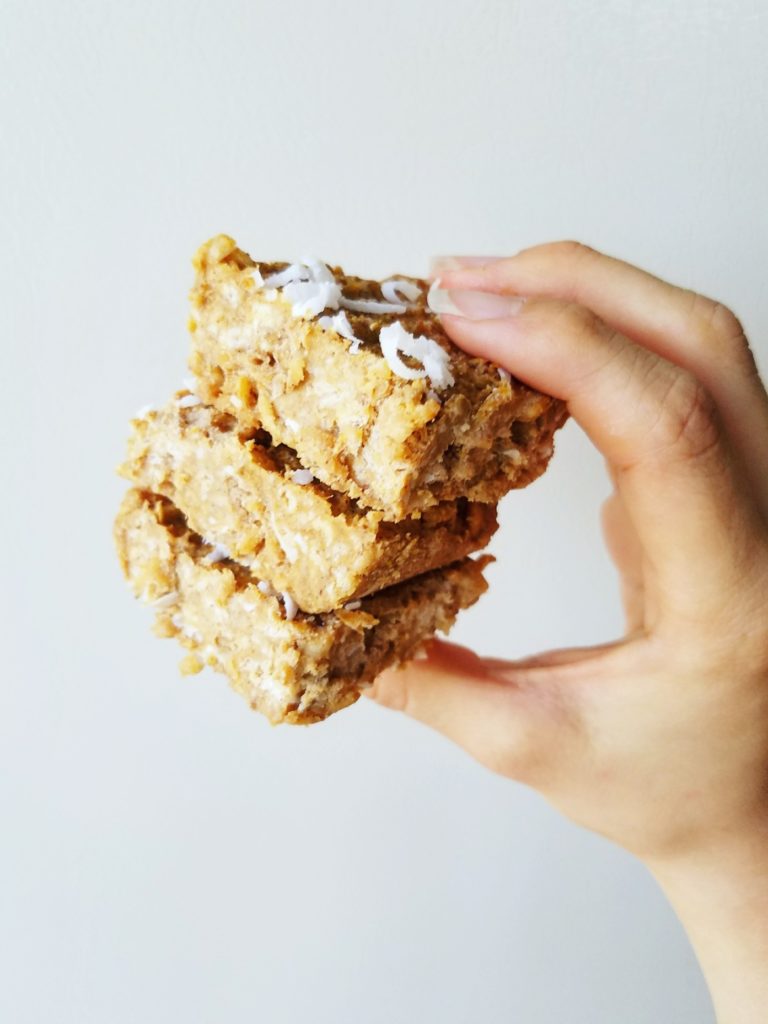
Throwback moment: my favorite childhood snack was the packaged rice krispy treats. Not even the homemade kind! The rice krispy treats in the blue packaging were perfect because of their balance of sweetness and textures—crunchy yet soft! As you know, I like healthifying sweet treats. So, I put a spin on my fave classic WITHOUT marshmallows for some pumpkin coconut NOT SCARY treat fun. I know, it almost sounds sacrilegious. Still, I think you’ll find that these are sweet and satisfying on their own and healthier than the sugar-laden original.
Also, this recipe is a good use for date puree, or, date caramel as Minimalist Baker calls it. Honestly, date caramel is what sweet dreams are made of and I highly recommend making some. Although, if you want to substitute whole dates, you can try 2 (take out the pits!) and blend them up with the pumpkin and coconut oil until smooth.
I know fall is all about baking but make room in your freezer for this no-bake treat! You can thank me later.
Pumpkin Coconut Treat Bars
Recipe Type: Snacks
Author: Melanie
Prep time:
Cook time:
Total time:
Serves: 8 bars
These Pumpkin Coconut Not Scary Treat Bars are made with ingredients you can recognize. They’re wholesome, satisfying, and no marshmallows are required!
Ingredients
¼ cup pumpkin puree
¼ cup melted coconut oil
2 tbsp almond butter
3 tbsp date caramel
1 tsp cinnamon
½ tsp nutmeg
½ tsp allspice
1/8 tsp salt
2 cups Erewhon cinnamon brown rice cereal or other brown rice cereal
2 tbsp sweetened shredded coconut, plus more for topping
Instructions
First up, grease a loaf pan with coconut oil or line with wax paper so that the bars will be easy to remove.
In a medium bowl, combine the pumpkin, coconut oil, almond butter, date caramel, and spices. Stir in the brown rice cereal and shredded coconut. Adjust to taste by adding a pinch of salt or a sprinkle of granulated sugar, if needed.
Press the mixture into the loaf pan, making sure to fill the corners. Then, place in the freezer for 2 hours to solidify.
Remove from freezer and cut into 8 squares. The bars taste best when stored in the freezer. Just leave them out to thaw for a minute before you are ready to eat one!
Notes
I used sweetened shredded coconut because I ran out of the unsweetened kind. You could definitely use unsweetened shredded coconut and perhaps add a teaspoon of granulated sweetener like coconut or brown sugar to make the bars sweeter. I just don’t recommend coconut flakes because those will be too thick and chunky for the bars.[br]Additionally, “cook time” reflects time in the freezer. This is a no-bake recipe.
We use cookies on our website to give you the most relevant experience by remembering your preferences and repeat visits. By clicking “Accept”, you consent to the use of ALL the cookies.
This website uses cookies to improve your experience while you navigate through the website. Out of these, the cookies that are categorized as necessary are stored on your browser as they are essential for the working of basic functionalities of the website. We also use third-party cookies that help us analyze and understand how you use this website. These cookies will be stored in your browser only with your consent. You also have the option to opt-out of these cookies. But opting out of some of these cookies may affect your browsing experience.
Necessary cookies are absolutely essential for the website to function properly. These cookies ensure basic functionalities and security features of the website, anonymously.
Cookie
Duration
Description
cookielawinfo-checbox-analytics
11 months
This cookie is set by GDPR Cookie Consent plugin. The cookie is used to store the user consent for the cookies in the category "Analytics".
cookielawinfo-checbox-functional
11 months
The cookie is set by GDPR cookie consent to record the user consent for the cookies in the category "Functional".
cookielawinfo-checbox-others
11 months
This cookie is set by GDPR Cookie Consent plugin. The cookie is used to store the user consent for the cookies in the category "Other.
cookielawinfo-checkbox-necessary
11 months
This cookie is set by GDPR Cookie Consent plugin. The cookies is used to store the user consent for the cookies in the category "Necessary".
cookielawinfo-checkbox-performance
11 months
This cookie is set by GDPR Cookie Consent plugin. The cookie is used to store the user consent for the cookies in the category "Performance".
viewed_cookie_policy
11 months
The cookie is set by the GDPR Cookie Consent plugin and is used to store whether or not user has consented to the use of cookies. It does not store any personal data.
Functional cookies help to perform certain functionalities like sharing the content of the website on social media platforms, collect feedbacks, and other third-party features.
Performance cookies are used to understand and analyze the key performance indexes of the website which helps in delivering a better user experience for the visitors.
Analytical cookies are used to understand how visitors interact with the website. These cookies help provide information on metrics the number of visitors, bounce rate, traffic source, etc.
Advertisement cookies are used to provide visitors with relevant ads and marketing campaigns. These cookies track visitors across websites and collect information to provide customized ads.