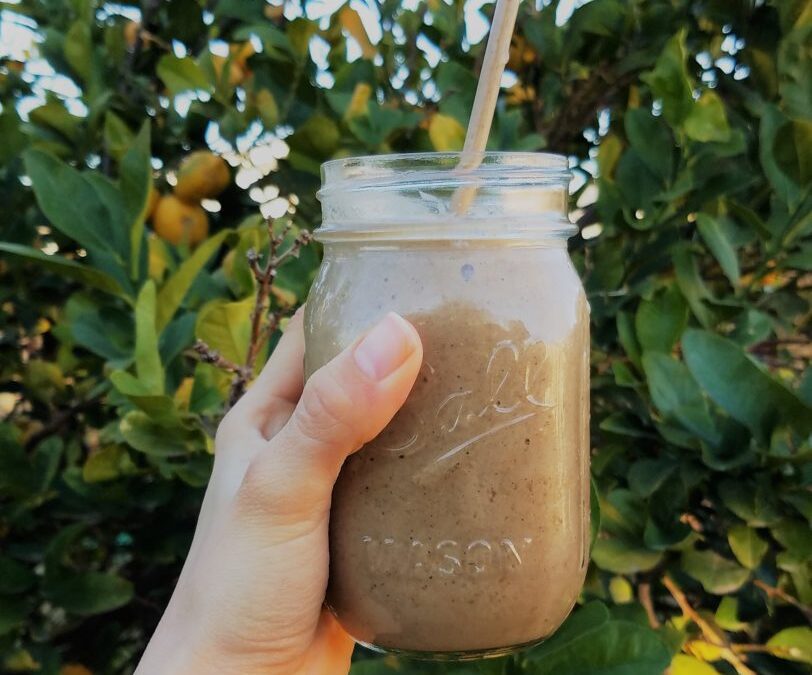
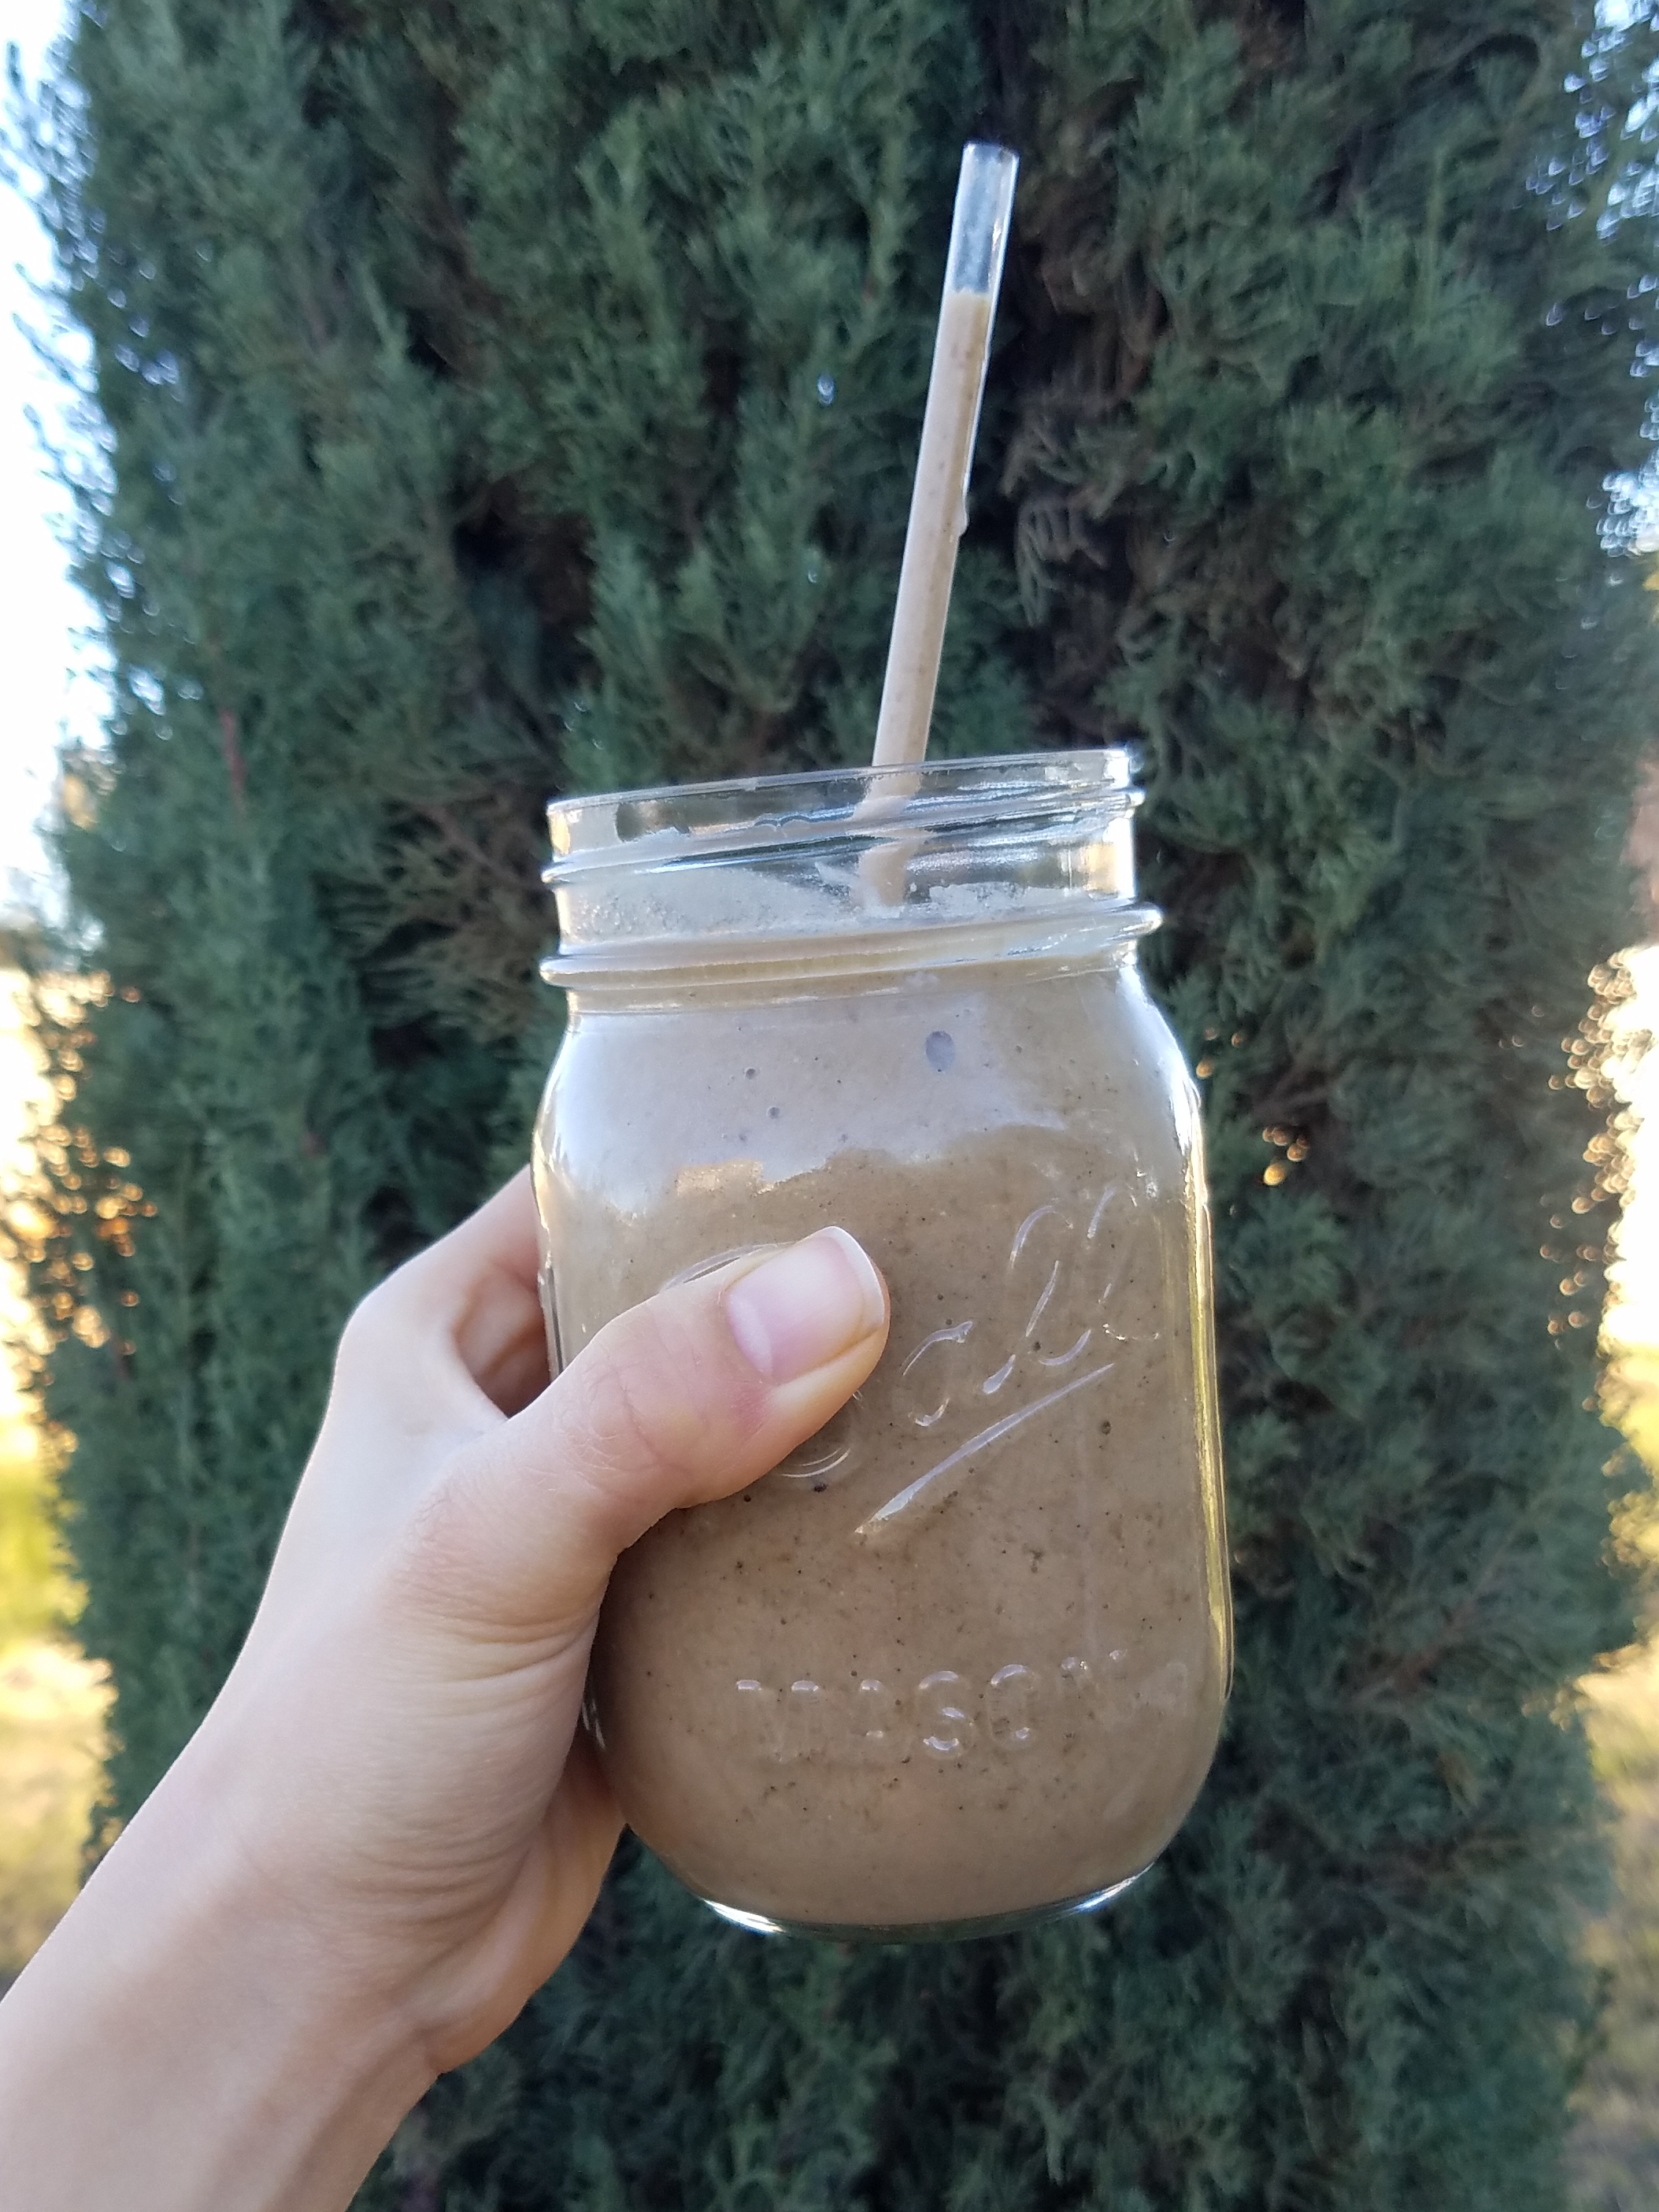
I’d like to say that my love for smoothies knows no season but I found myself slipping away from them during the wintertime. I felt cravings for fresh fruit and creamy flavors but opted for breakfasts of oatmeal most days, instead. If the weather seemed mild, I’d make a cup of hot tea and drink my smoothie underneath a blanket on my couch. The hot and cold drinks allowed me to sip on my beloved smoothie without turning my insides into ice cubes.
Now that the worst of the cold days are behind us, I am sharing one of my favorite smoothies that I was sipping in the winter and into spring. It is also the perfect pick-me-up any time of year. Coffee is special like that 🙂
I usually opt to drink decaf most of the time because the caffeine from coffee is almost impossible for me to tolerate. Call me a wimp but I just feel jittery and unstable after a mere half cup. You can totally use regular coffee but make sure it is cooled first because, otherwise, it might melt the ice cubes and reduce the frostiness of the smoothie. Oh, and do not pass up on the ice cubes! They really make all the difference in this frosty smoothie.
Notice the keyword: frosty. I can’t stand thin, watery smoothies. Super thick and creamy is how I like ‘em usually. The exception is this smoothie. It isn’t quite as thick or richly creamy, but it is frosty! It is a very refreshing choice and way healthier than a frappuccino, just saying.
As always, leave me a comment if you try it out. I’d like to know what smoothies you’re drinking on these spring days.
Simple Coffee Protein Smoothie
Recipe Type: Breakfast, Snacks
Cuisine: American, Vegetarian, Vegan
Author: Melanie
Prep time:
Cook time:
Total time:
Serves: 1 smoothie
Adapted from a Tone it Up recipe, this Coffee Smoothie is easy to make and full of frosty deliciousness!
Ingredients
1 cup of decaf/coffee ice cubes, about 5 cubes*
½ large banana, frozen
½ cup of decaf or regular coffee, cooled
½ cup of cashew milk**
2 scoops of Chocolate Protein Powder***
Instructions
If you have a strong blender, then toss all of the ingredients in and blend away!
If not, I’d recommend blitzing the ice cubes with the coffee and banana first. Then, add in the cashew milk and protein powder. Once it looks like it is all combined and starting to get a little frothy, you are done. Drink up!
Notes
Prep time does not include freezing the ice cubes or brewing coffee[br]*Simply, pour brewed coffee into an ice cube try and let freeze overnight.[br]**Can sub other milk but I like the creaminess of cashew milk[br]***I used Nuzest USA’s plant-based Chocolate Protein Powder. Not all protein powders get frothy when blended. For example, I don’t recommend ALOHA in this smoothie. You can sub other plant-based powders like Perfect Fit but there may be slight variations in thickness.
When I was younger, I was not a fan of vegetables. Like, at all. Occasionally I would eat salad out of necessity to add color to my plate. Though, I was definitely disappointed to learn that my favorite tomatoes and potatoes were not really even actual vegetables!
I’ve come a long way since then.
Heck, I’m all about the plant-based lifestyle these days.
I am a big fan of fruit and always have been. Though, I know I can go a little overboard on it sometimes so I’m making efforts to incorporate more vegetables into my meals. Lunch and dinner are easier but breakfast is not usually the place this sweets-lover thinks of eating a vegetable.
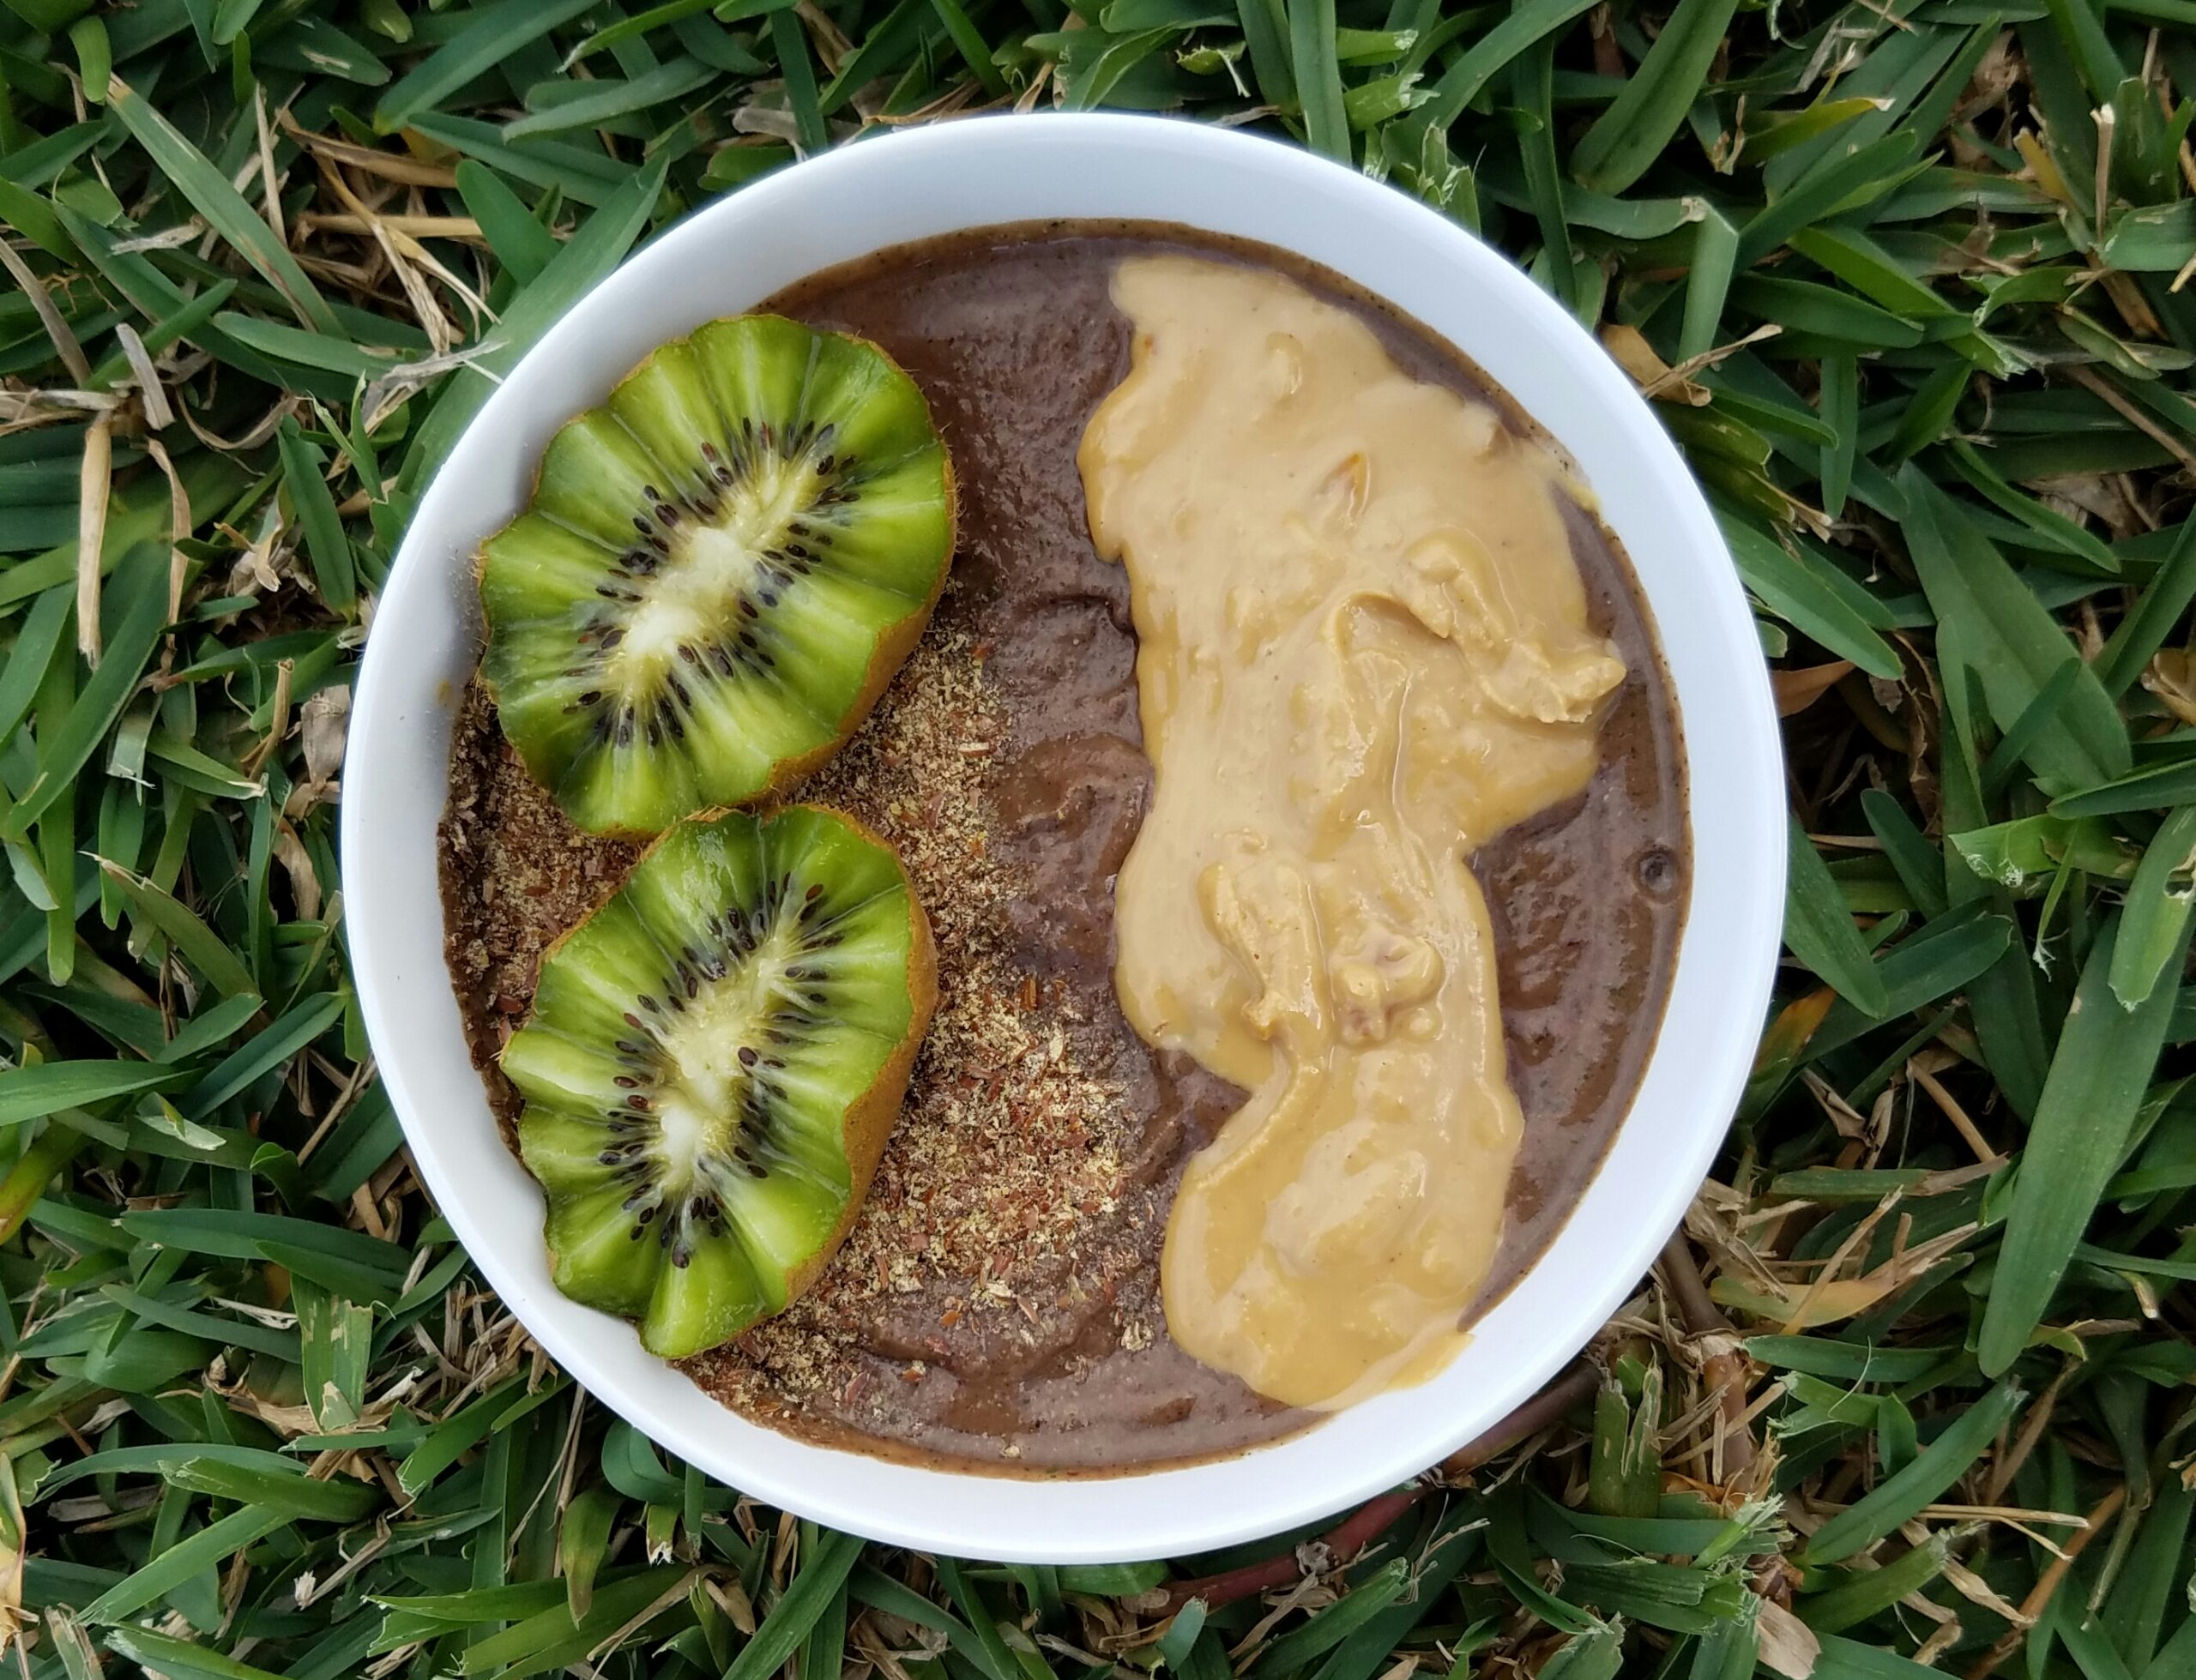
A handful of greens can usually sneak by in a smoothie but there’s no disguising the taste. Zucchini, on the other hand, is basically water. When frozen, the zucchini adds some frosty thickness to any smoothie or, my fave, a smoothie bowl.
It’s the perfect bowl for getting in some vegetables and keeping sugar intake low.
Many times smoothie bowls can pack a sugar punch but not this one. You may want to opt for some sweet toppings or peanut butter😜 because the bowl itself isn’t very sweet. Let me know what you think if you try it out!
Zucchini Smoothie Bowl
Recipe Type: Breakfast
Cuisine: Vegan, Vegetarian
Author: Melanie
Prep time:
Cook time:
Total time:
Serves: 1 smoothie bowl
A great smoothie bowl for getting in some veggies, greens, berries, and fruit all in one. Yet, it is lower in sugar than traditional fruit-only smoothies. Many times smoothie bowls can pack a sugar punch but not this one. Opt for a few sweet toppings on top, instead.
Ingredients
¼ cup water, beet juice, or milk of choice
1 small handful of baby kale (1/2 cup)
1 serving of protein powder (I used Nativas Naturals Vanilla)
½ medium frozen zucchini (chopped into 3-4 pieces to make it easier on your blender)
1 medium frozen banana, ripe is best
¼-1/3 cup blackberries, fresh or frozen
Topping ideas: kiwi, granola, ground flax, or peanut butter
Instructions
Add the liquid (I used beet juice) and kale to the blender first. Blitz until the leaves are broken down.
Then, add in the protein powder, slices of zucchini, banana, and blackberries. Blend thoroughly. (My blender isn’t the strongest but it was able to process the ingredients without added liquid. Feel free to add a tablespoon or two of water if your blender needs some help.)
Pour the smoothie into a bowl and top with some of your favorite goods and eat!
Notes
Prep time does not include freezing time for the banana or zucchini
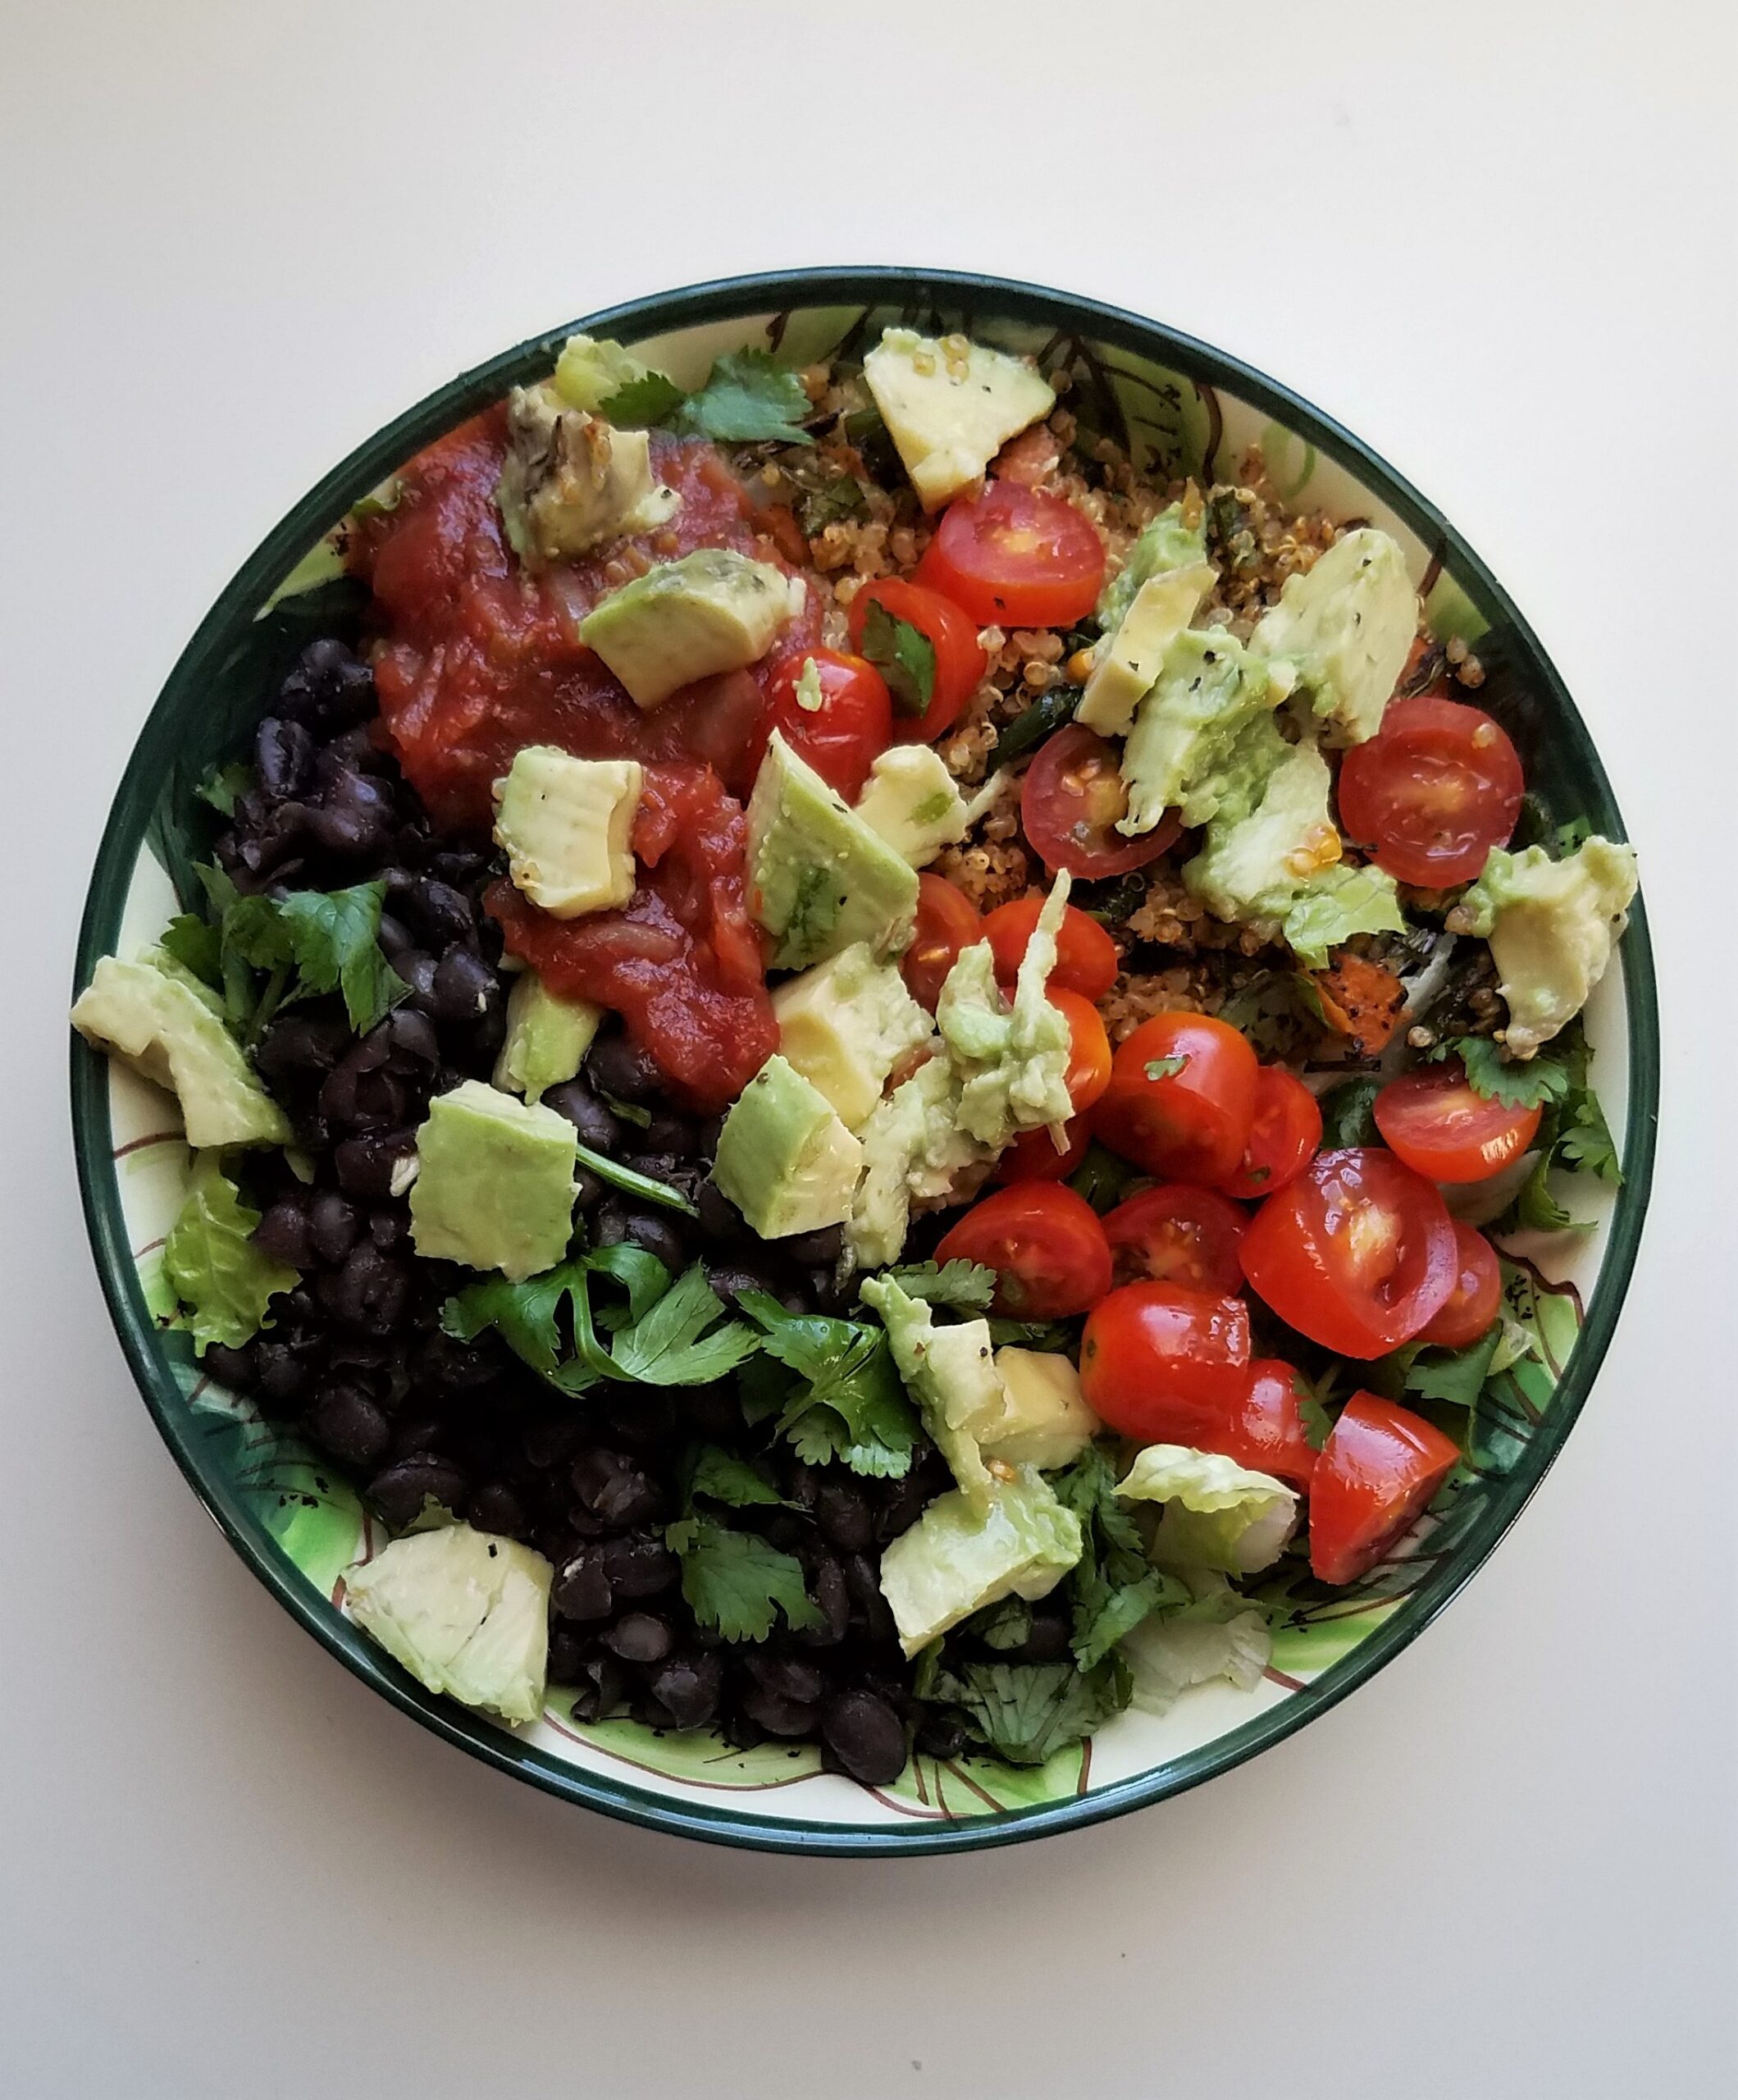
When I was in high school, the cafeteria used to serve junk like pizza, spaghetti and meatballs, or hot dogs. I like a slice of pizza once in a while but what I love is food that makes me feel good. There was a limited supply of salads because the school must’ve thought no one would want to eat salads. On the contrary, everyone would make a beeline for them right at the start of lunch (teachers included). Every day there was a different lunchtime salad option. Wednesdays used to be Taco Salad day.
My very favorite!
You know the one.
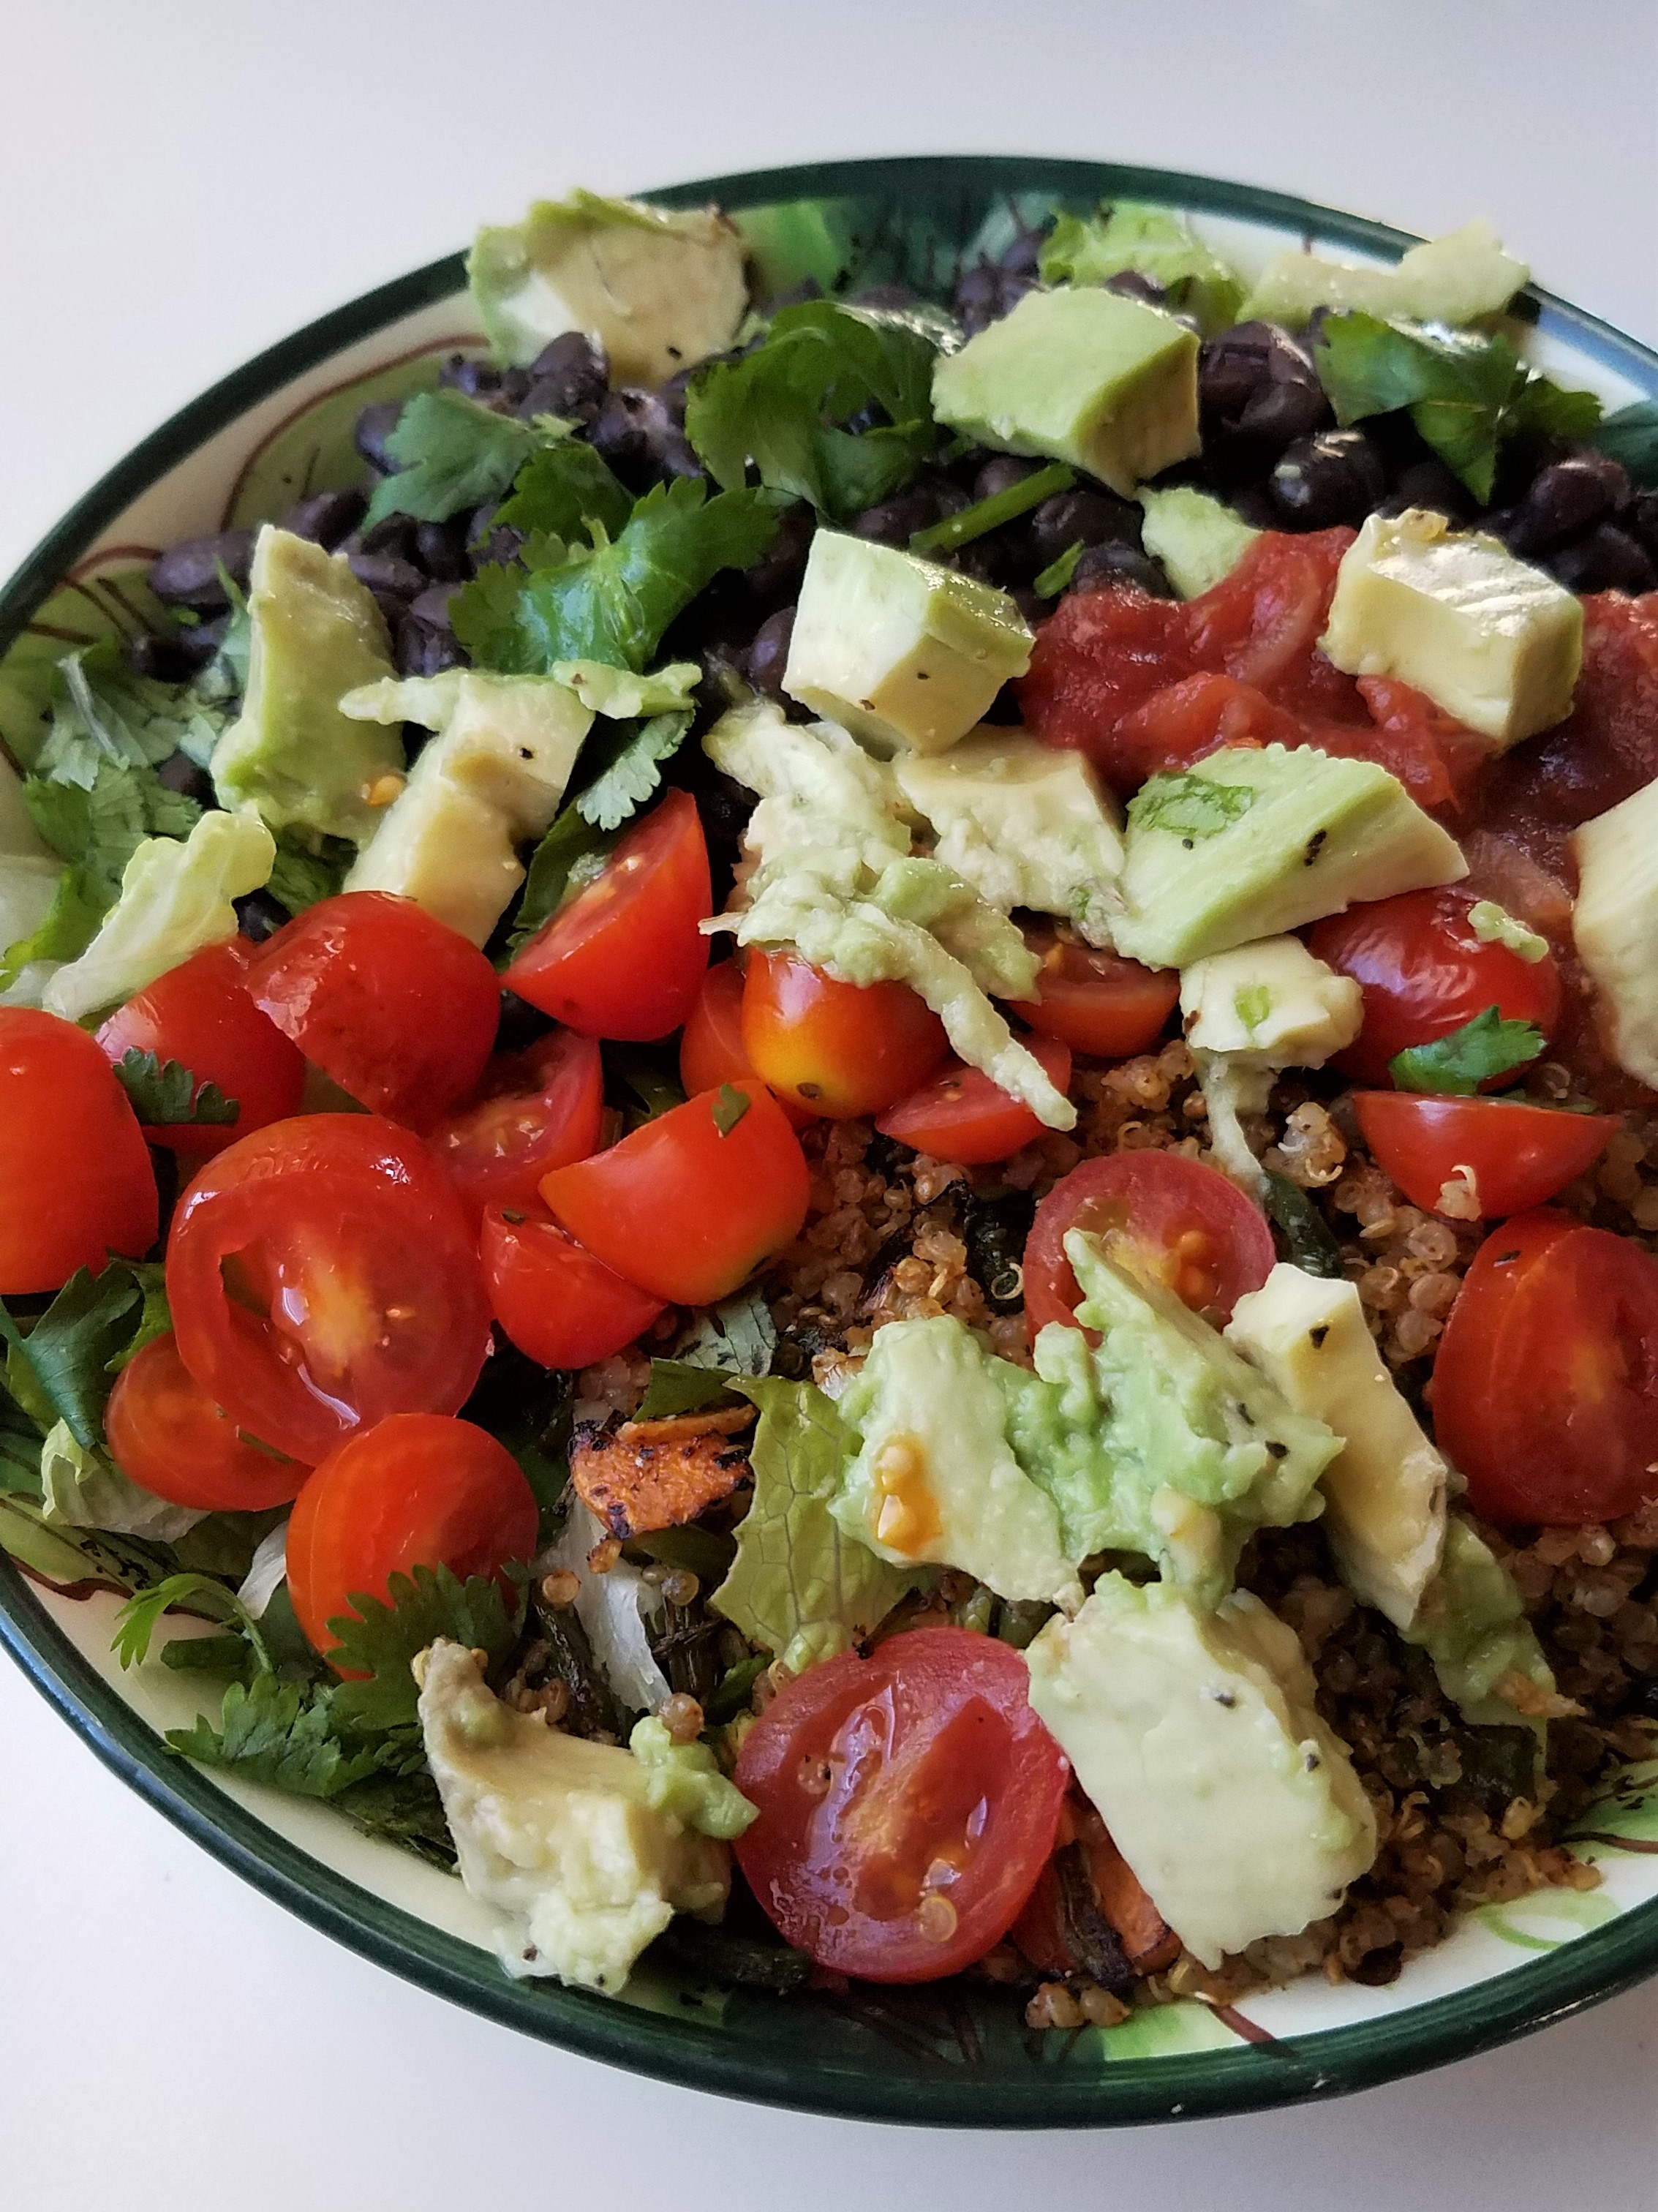
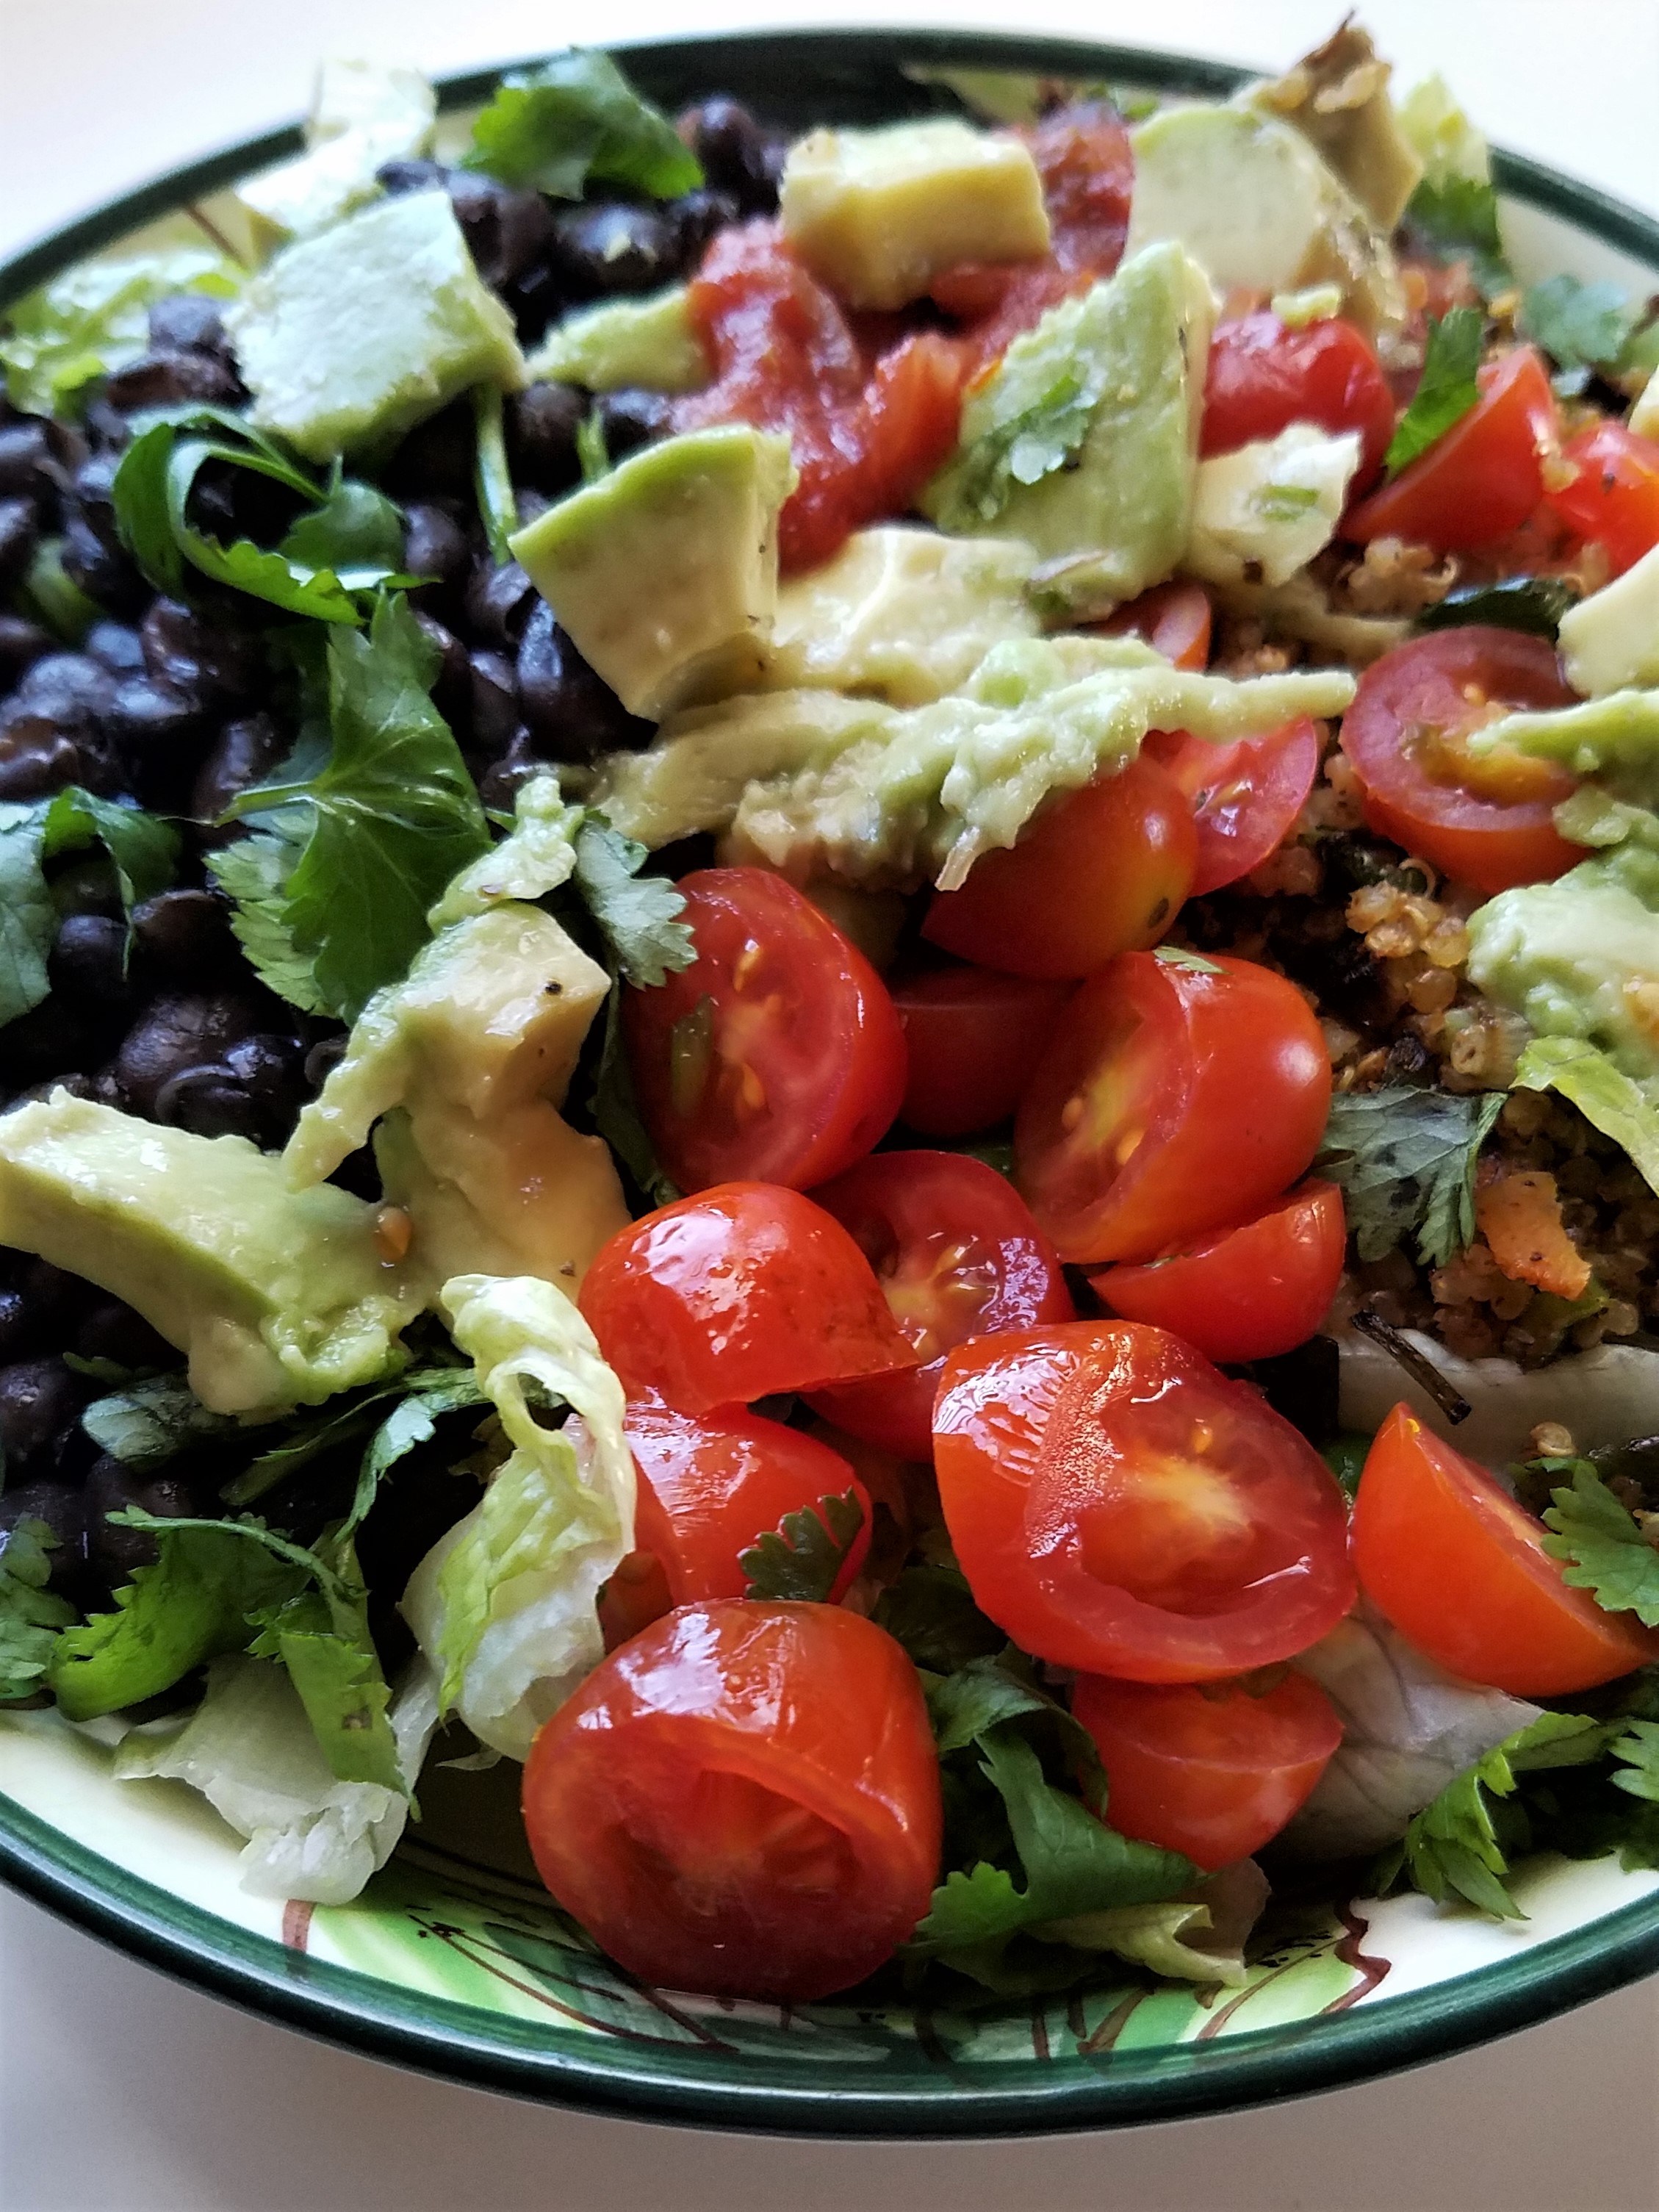
It has a bed of lettuce, ground beef crumbles, tomatoes, black or pinto beans, shredded cheese, crunchy tortilla chips, and salsa. If you order something similar at restaurants, it will probably come with some guacamole, too. It has all of the yummy taco flavors but is totally healthy because there’s some lettuce in there, am I right? Well, today’s quinoa taco meat recipe is inspired by my old favorite salad but completely plant-based.
I use a taco seasoning recipe from My Blessed Life which I then add to cooked quinoa, warmed up in a pan. It provides the Mexican taco flavors but also adds a bit of protein and texture to a salad. My favorite salad is shown in the pictures. I like using the quinoa meat with a romaine lettuce base, cilantro, black beans, tomatoes, avocado, and a red salsa for topping.
It is so simple and find myself making this all too often! Let me know if you give it a try.
Quinoa Taco “Meat” Recipe
Cuisine: Vegetarina, Vegan
Author: Melanie
Prep time:
Cook time:
Total time:
Serves: 1 serving
An easy-to-make “meat” alternative to add some Mexican flair to any dish. It is the perfect base for beans, vegetables, or any other proteins you would like to add.
Ingredients
½ cup cooked quinoa
1 tsp taco seasoning (see notes)
Instructions
There is not really a science to making the taco meat. I throw some quinoa into a pan and warm it up with the spices. Half a cup of quinoa to 1 tsp of homemade taco seasoning or store-bought should work, though adjust based on your taste for spice.
Notes
Easy Homemade Taco Seasoning via my Blessed Life[br]1 tsp garlic powder[br]1 tsp onion powder[br]1 tsp sea salt[br]1 tsp ground cumin[br]1 tsp paprika[br]1 tsp chili powder[br]Simply, mix all seasoning ingredients together.
Today I was reading about NASA’s recent discovery of exoplanets that may be similar to our planet Earth. It seems that they are in a prime zone for habitation and may even have oceans. See the article here. I don’t avidly follow space and scientific findings but something about the excitement surrounding the discovery of the planets really cheered me up this morning. I think the optimism about the possibility that life may exist elsewhere is a really neat thought. It is a wild thought but that doesn’t mean it can’t happen.
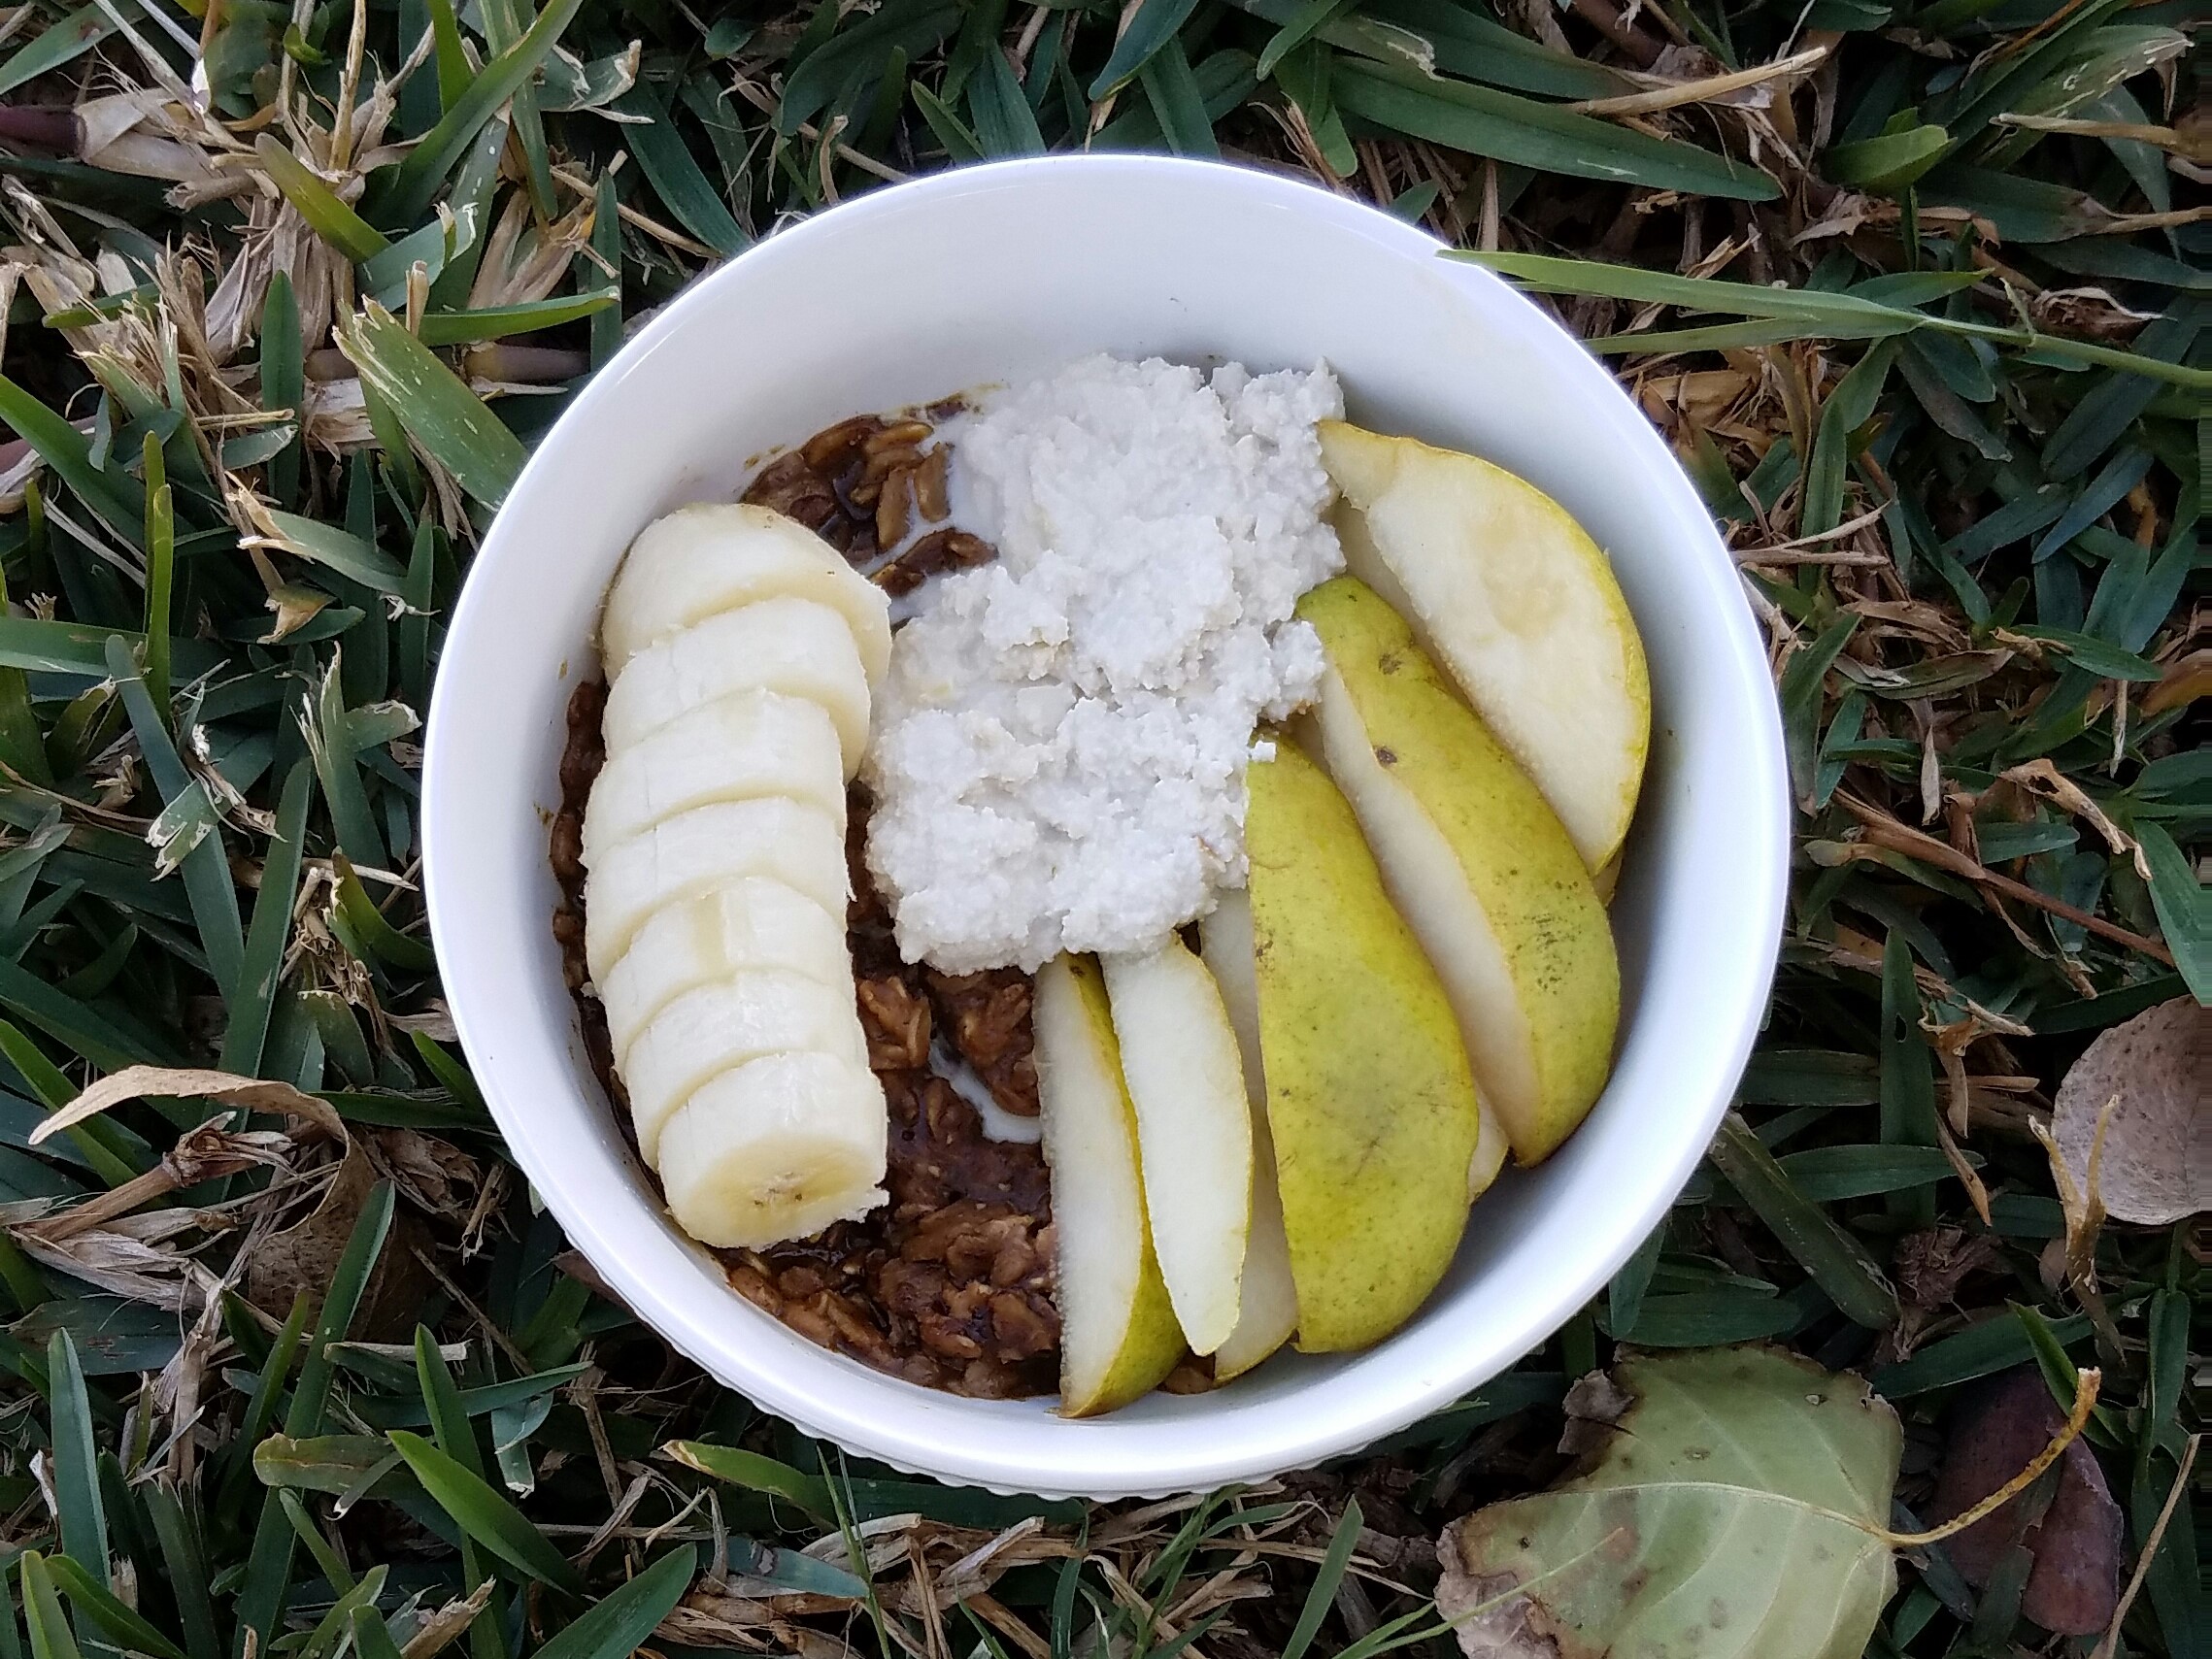
I have something a little less wild and not very space-related to share with you today: Gingerbread Oatmeal!
I know we are in the month February but who says the gingerbread flavors are only for November/December? I’m still totally digging spiced flavors in my breakfast!
I must admit, I’m usually a much bigger fan of overnight oats than I am of warm, cooked oats. It’s a texture thing. One exception is this recipe for gingerbread oatmeal. The molasses and spices are so comforting and delicious that it would be a crime not to try them warm!
Another factor that kept me from liking hot oatmeal in the past was the bland taste of it. I felt it was necessary to add sugar to make it taste like something! Hold your horses because there is NO sugar needed for this recipe. We’re using the au natural sweetness of banana 😀 Then, we top off the oatmeal with some fruit of your choosing ( I like pear) and some delectable cashew cream. I say we soak some cashews NOW so that we can whip up the cashew cream and this oatmeal for breakfast tomorrow! 😉 Who’s with me?!
Gingerbread Stovetop Oats with Cashew Cream
Recipe Type: Breakfast
Author: Melanie
Prep time:
Cook time:
Total time:
Serves: 1 bowl
A warm bowl of oatmeal, sweetened with banana, and bursting with the flavors of molasses and gingerbread spices. A comforting breakfast for one or double up, as needed, to serve more. Top with fruit of choice and cashew cream.
Ingredients
1/3 cup rolled oats
2/3 cup water
1 medium banana (half mashed, the other half sliced)*
1/4 tsp cinnamon
1/8 tsp ginger
1/8 tsp nutmeg
1/8 tsp allspice
1/8 tsp cloves (optional)
½ tsp vanilla extract
1 tsp blackstrap molasses
1 tsp chia seeds
1 tsp ground flax seeds
Cashew milk or milk of choice, for serving
Sliced pear, optional
Cashew cream**, for serving (see notes for recipe)
Instructions
Add the water to a small pot and bring to a boil. Then, add the oats, mashed banana, spices, vanilla, and molasses. Turn down the heat to a medium level.
After about two minutes, once most of the water has been absorbed, stir in the flax and chia seeds until well-dispersed and cook on low for one additional minute.
Take the oatmeal off the heat and let sit for a minute. This is important because the banana makes the oatmeal retain a lot of heat so it will be REALLY HOT if you dig into it right away.
Serve oatmeal with the other half of the banana, sliced pear, a small pour of milk, and a scoop of cashew cream.
Notes
*If desired, applesauce could be substituted for the banana in the recipe.[br][br]**You will have leftover cashew cream if making this recipe to go with the gingerbread oatmeal. [br][br]Cashew Cream recipe is as follows: [br]¾ cup raw cashews[br]1/3 cup water, plus more for soaking[br]1 ½ tbsp maple syrup[br]¾ tsp vanilla extract[br]A pinch of pink Himalayan sea salt or kosher salt[br][br]Simply place cashews in a bowl and fill with water until they are covered. Let them soak to soften. I recommend soaking cashews overnight in the fridge but between 2-6 hours is all that is necessary. Once cashews have softened and expanded, empty the soaking water and add them to a blender or food processor. Blend up the cashews until crumbly, then add 1/3 water, the maple syrup, vanilla, and salt. The resulting thickness will depend on the power of your blender or food processor. I left mine a bit clumpy but blend until desired consistency is achieved.[br][br]Cashew cream yields about 3 servings of 1/4 cup portions.[br][br]NOTE: Prep time does not include soaking time for the cashews.
3.5.3226
Let’s embrace the last days of winter and enjoy the warm spices of gingerbread!
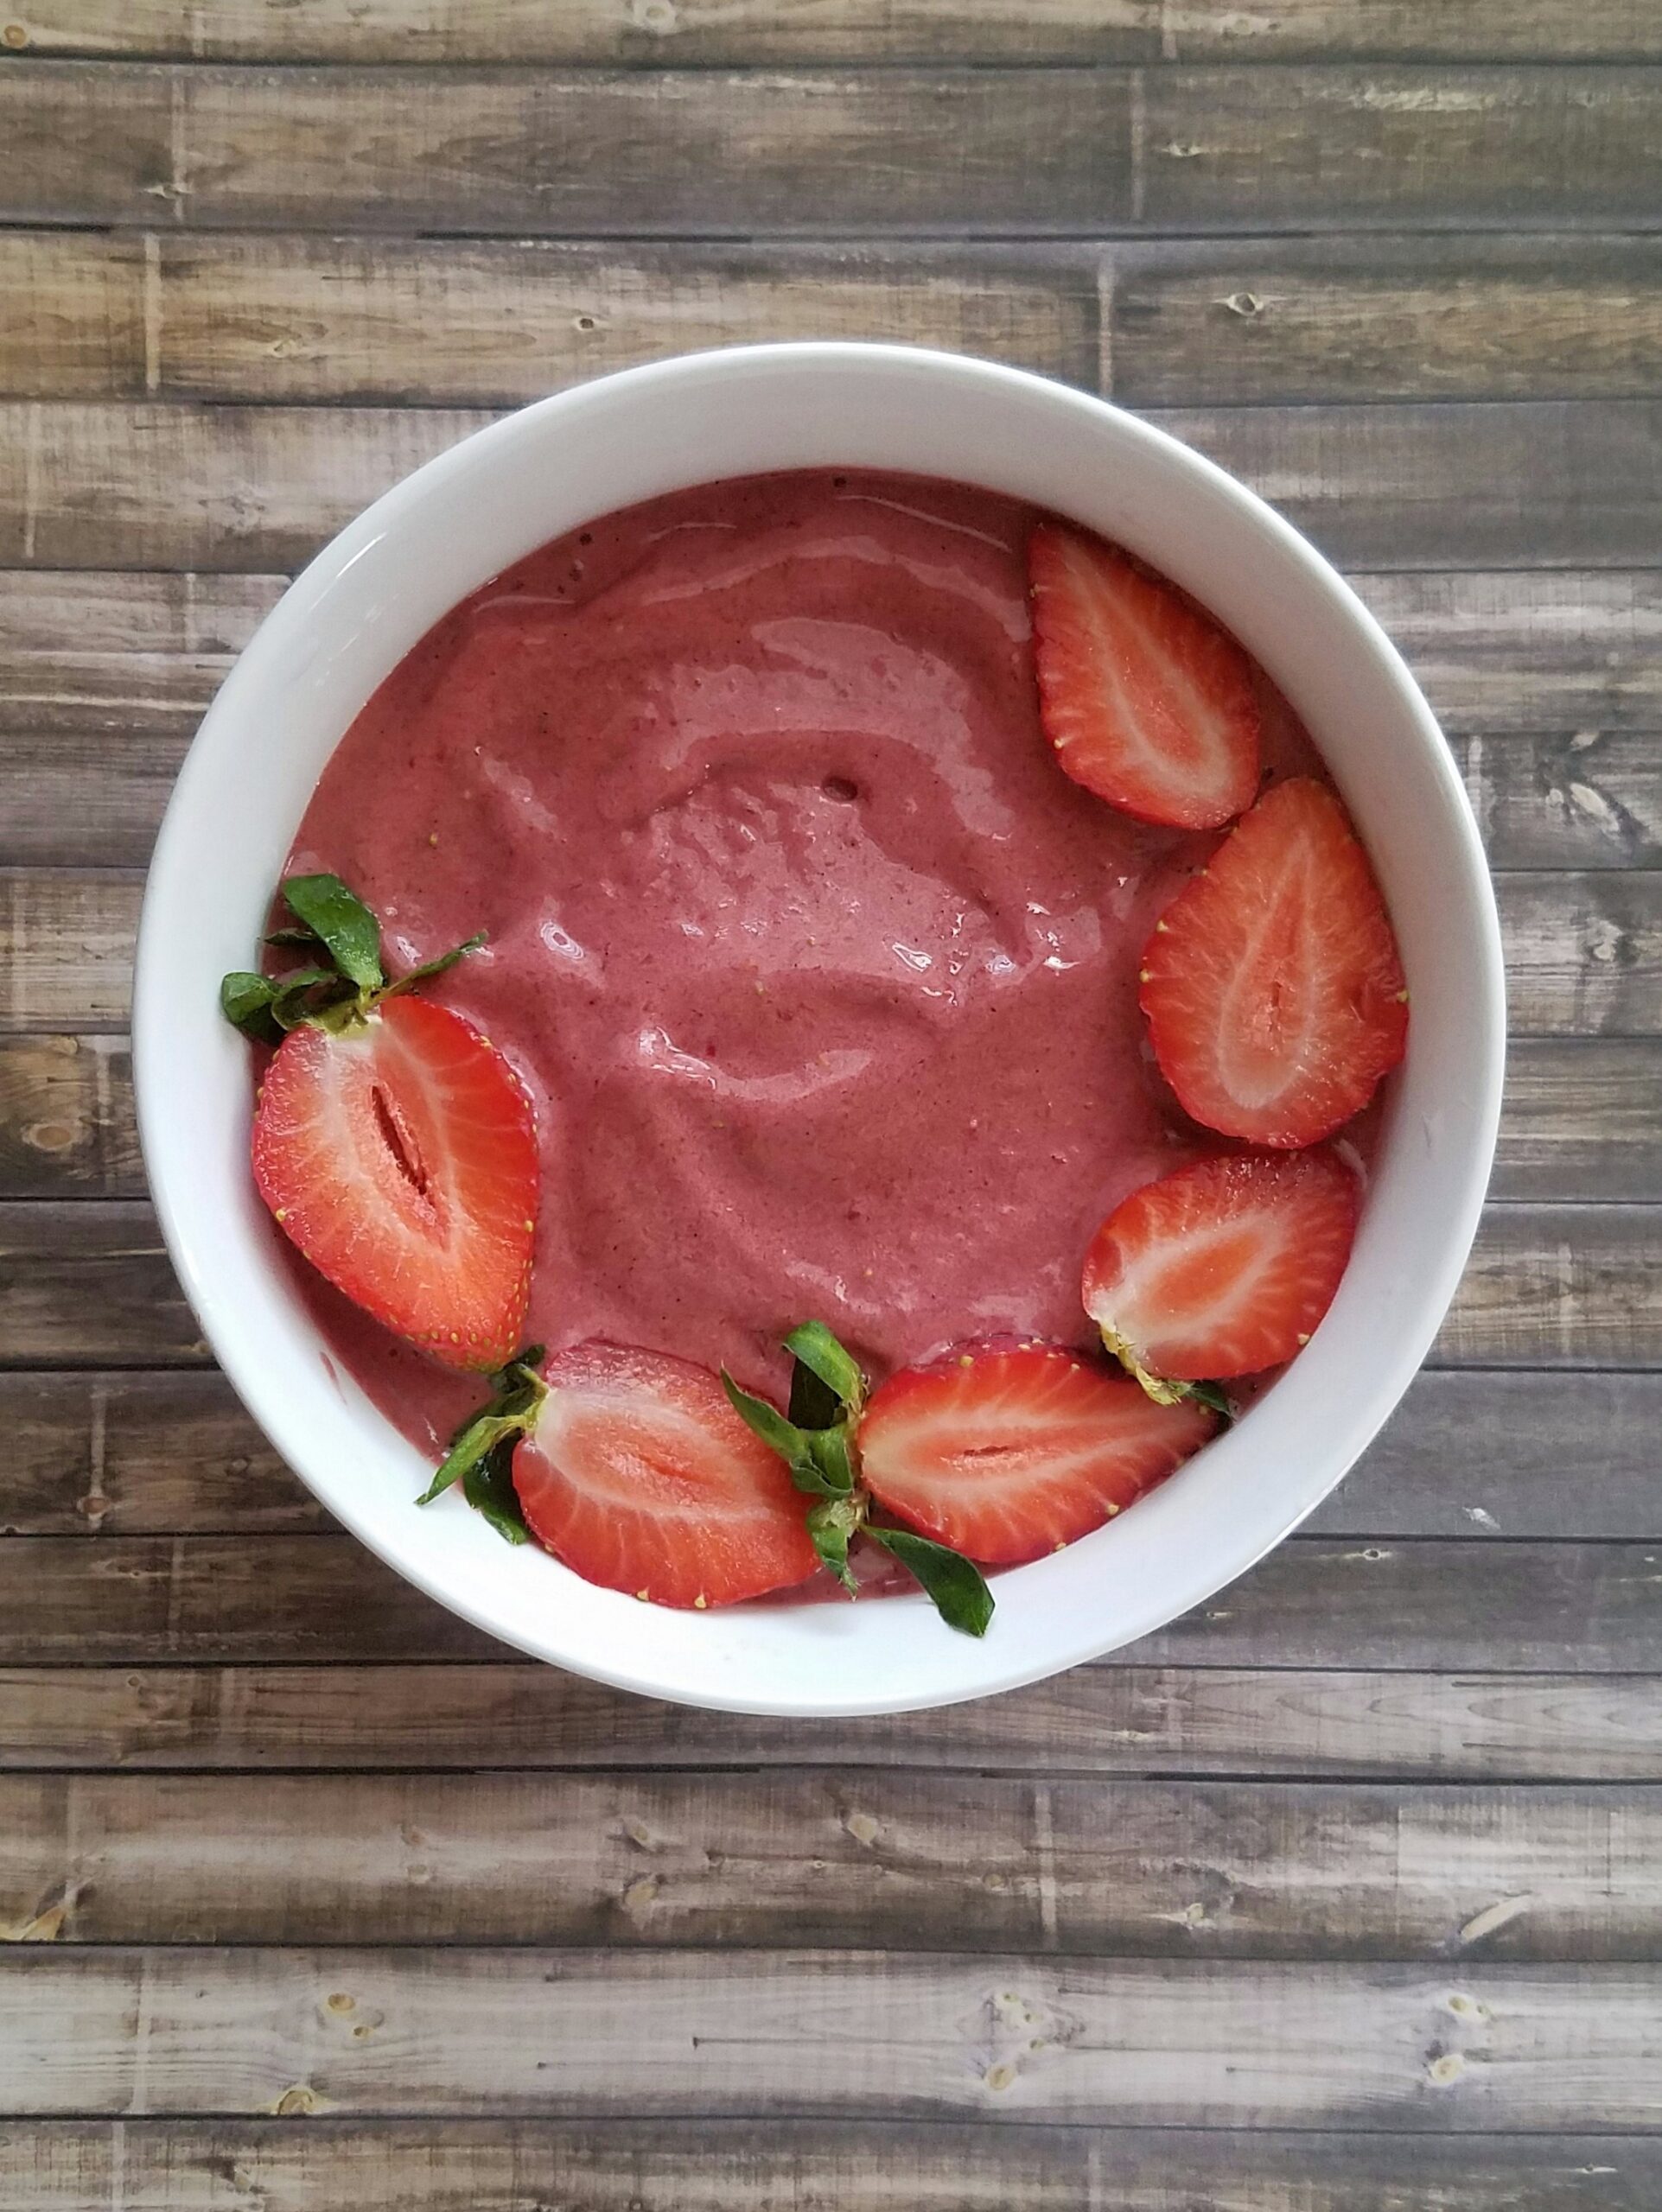
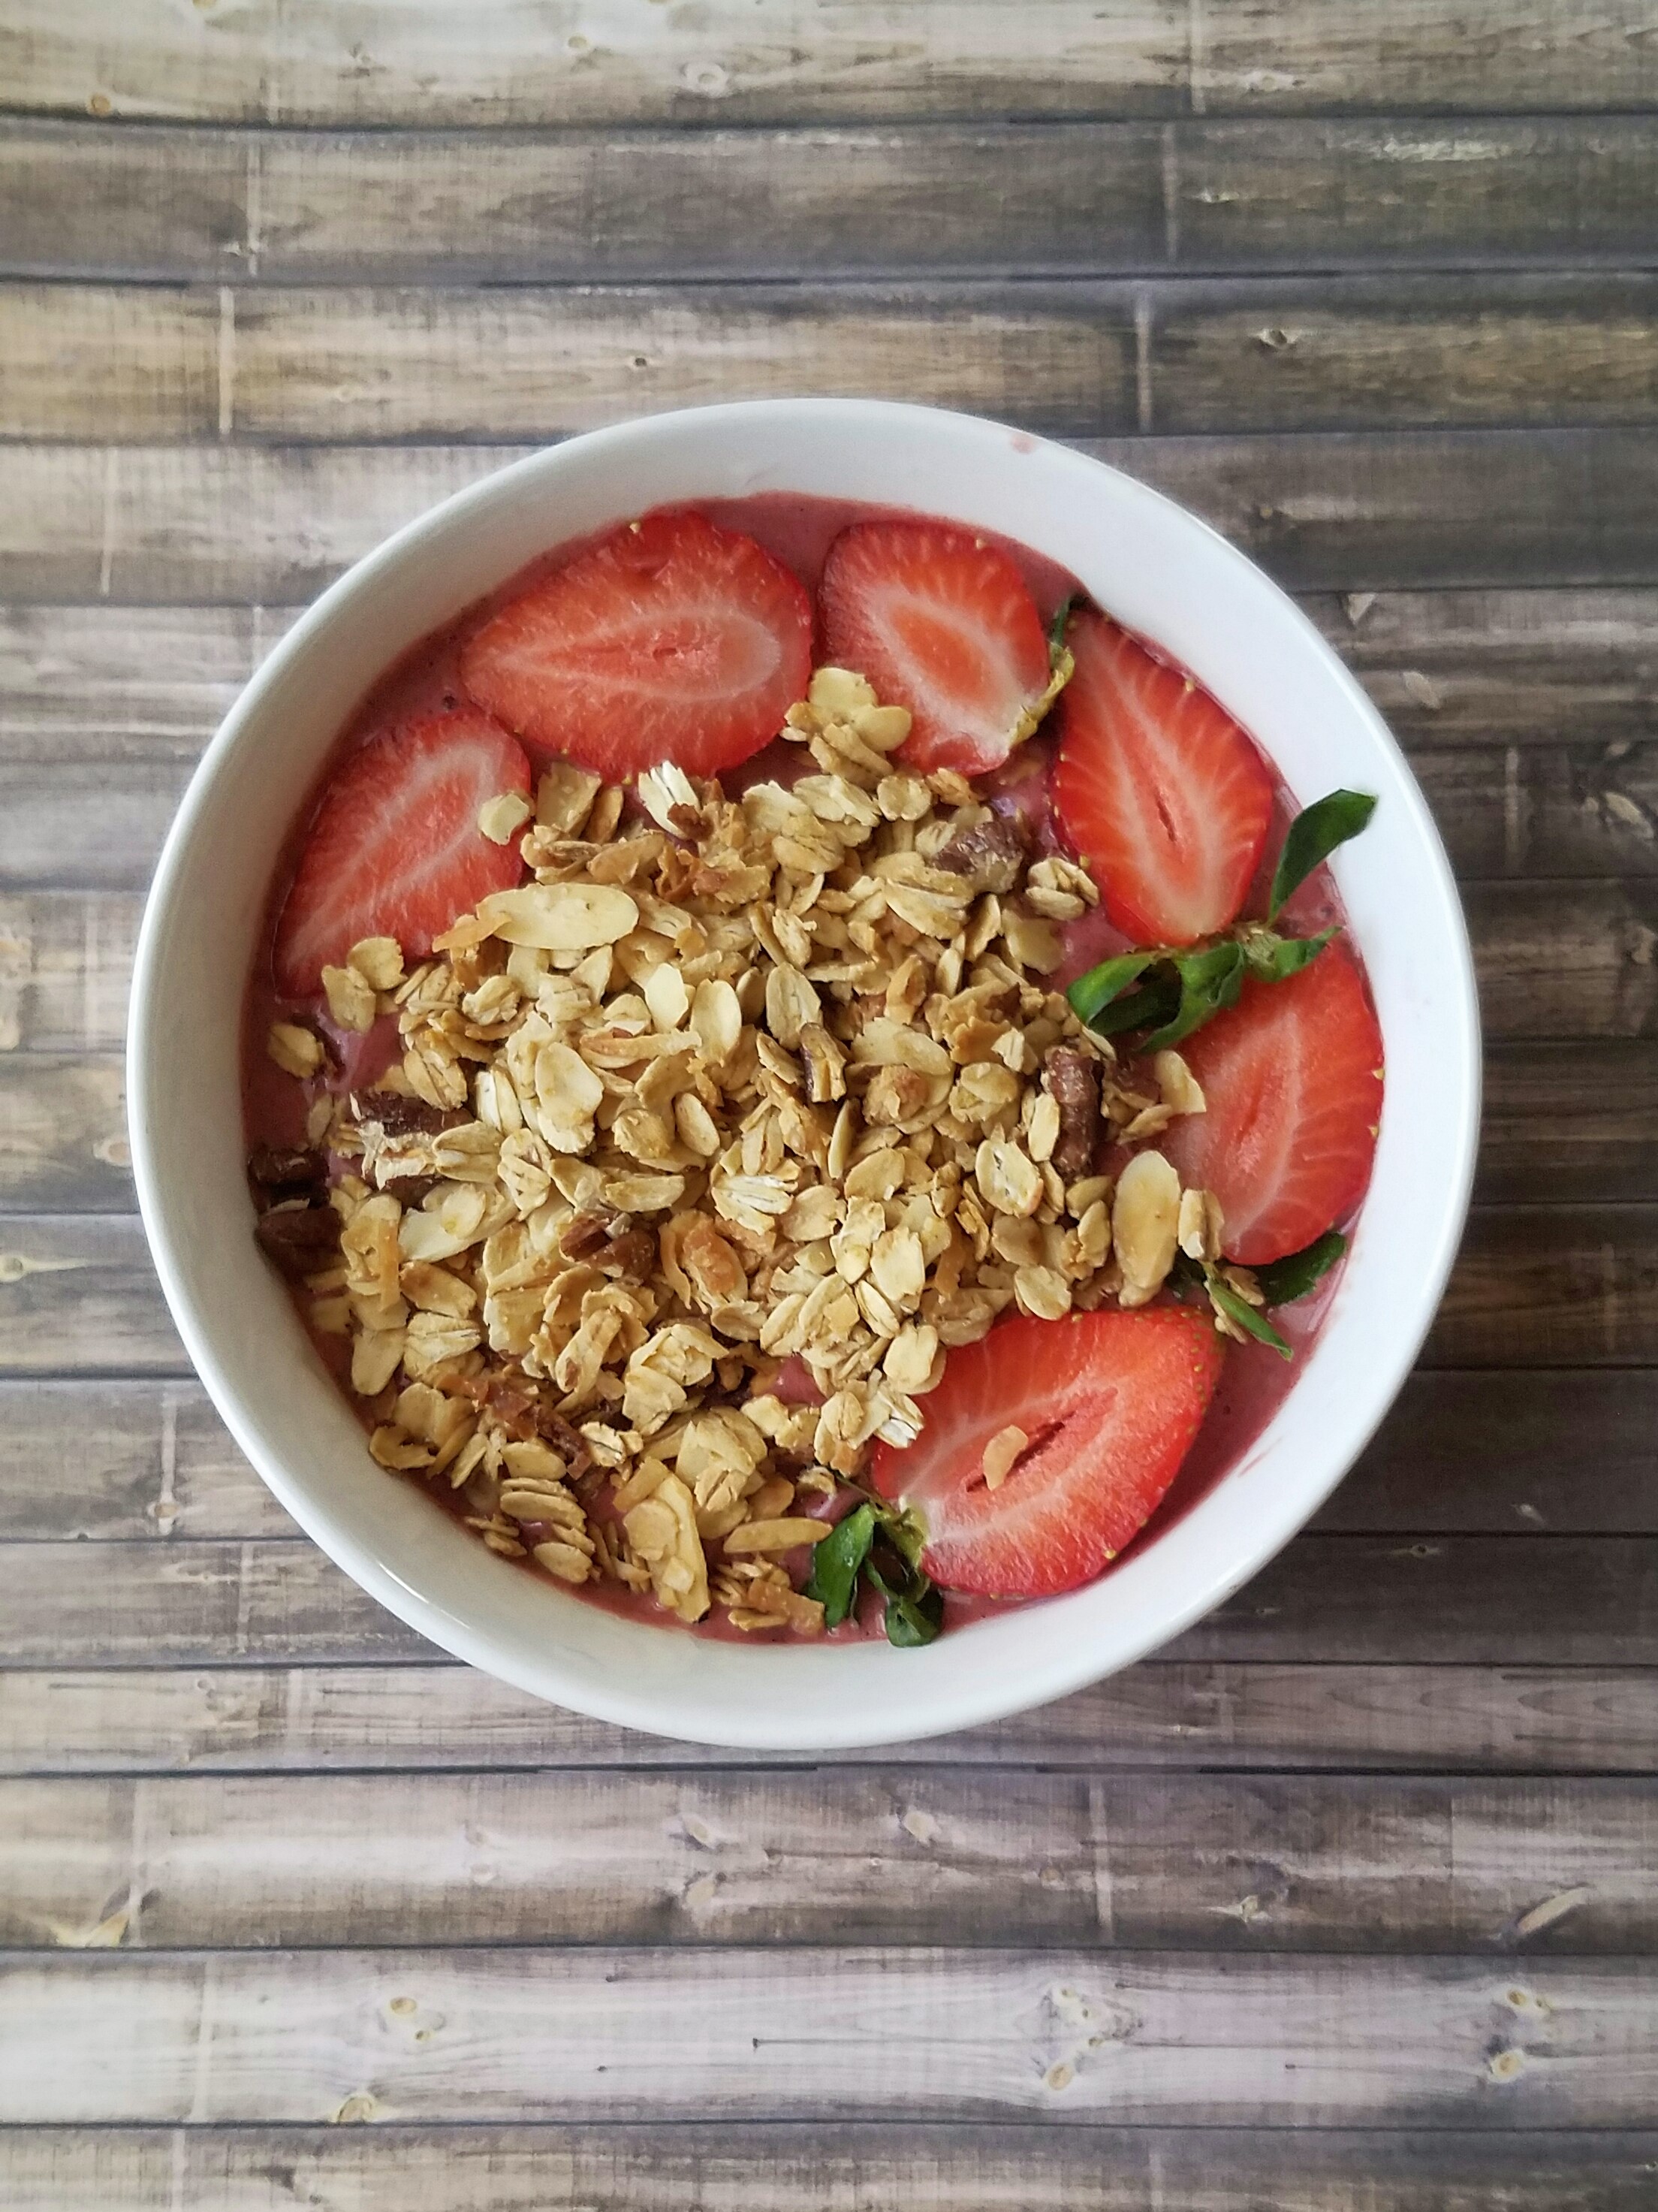
Hey, so, call me cheesy, but I made a Valentine’s Day themed smoothie bowl. I felt inspired by a smoothie I saw on Miami Wellness Club that used beets. You might have seen my smoothie bowl on my Instagram but I thought I’d catalog this recipe here on my blog.
I experimented with some beet juice that I had from Love Beets and used that as the liquid to get this beauty happening. You could also use the soaking liquid from home-cooked beets or plain nut milk. It is healthy, fruity, and made a meal with some protein powder. I used vanilla but I bet chocolate protein powder would taste equally delicious.
Let me know if you try this smoothie recipe out!
Valentine’s Day Smoothie Bowl
Recipe Type: Breakfast
Author: Melanie
Prep time:
Cook time:
Total time:
Serves: 1 smoothie
A bright pink (or red) smoothie bowl in honor of Valentine’s Day. It’s healthy and fruit-filled and makes for the perfect breakfast.
Ingredients
1 small frozen banana
1/2 cup frozen raspberries
1/2 cup sliced & frozen strawberries
1 serving of vanilla plant-based protein powder
1/2 cup Love Beets organic beet juice, more if needed
I know what it feels like to get major cravings all of a sudden and desire immediate satisfaction.
I try not to keep unhealthy snacks or desserts around my house because I do not want the temptation.
Sure, I could make myself a healthy dessert but the thought of going through a lengthy process to whip up something is not always appealing. Plus, what would I do with the leftovers? Or, more likely, the problem will be that there are no leftovers.
Sometimes I have no self-restraint 🙈
Thus, I have created a treat to satisfy the quick snack cravings in a way that won’t leave you feeling yucky from an overindulgent dessert.
I cover all the sweet treat bases:
Warm
Crispy
Fruity
Peanut-buttery
Crunchy (Wait, is that the same as crispy? Nope!)
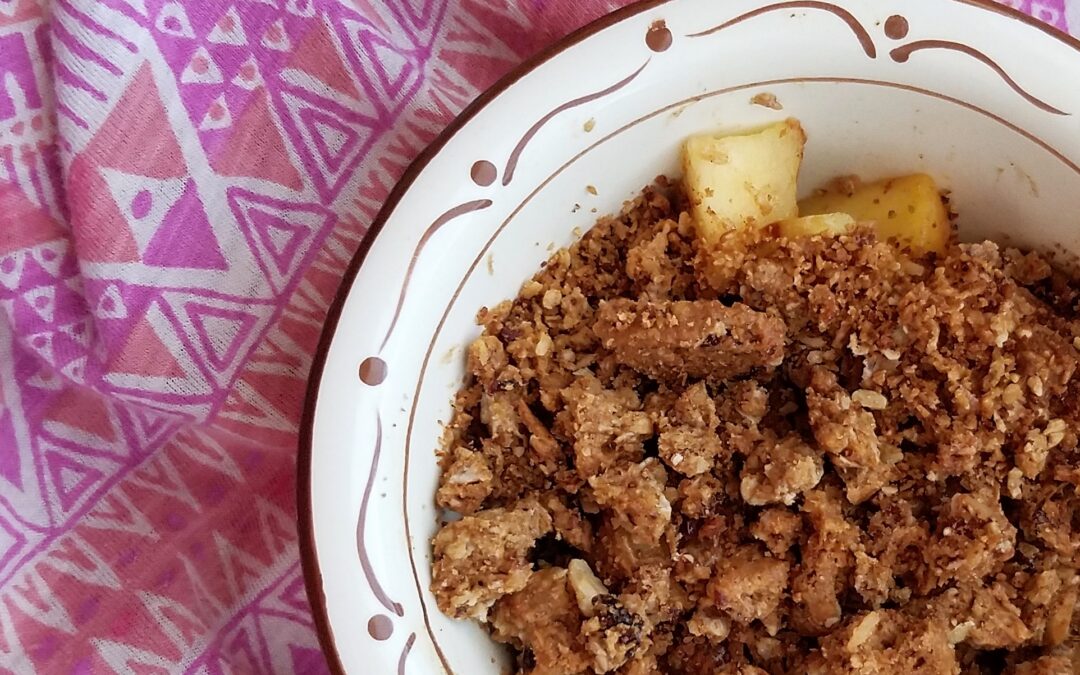
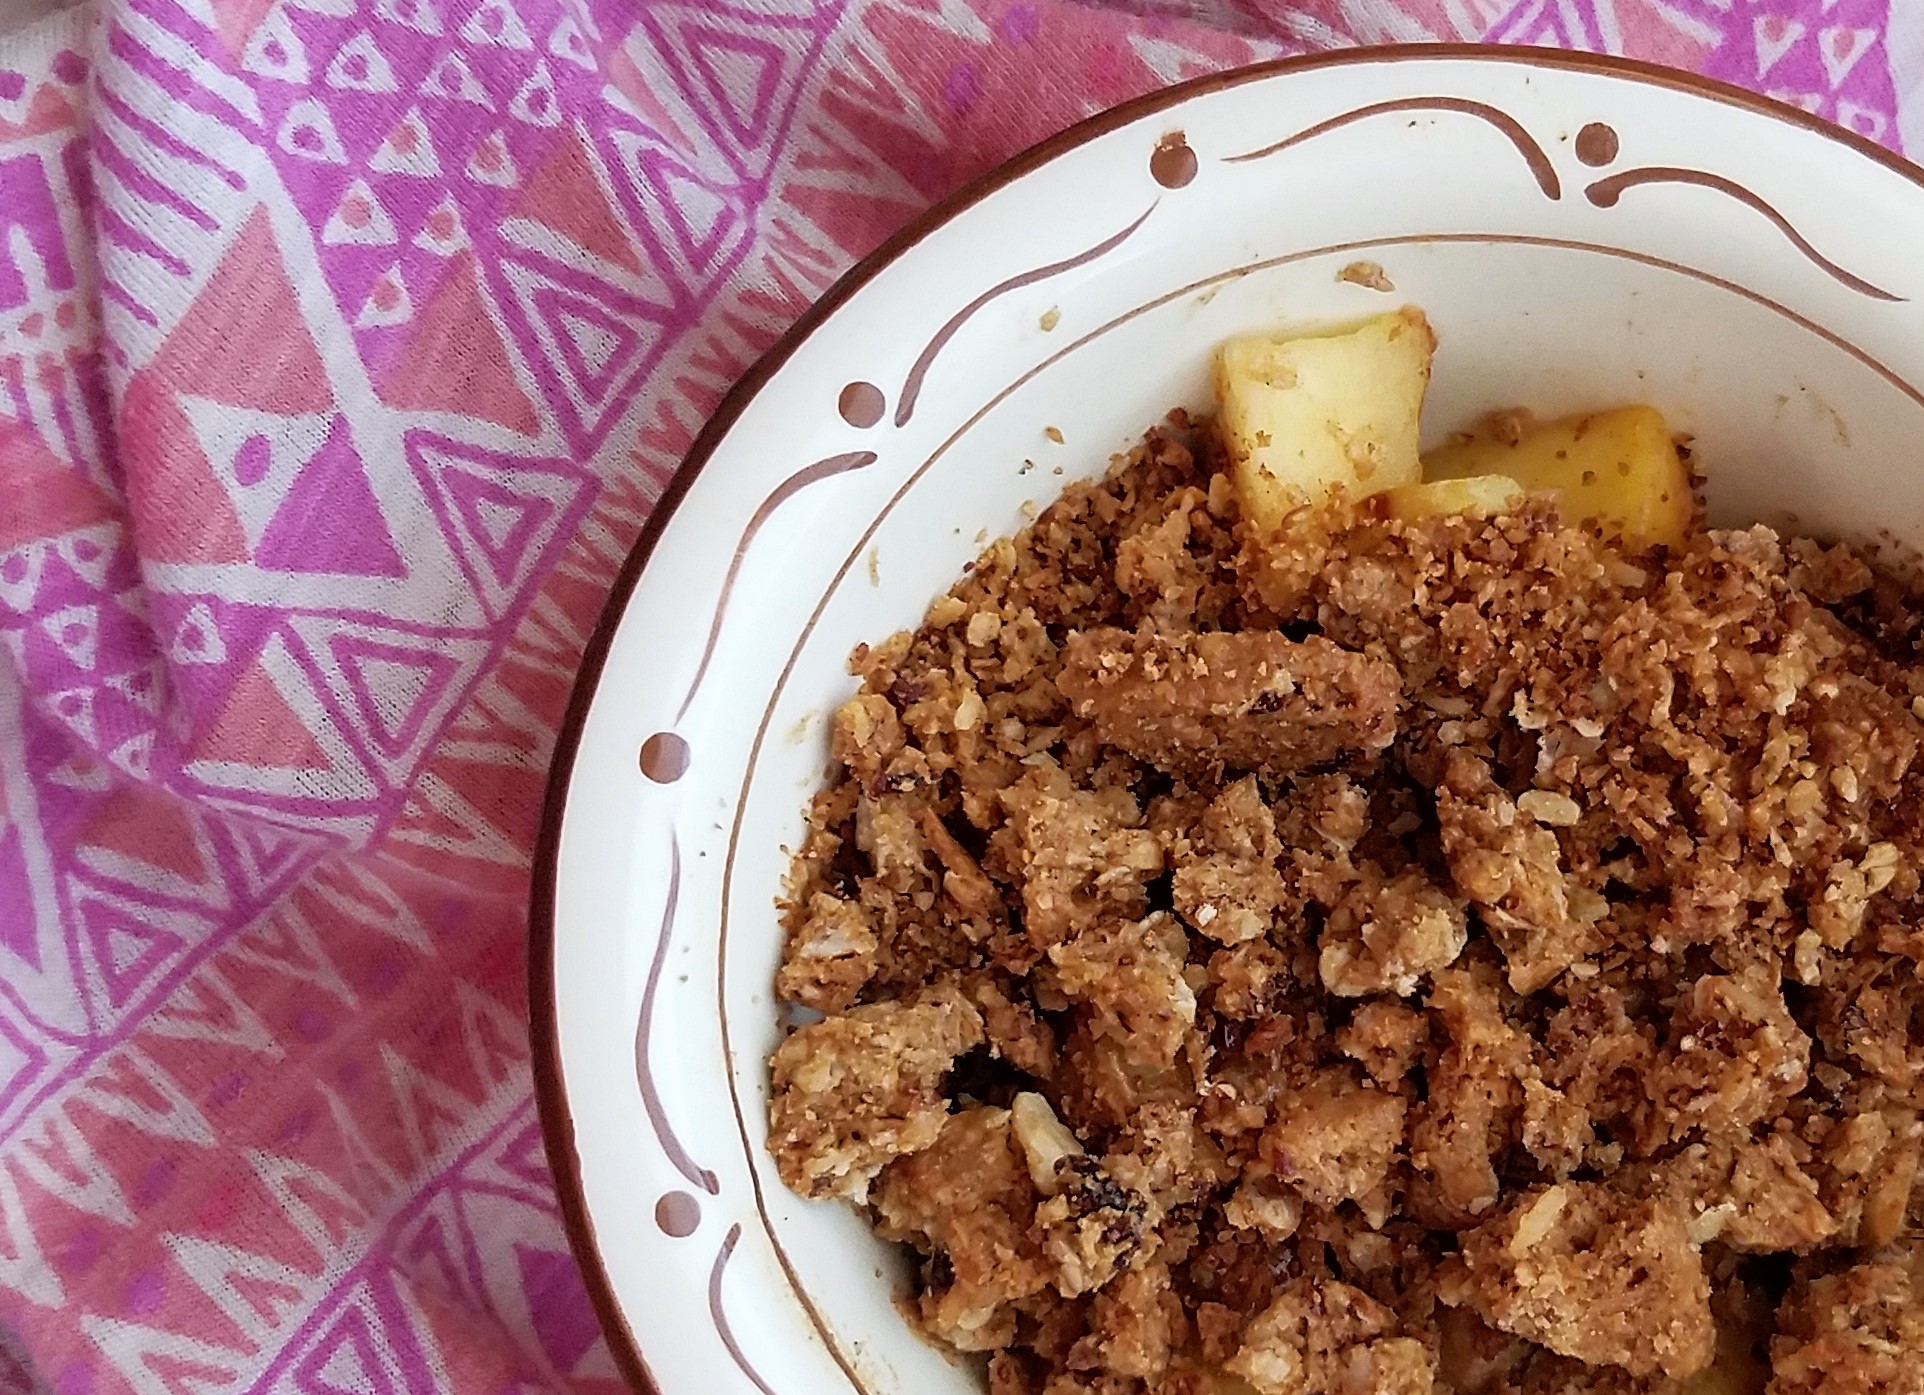
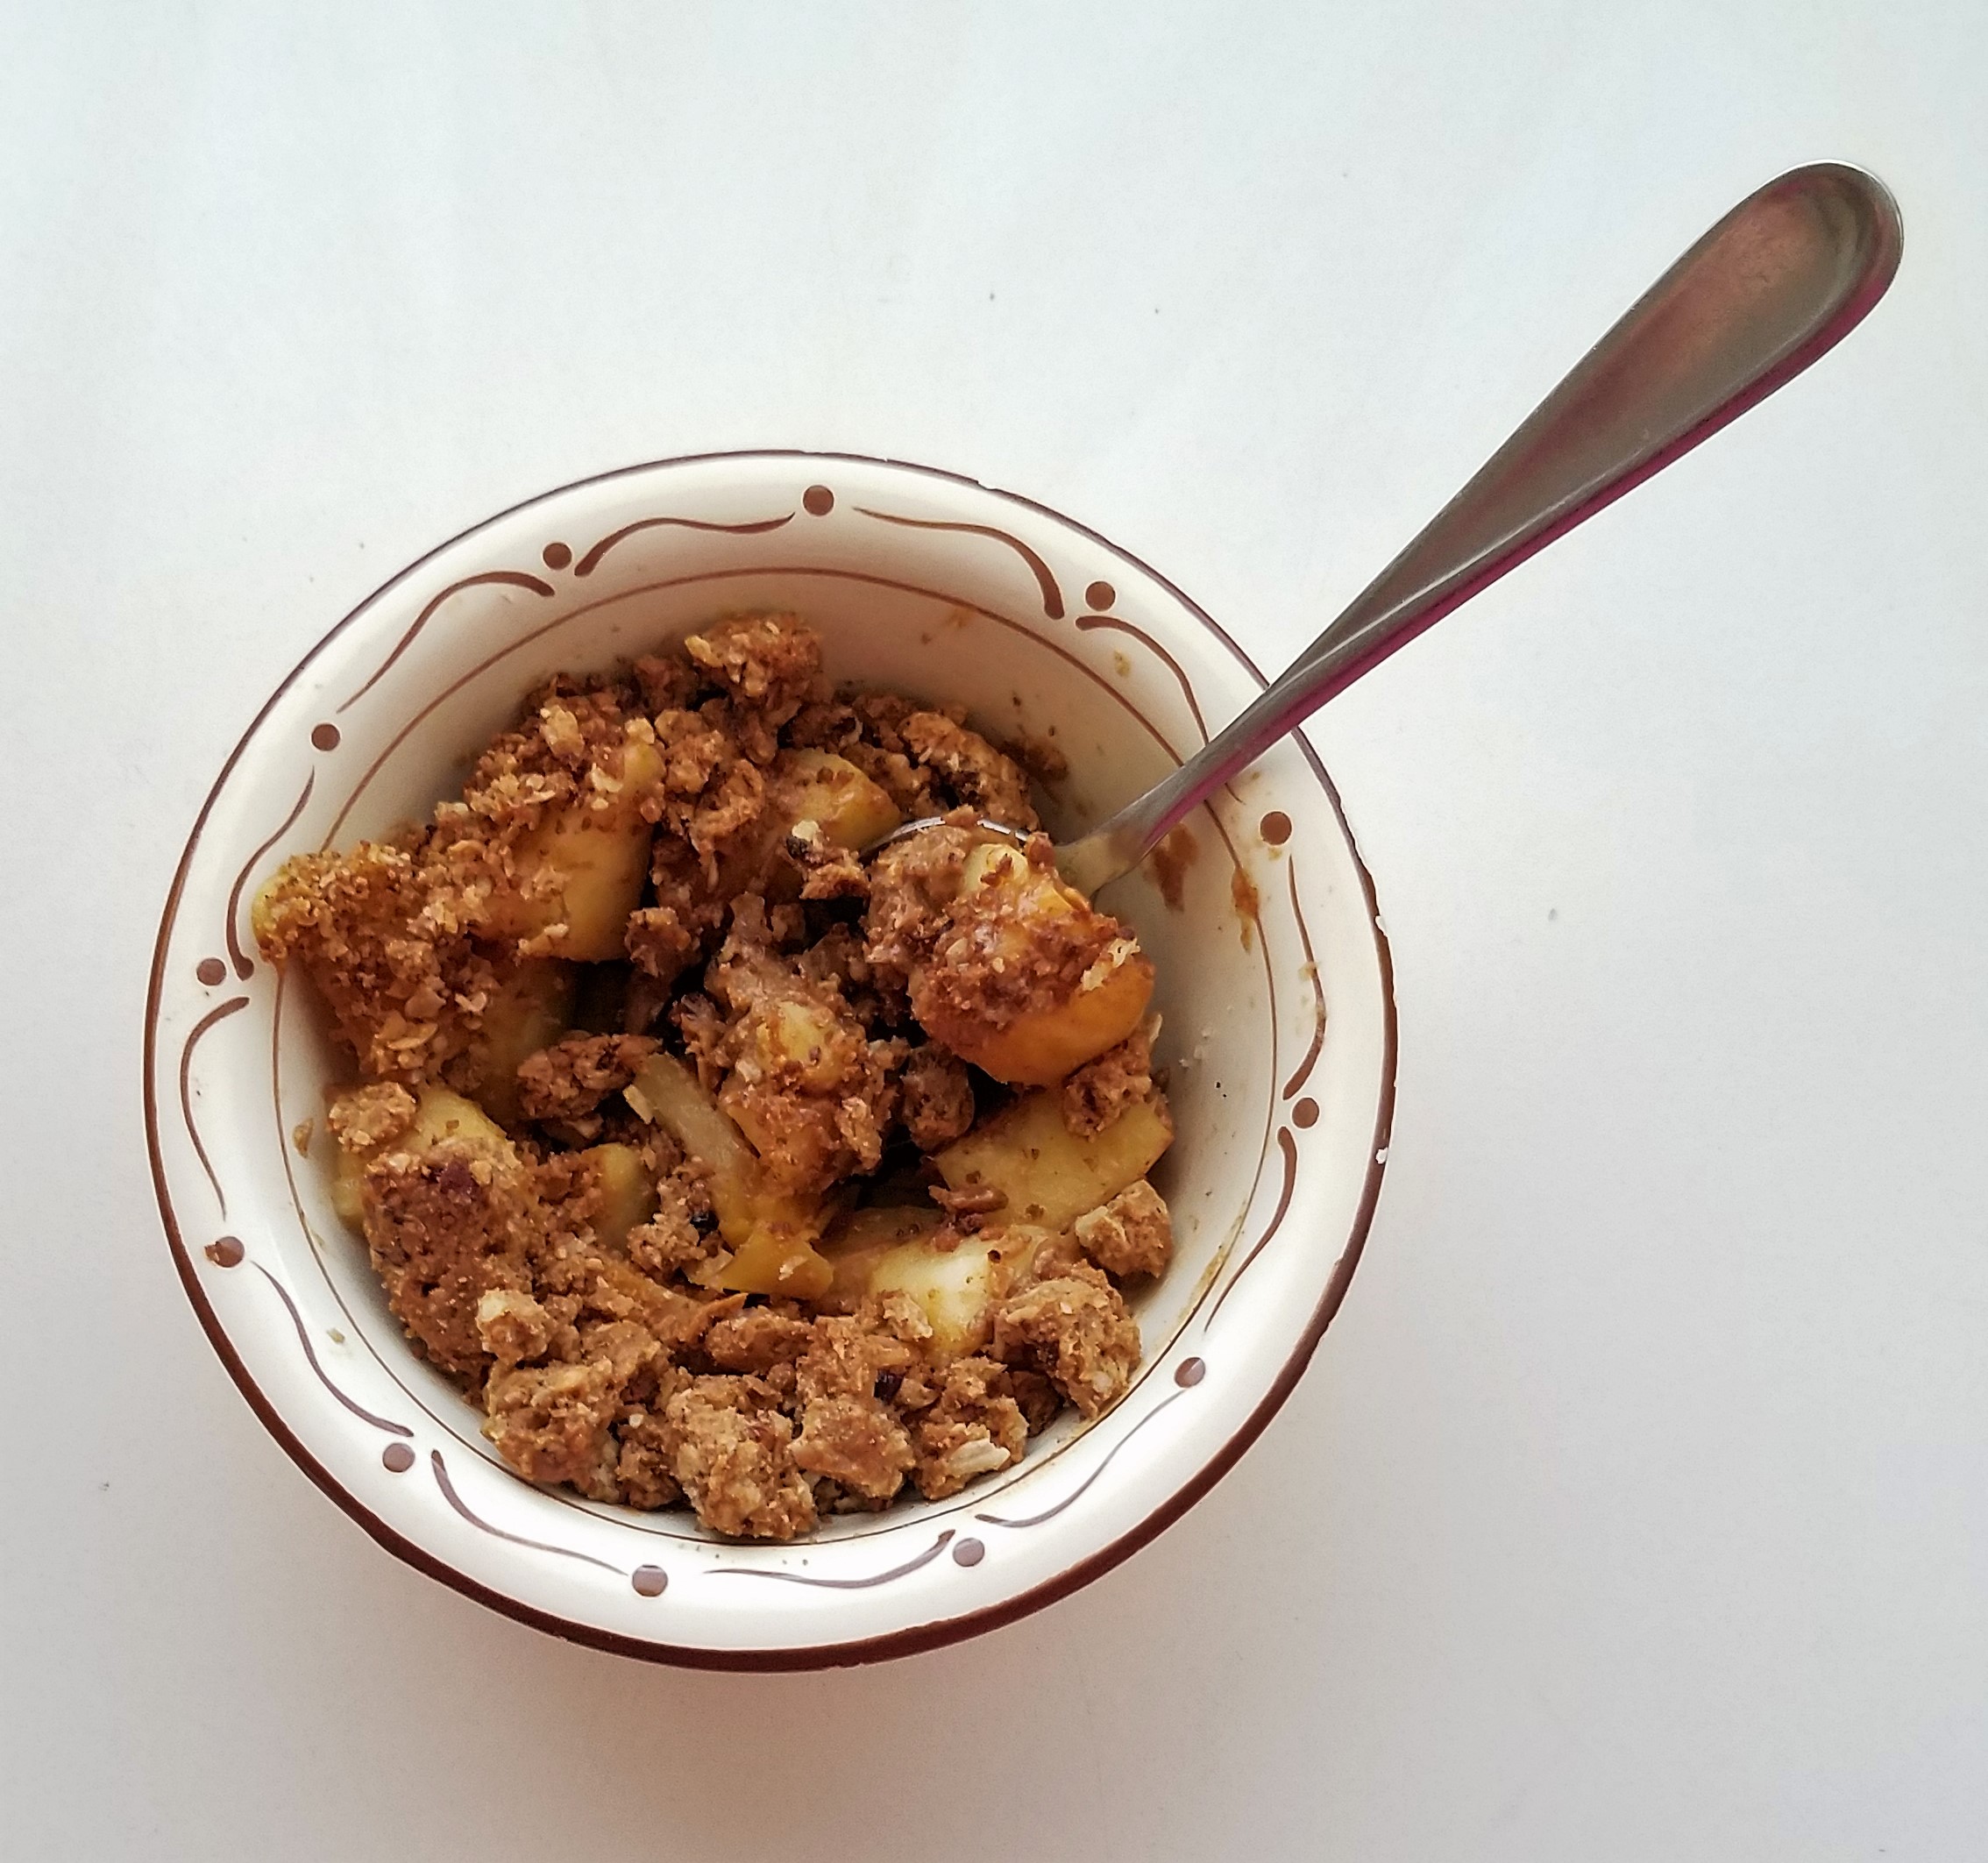
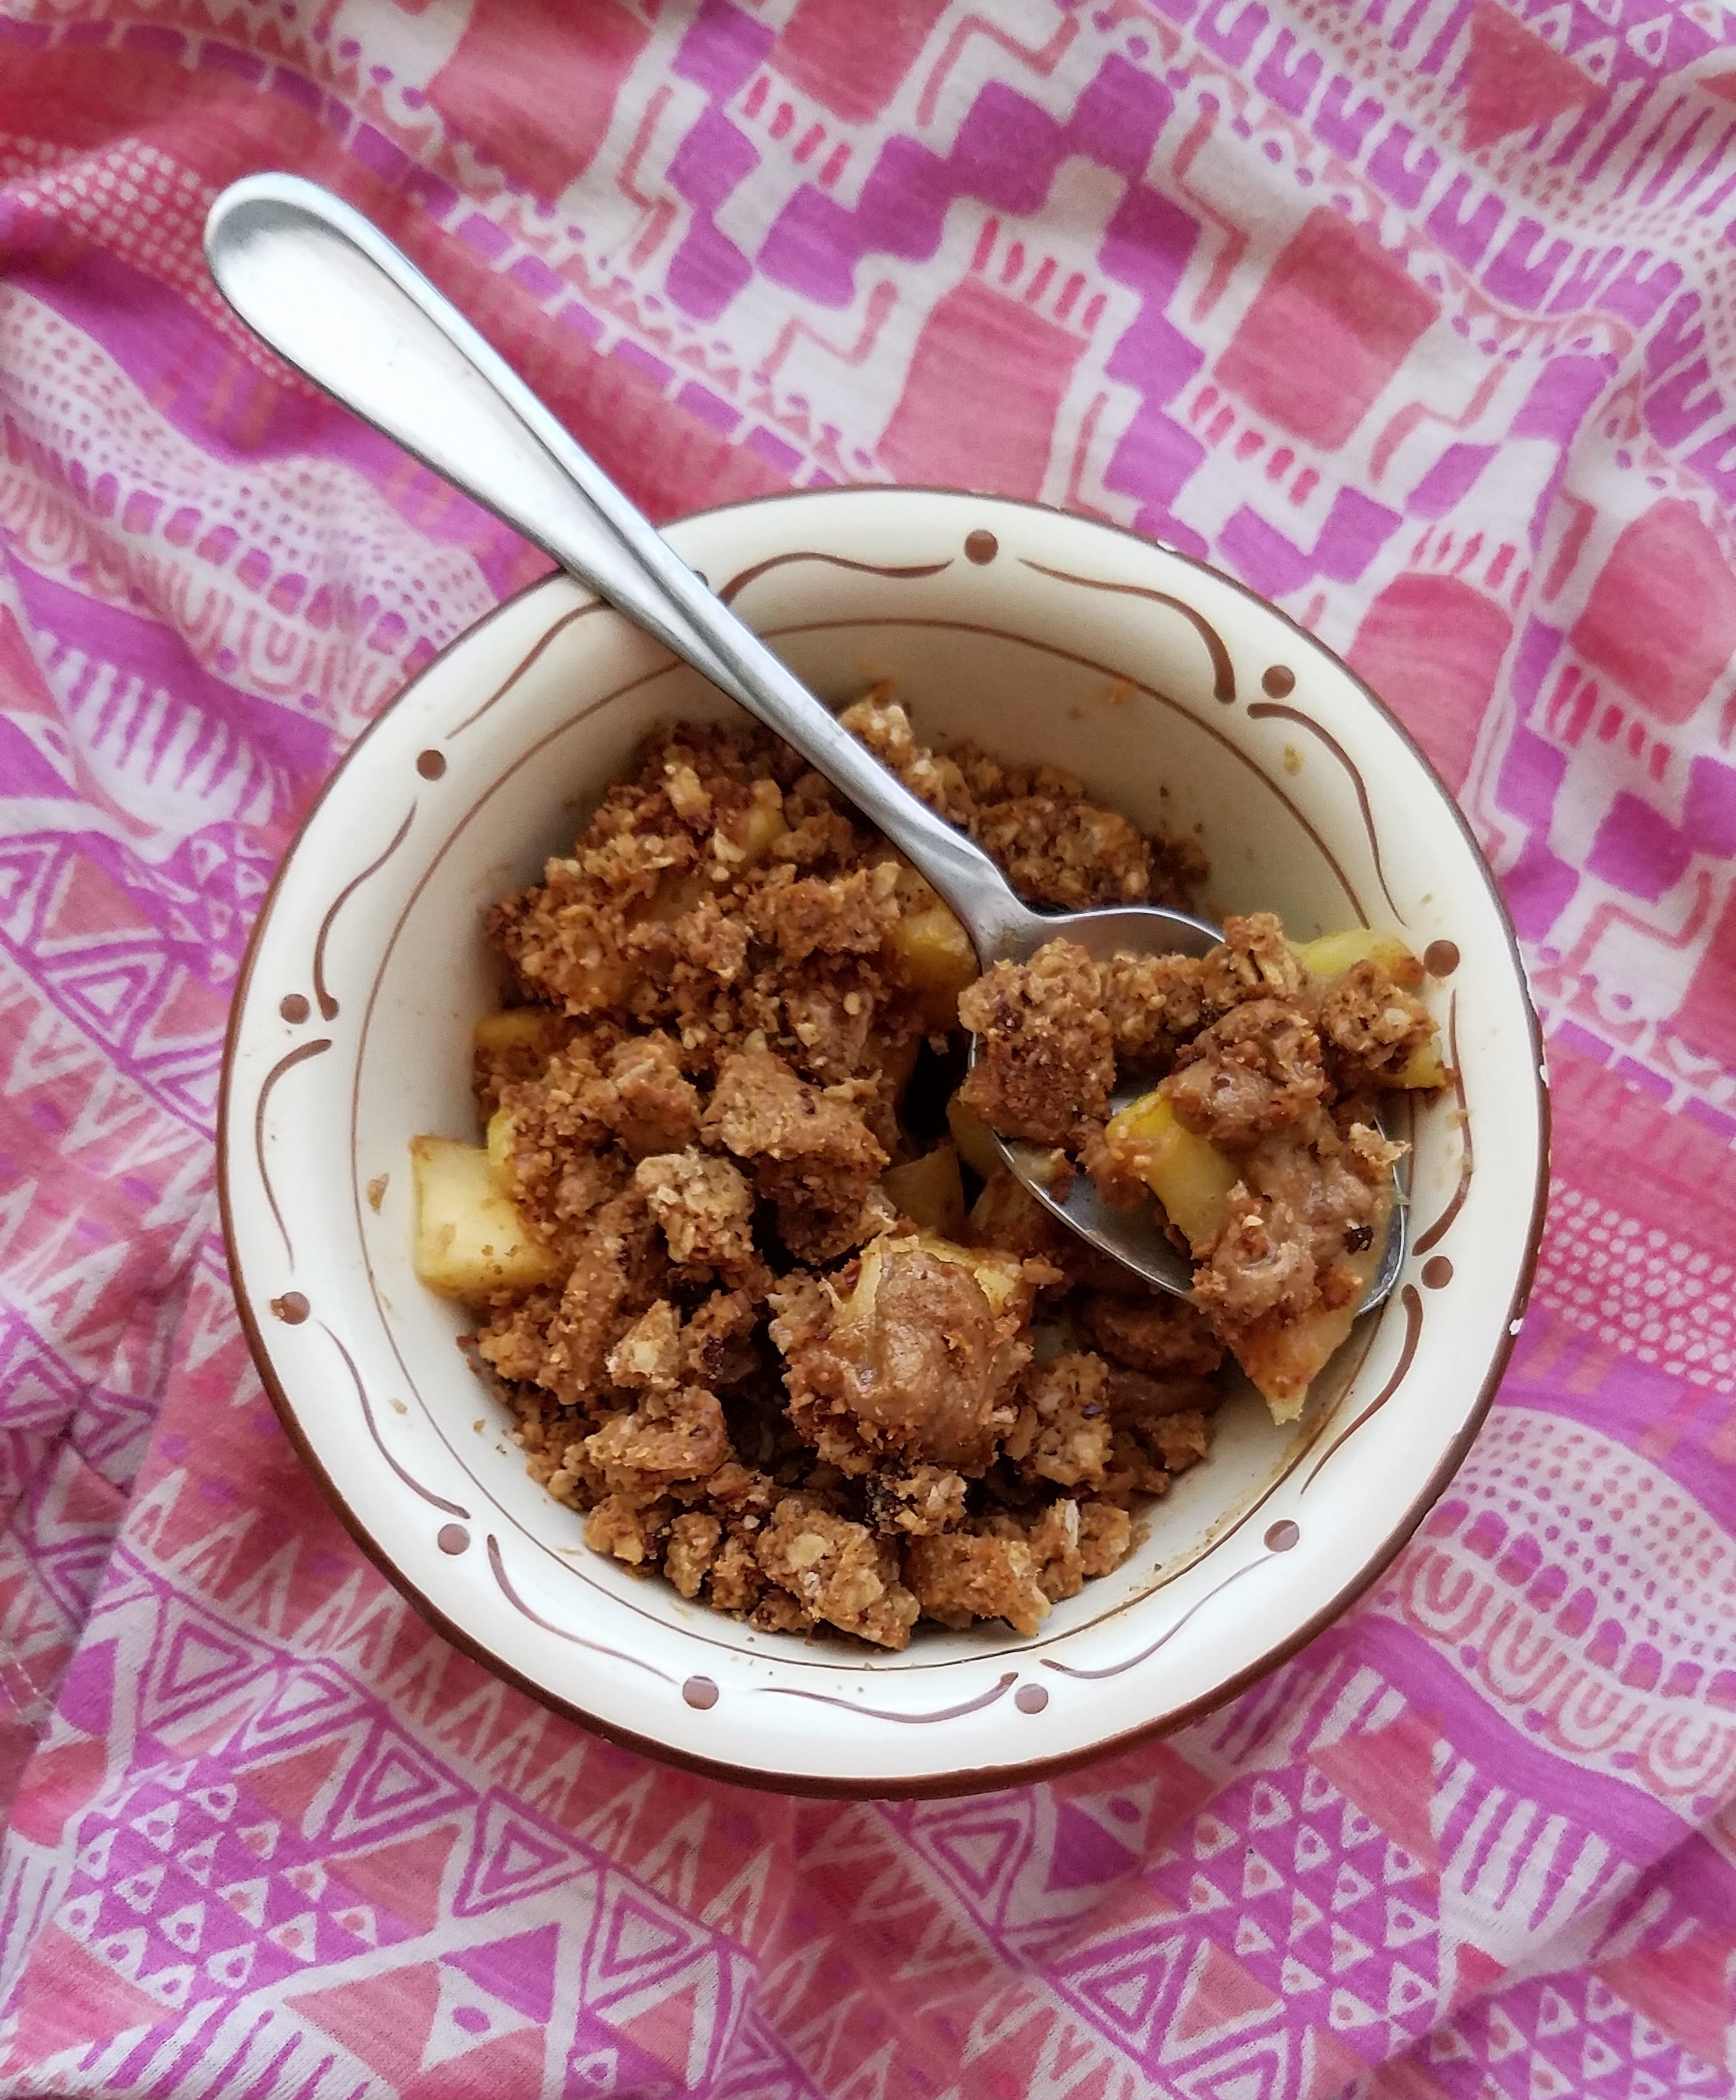
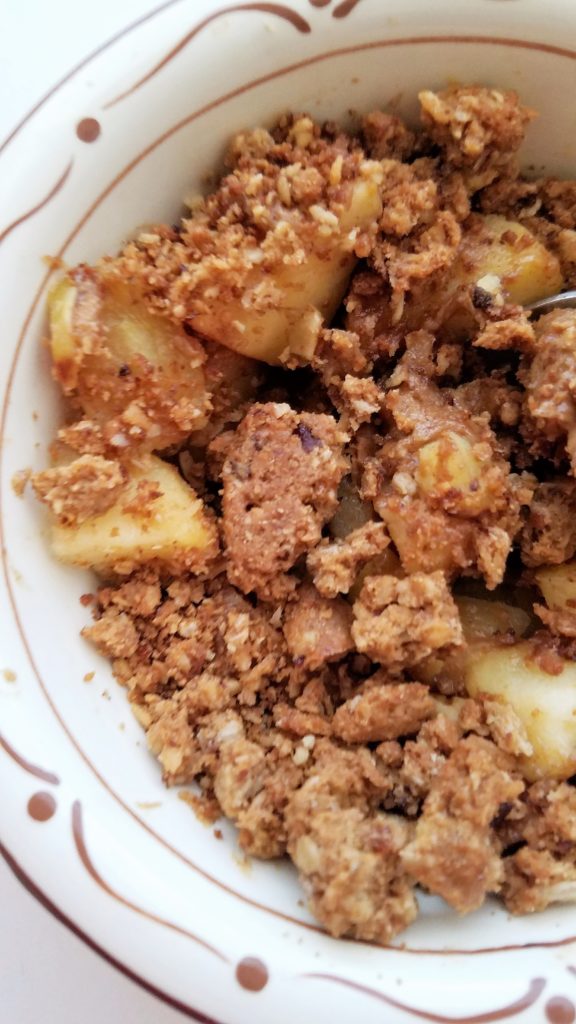
The most delicious crisp texture comes from broken down Ginnybakes cookies. They are very firm, gluten-free cookies. I personally like microwaving them for a few seconds to soften them up, if I’m going to eat them on their own, but their hockey-puck like texture is perfect for adding crunch to this dessert snack!
Also, in the recipe, I used half of a large Gala apple but feel free to use an entire apple if you don’t want to leave half of an apple lying around. Alternatively, double the recipe and share the snack-sized crisp with a friend! 😉
I’m aaaall ready to dive headfirst into this easy to assemble snack! Let’s go!
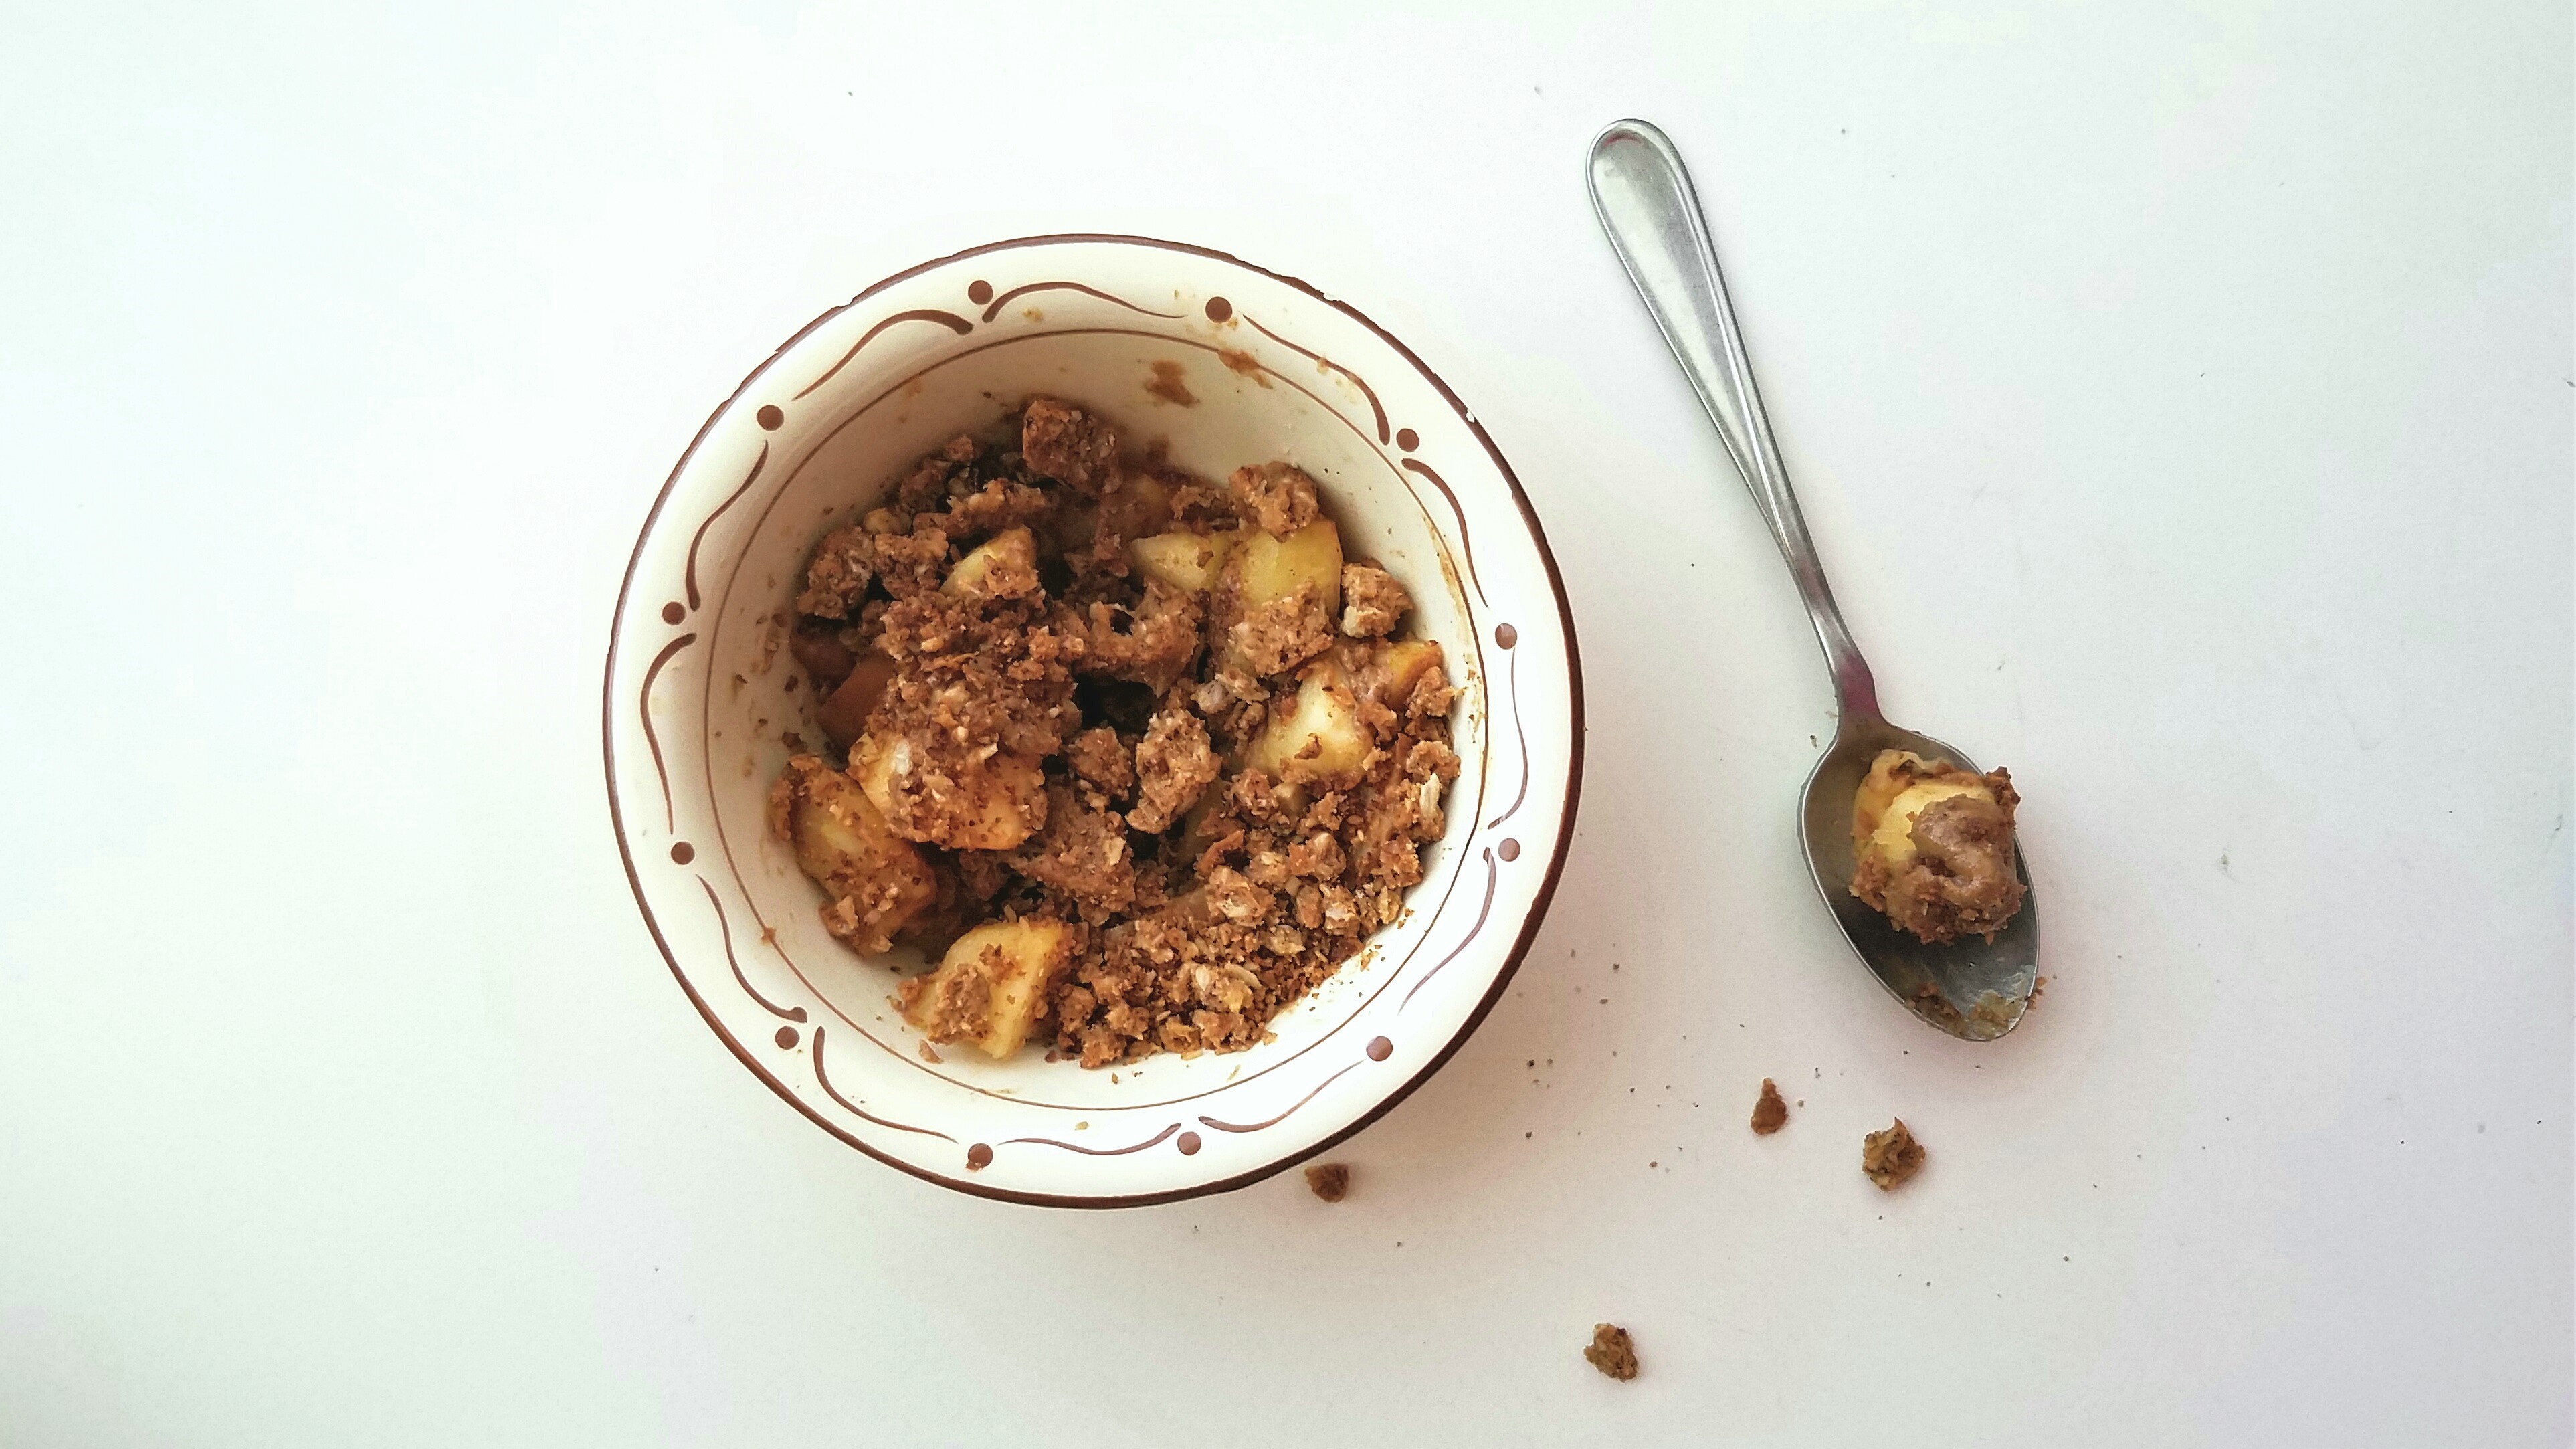
5 Minute Peanut Butter Apple Crisp for One
Recipe Type: Snacks
Author: Melanie
Prep time:
Cook time:
Total time:
Serves: 1 serving
A quick and easy apple crisp that is healthy enough for a snack and filling enough to satisfy a sweet tooth for dessert.
Ingredients
½ tsp of Nutiva butter flavored coconut oil or plain coconut oil
½ a large Gala apple or apple of choice, chopped
1/8 tsp cinnamon
2 Ginnybakes Coconut Oatmeal Bliss Cookies*
2 tsp of peanut butter (I used Wild Friends Pumpkin Spice peanut butter)
Instructions
In a small, nonstick pan, warm up the coconut oil over medium heat.
Add chopped apples and sprinkle with cinnamon. Stir the apples around in the pan until warm. Pour apples into a serving bowl.
Place the nonstick pan back on the stove, turning the temperature down to the lowest heat. On a cutting board, chop up the 2 cookies until there is a mixture of fine and medium-sized crumbs.
Add cookie crumbs to the pan and turn off the flame. Let sit for 1 minute, swirling the crumbs every few seconds. The crumbs should already be crunchy so they just need to warm up.
While the crumbs warm from the heat of the pan, add the 2 teaspoons of peanut butter to the cinnamon apples and stir until coated.
Remove the pan from the stove and pour cookie crumbs over the apple-peanut butter mixture. Pat yourself on the back and eat!
Notes
*You can use another crunchy cookie of your choosing. The classic Nature Valley granola bars are the kind of firm, crispness that you’re looking for. Alternatively, you can sub 2 tbsp of pre-made granola for the cookie crumbs.
We use cookies on our website to give you the most relevant experience by remembering your preferences and repeat visits. By clicking “Accept”, you consent to the use of ALL the cookies.
This website uses cookies to improve your experience while you navigate through the website. Out of these, the cookies that are categorized as necessary are stored on your browser as they are essential for the working of basic functionalities of the website. We also use third-party cookies that help us analyze and understand how you use this website. These cookies will be stored in your browser only with your consent. You also have the option to opt-out of these cookies. But opting out of some of these cookies may affect your browsing experience.
Necessary cookies are absolutely essential for the website to function properly. These cookies ensure basic functionalities and security features of the website, anonymously.
Cookie
Duration
Description
cookielawinfo-checbox-analytics
11 months
This cookie is set by GDPR Cookie Consent plugin. The cookie is used to store the user consent for the cookies in the category "Analytics".
cookielawinfo-checbox-functional
11 months
The cookie is set by GDPR cookie consent to record the user consent for the cookies in the category "Functional".
cookielawinfo-checbox-others
11 months
This cookie is set by GDPR Cookie Consent plugin. The cookie is used to store the user consent for the cookies in the category "Other.
cookielawinfo-checkbox-necessary
11 months
This cookie is set by GDPR Cookie Consent plugin. The cookies is used to store the user consent for the cookies in the category "Necessary".
cookielawinfo-checkbox-performance
11 months
This cookie is set by GDPR Cookie Consent plugin. The cookie is used to store the user consent for the cookies in the category "Performance".
viewed_cookie_policy
11 months
The cookie is set by the GDPR Cookie Consent plugin and is used to store whether or not user has consented to the use of cookies. It does not store any personal data.
Functional cookies help to perform certain functionalities like sharing the content of the website on social media platforms, collect feedbacks, and other third-party features.
Performance cookies are used to understand and analyze the key performance indexes of the website which helps in delivering a better user experience for the visitors.
Analytical cookies are used to understand how visitors interact with the website. These cookies help provide information on metrics the number of visitors, bounce rate, traffic source, etc.
Advertisement cookies are used to provide visitors with relevant ads and marketing campaigns. These cookies track visitors across websites and collect information to provide customized ads.