Have you ever wondered how to make your smoothies ultra thick and fluffy but just end up with a flat fruity liquid? Stay tuned for my top fluffy smoothie tips!
As I write this, I’m currently at home, in my comfy clothes, and with a mouth full of stitches. Okay, that sounds dramatic but, with all seriousness, I did just get my wisdom teeth removed. I know the thought of dentists and teeth weirds some people out so go ahead and skip to the bottom if you’re just here for the recipe.
Ever since November of last year, I knew 2018 was going to be the year I would get my wisdom teeth removed. My dentist has been telling me they were surfacing and close to pushing on my other teeth. So, after my last dental check-up, I just bit the bullet and made an appointment.
I’ve never had cavities or any big problems with my teeth so I can’t say I had too many concerns going in. Obviously the pain was concerning. Also, the fact that I would need to take some days off of work for recuperation was concerning (since I’m currently on my first year probationary period). Though, the real fright came the day of my wisdom teeth extraction when I got some news sprung on me.
While I was prepared to get all four of my teeth pulled out, I was not prepared for was the information my dentist gave me that day. Apparently, my two bottom teeth were literally grazing the top of a very sensitive nerve canal in my jaw. Basically, my dentist said, if the nerve gets damaged during the extraction, I could end up with numbness for a few weeks, months, or even a lifetime.
Perfect timing to break this to me, doc.
The chances were super slim. Apparently 99% people who have that occur will regain feeling within six months. So, I mean, my wisdom teeth were still wreaking havoc in my mouth… I figured I just needed to go through with the procedure as planned.
Thankfully, I’m here three days later and I’m okay. My cheeks are super swollen but I hardly have pain so that is good. I was even able to eat some solid (but soft) food today! Yay!
Let’s keep up the spirit of celebration by talking about this Sweet and Fluffy Smoothie Bowl, yeah?
Sometimes a drinkable smoothie is good. Sometimes a thick frozen puree is calling my name. And sometimes, I’m craving a fluffy cloud for breakfast. Anyone else?
If you have trouble getting your smoothie fluffy, use these ingredients:
Frozen banana – a usual suspect in smoothies but undeniably the best creamy and naturally sweet addition.
Chia seeds – add a tablespoon to your smoothie liquid (milk or water) to soak before adding the rest of your ingredients. Trust me. The soaked chia makes ALL the difference.
Ground flaxseed – follow the same method for the chia seeds for an easy, nutritious way to add body to a smoothie.
Frozen mango – serves to add thickness and fluff, and sweetness, just like banana.
Frozen cauliflower – the trendy fruit-free smoothie thickener. When mixed with other berries, spices, or flavored powders, it will remain unrecognizable in your smoothie. Try my Sweet Potato Cinnamon Peach Smoothie!
Frozen zucchini – you’ve seen me use this in previous smoothies like my Green Banana Tahini Shake and Zucchini Smoothie Bowl. I love using this light and easily digestible vegetable to give my smoothie some body.
Protein powder – it’s hard to get a fruit-only smoothie to be fluffy but add in some protein powder and suddenly it becomes a thick shake-like texture.
And for a new fluffy smoothie ingredient discovery of mine…oat milk!
Oat milk – make your own by soaking half a cup of dry rolled oats in 2-3 cups of water. Blend and strain as you would nut milk (reserve the oat pulp for overnight oats!). The starchiness from the oats releases into the water which helps add incredible thickness to any smoothie.
This list of ingredients is not comprehensive but it does include my go-to choices for making a delicious, thick smoothie. Tinker around with whichever ingredients sound good to you. Mix one or two with your favorite fruit or greens and let me know what you think!
If you want a little inspiration for how to combine some of these fluff-boosters then look no further.
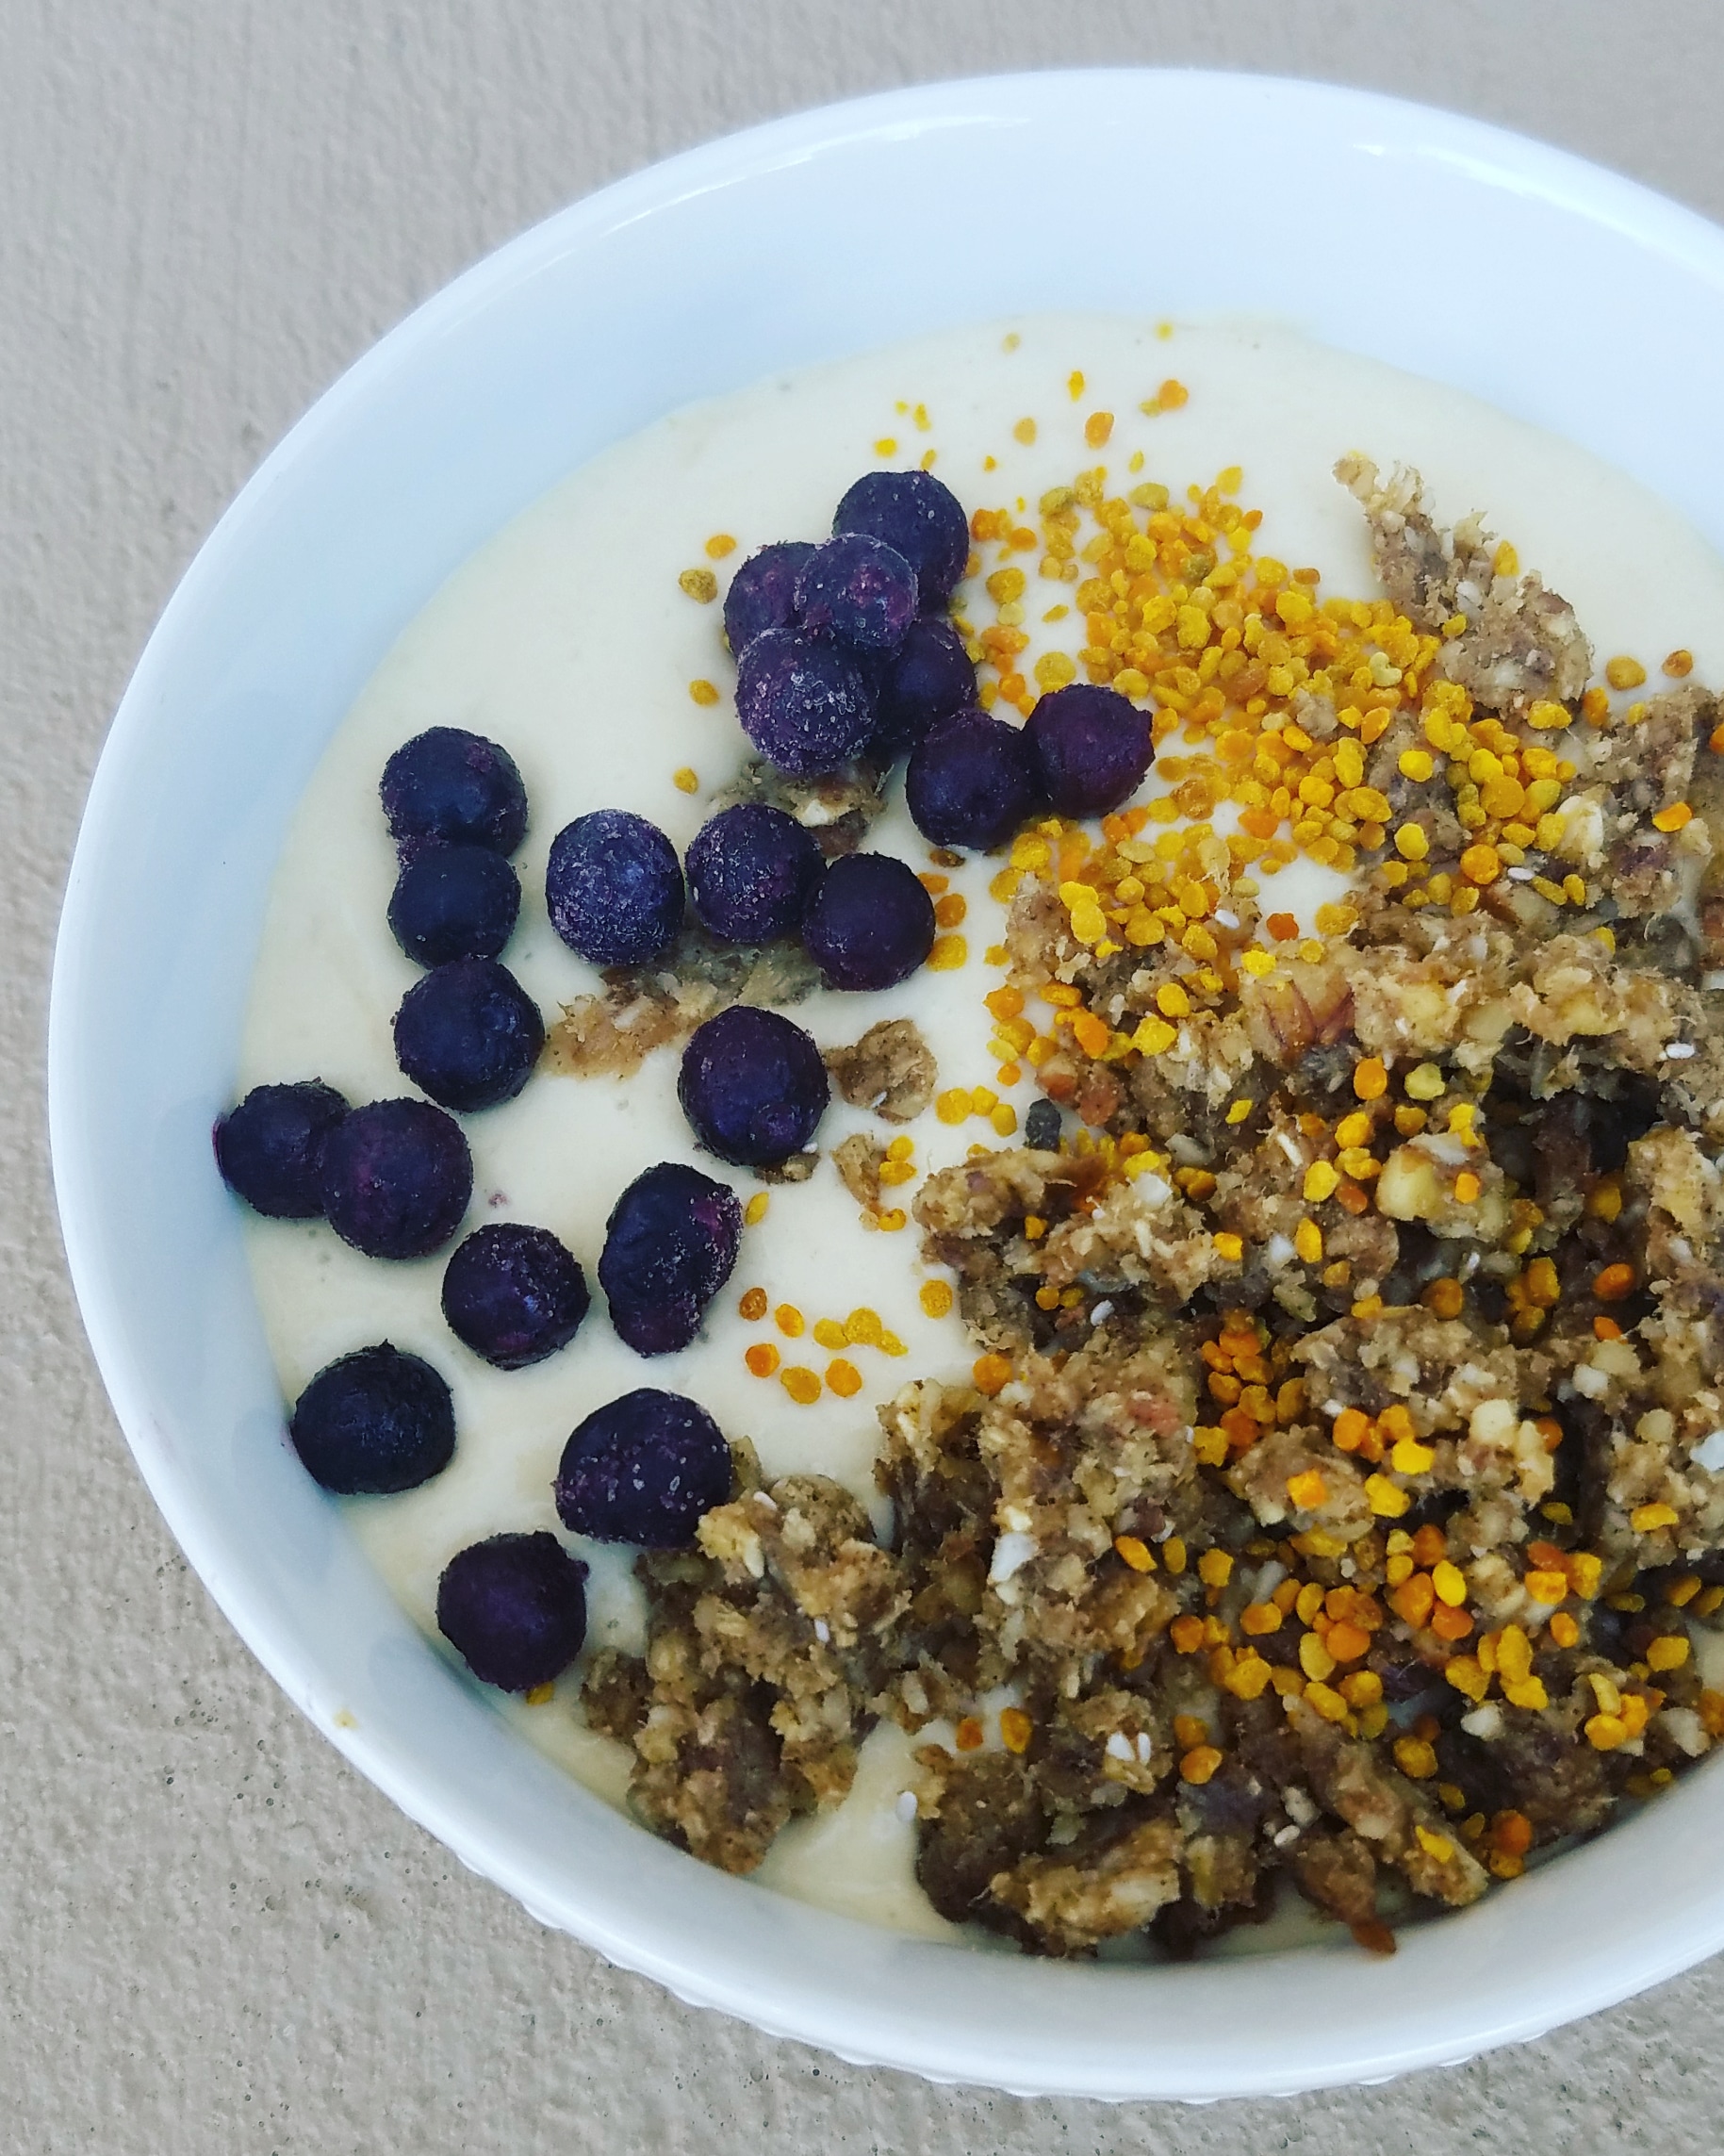
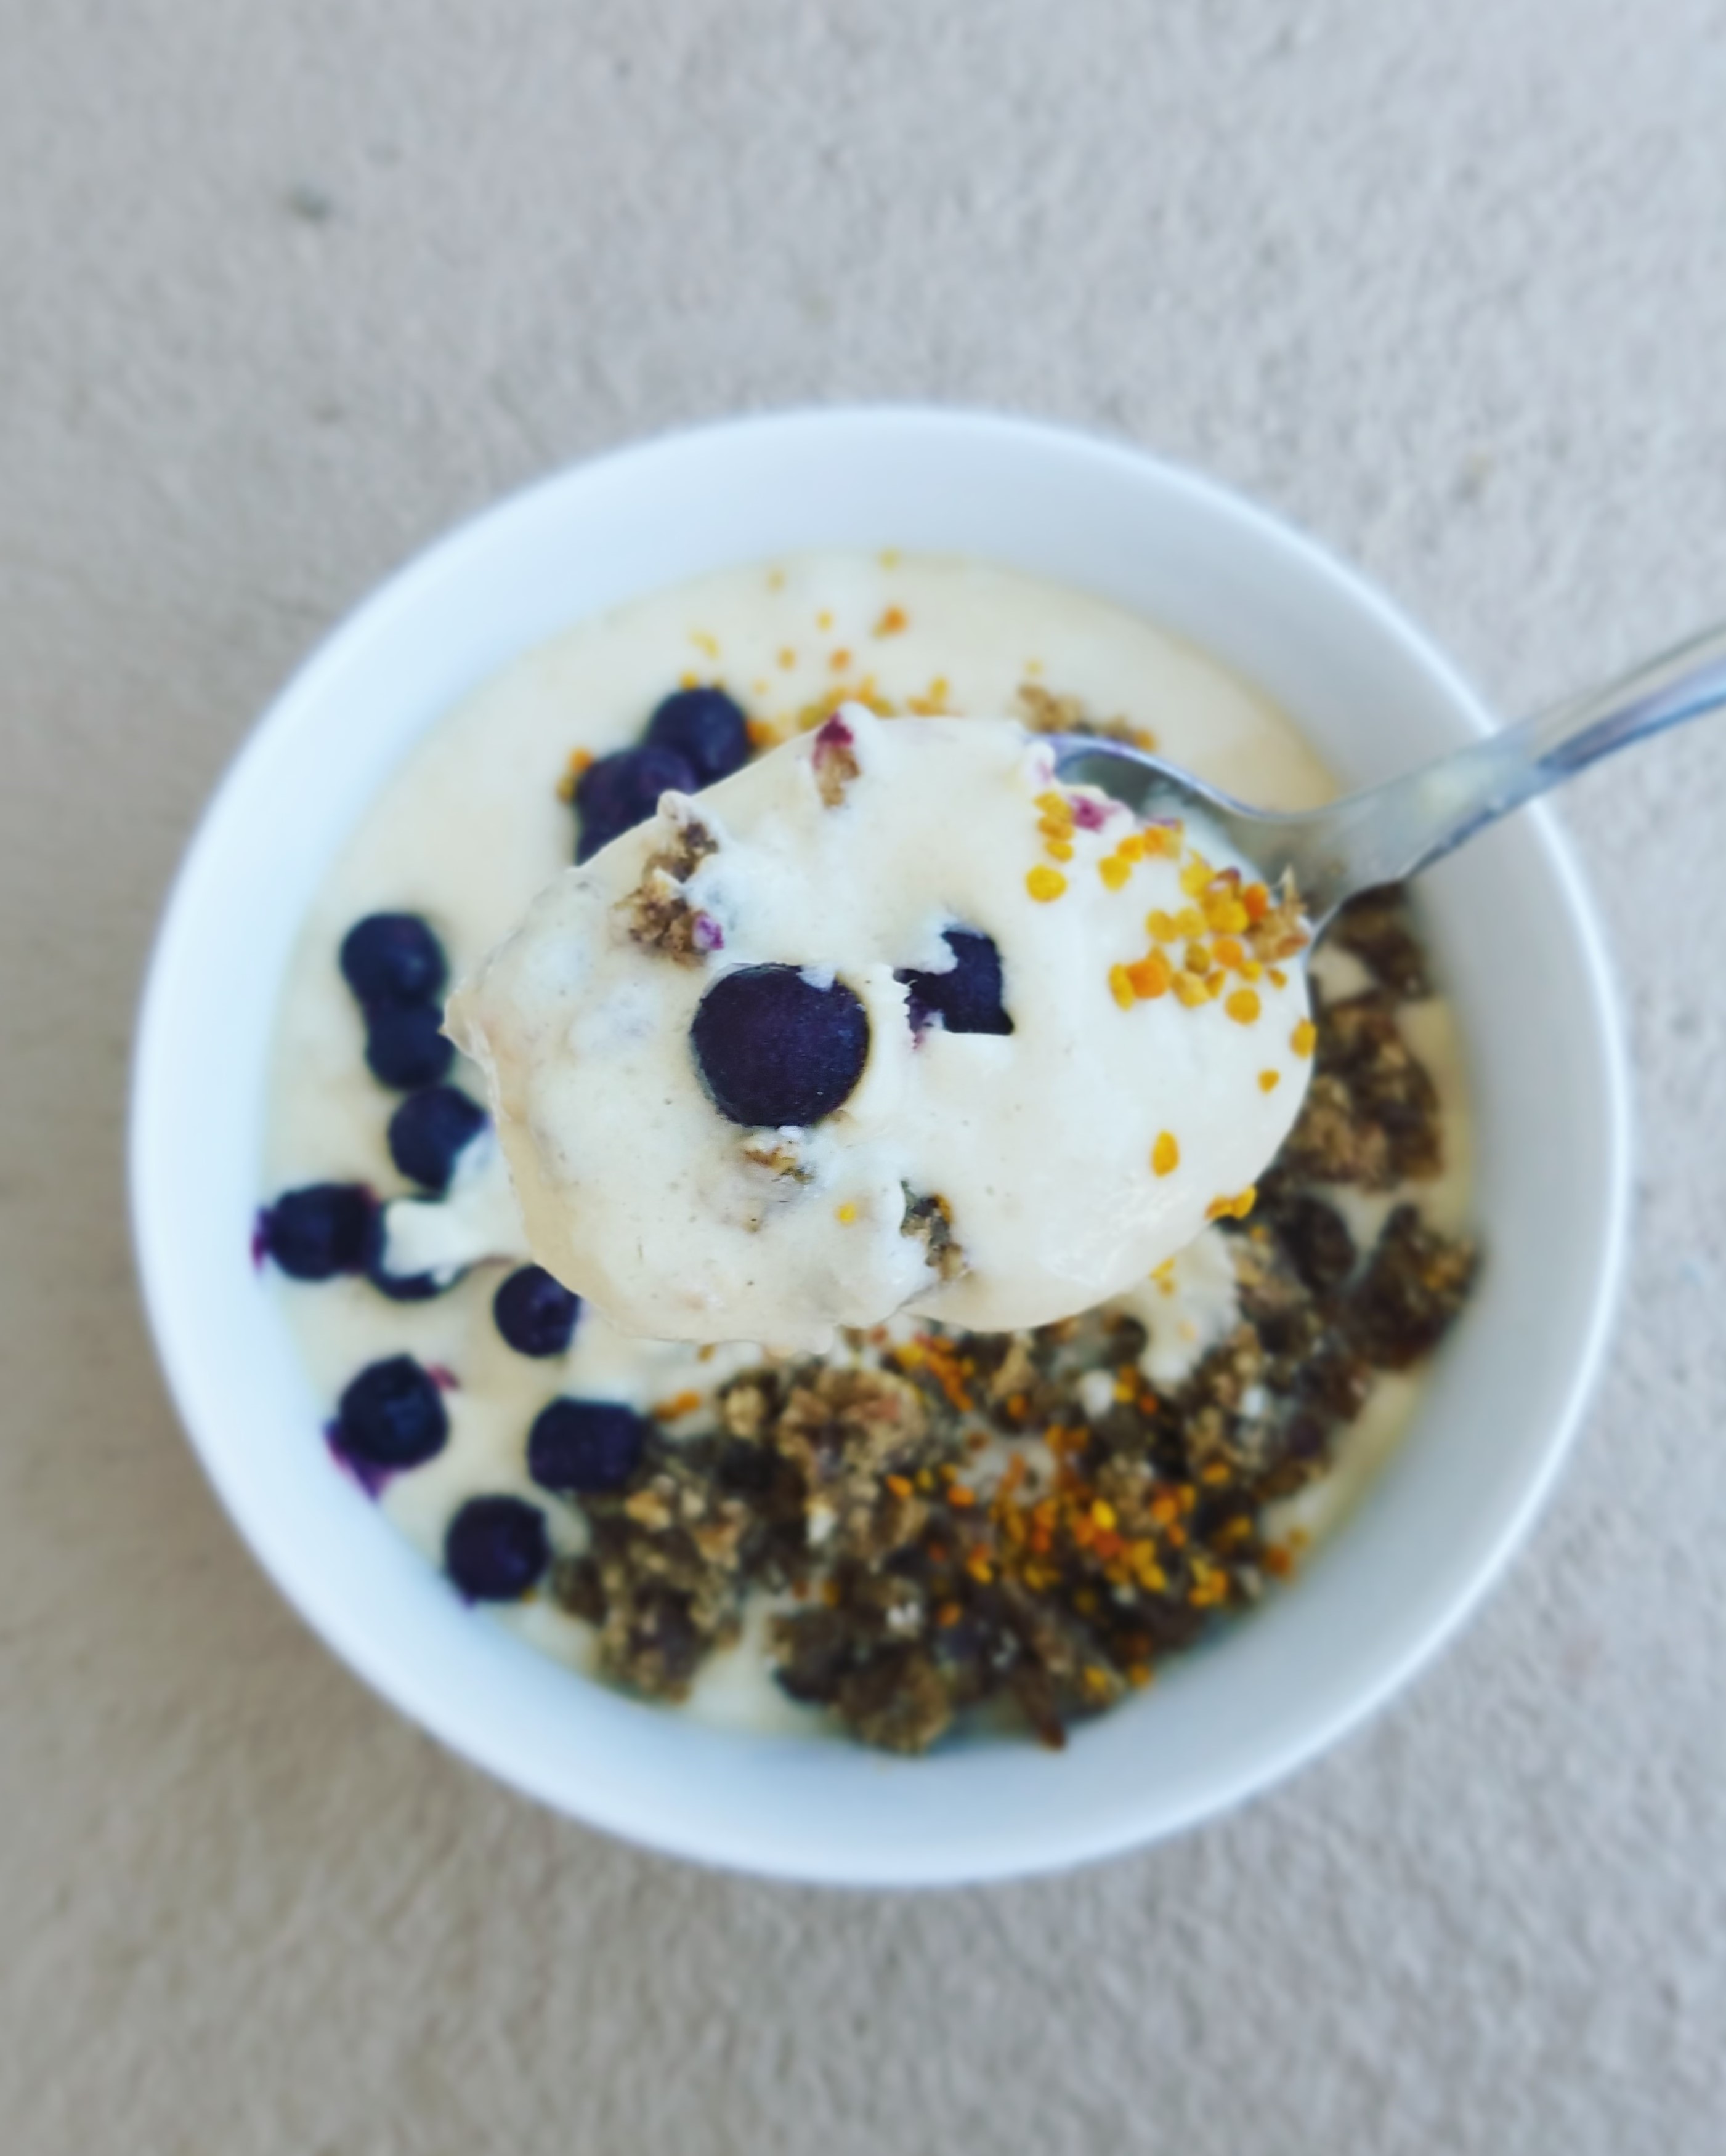
The addition of Minimalist Baker’s Rawnola, bee pollen, and ground flax make this breakfast bowl a real treat.
Sweet and Fluffy Smoothie Bowl
Recipe Type: Breakfast
Cuisine: Vegan
Author: Melanie
Prep time:
Total time:
Serves: 1 bowl
I use a combination of my top fluff-boosters to make this ultra creamy, dreamy, and fluffy smoothie bowl!
Add ¾ cup of the milk and frozen goods to the blender. Process until everything is nice and smooth.
Add the protein powder and, if needed, the remaining milk to the blender.
Let the blender run for at least a minute. The longer it blends, the more the ingredients get whipped (aka FLUFFY).
Once your smoothie is sufficiently fluffed, pour it into a bowl and add whatever toppings you like. I’ve been loving rawnola and bee pollen lately but coconut or fresh fruit would also be good! Enjoy!
3.5.3251
Thanks so much for reading! I am living off of pureed soups and smoothies these days but you definitely don’t need to have your wisdom teeth pulled out to enjoy this baby. If you give it a try—or if you try using any of my favorite fluff-boosters—let me know what you think! xoxo
Move over taco Tuesday because tostadas are here and they’ve brought company (aka nopales)!
My Mexican roots involve a lot of delicious food…much of which I no longer eat. I grew up on tacos, posoles, combination plates, and, many times, meat plays center stage. I won’t even get into the different ways meat is prepared but it is a staple in Mexican cuisine! Luckily, there are meat-free options that can be made with little to no effort.
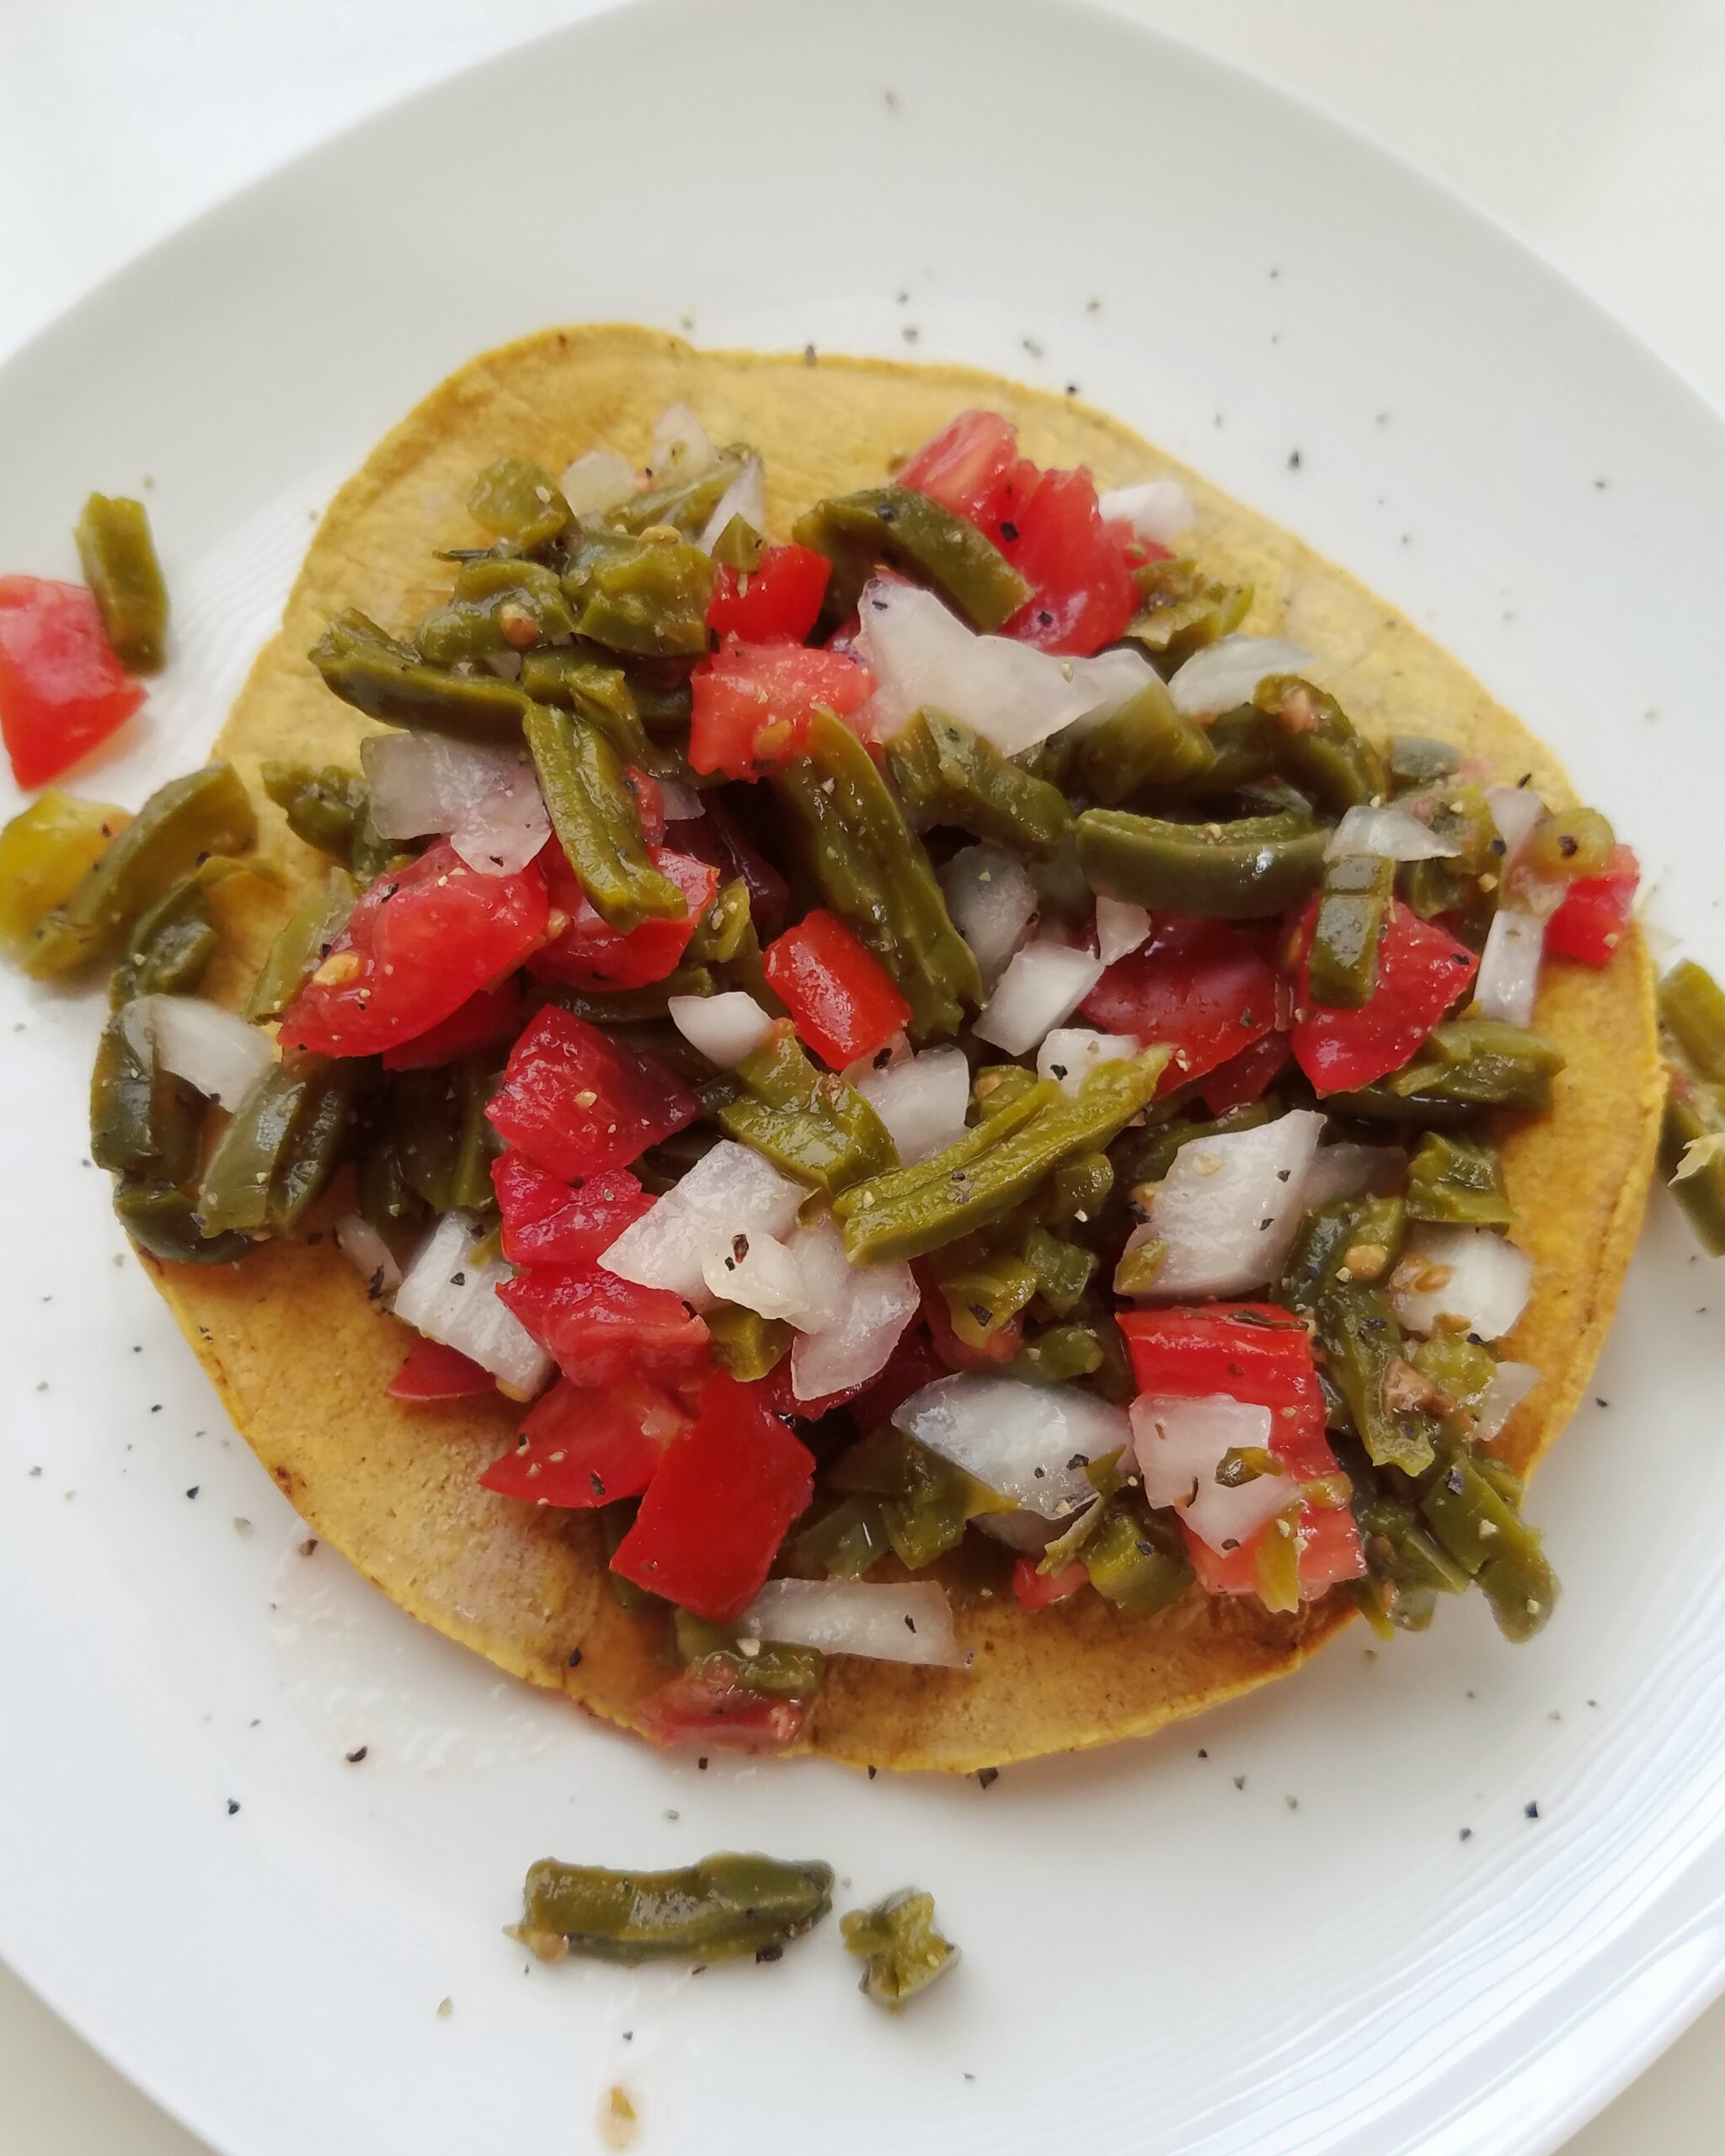
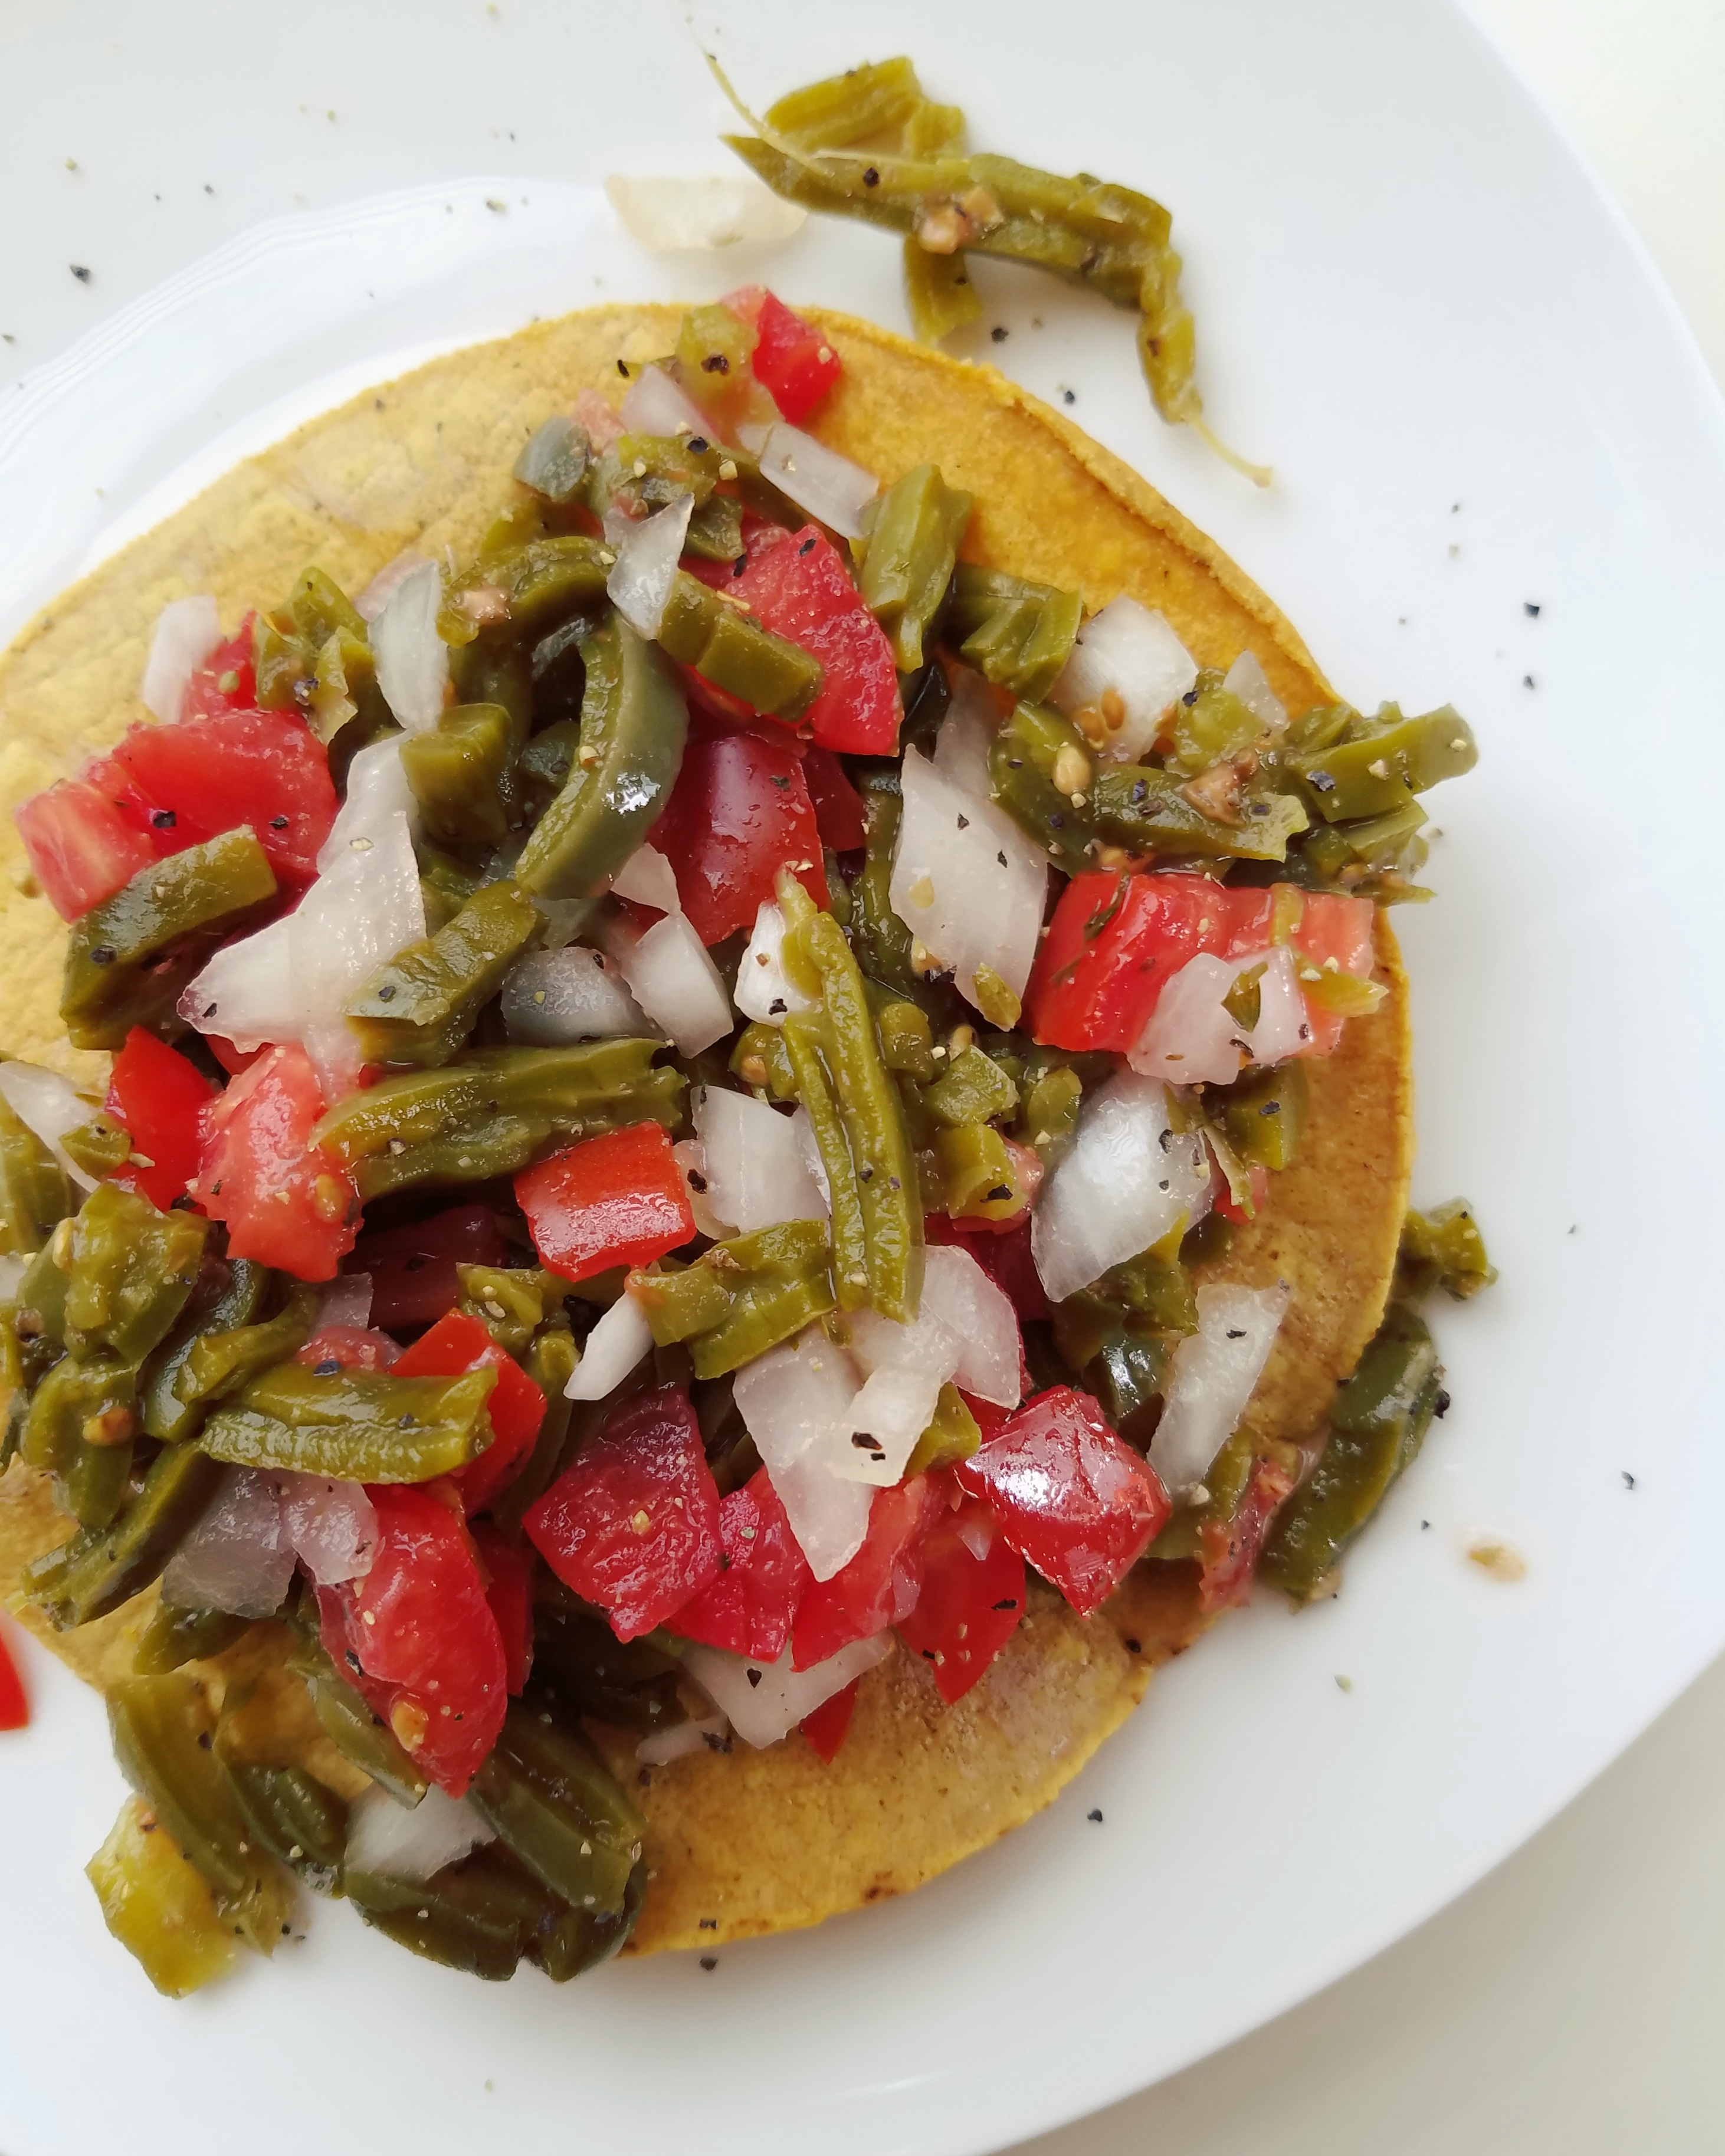
I’ve got to first and foremost give credit to my mama for this Nopales Salad. My mom would make this all the time while I was growing up and on a recent occasion she made it I was excited to think there is still a childhood food that I could eat 🙂 I can’t say that happens to often so it makes me feel connected to my heritage to enjoy dishes like this one.
You might be thinking: wait, so what are nopales??
Nopales are the Spanish term for cactus. Mexicans might have some cactus growing in their backyard which they can chop and prepare but, this recipe is made EASY thanks to a jar of nopales. You can find tender cactus slices in the Hispanic food section at you grocery store. I use the Dona Maria brand but any should be fine as long as there aren’t any added flavorings.
Make this salad when you’re craving a light, fresh meal or enjoy it as a side to barbecue dishes!
Nopales (Cactus) Salad
Recipe Type: Side Dish
Cuisine: Mexican
Author: Melanie
Prep time:
Total time:
Serves: 4 servings
A fresh nopales salad perfect for enjoying on its own or as a side dish to any Mexican food.
Ingredients
1 30oz jar of nopales
½ large white onion, chopped
4 small roma tomatoes, diced
Juice of one lemon, more to taste
¼ tsp garlic powder
¾ tsp dried oregano
Salt and pepper, to taste
Tostadas, for serving
Instructions
Before beginning the salad, clean the nopales. Add the nopales to a colander and rinse them in cool water. Shake off as much water as possible and add them to a bowl.
Chop the onion and tomatoes and add them to the bowl with nopales. There should be an even distribution of each ingredient. Season with lemon and the spices and your salad is ready!
Notes
I like to make this ahead of time because the nopales get a chance to marinate and there is no worry about the ingredients getting mushy or soggy. Two hours should be fine but you can also make it a day ahead!
3.5.3229
Let me know what you guys think if you give this simple recipe a try. I would also love to hear what some of your childhood foods are from your cultural background.
It’s funny to think of how nothing in our world is one set way. I used to think challenges were a necessary part of anything I would embark on. Yet, I also believe the total opposite. There is something to be said for the times when things fall into place so effortlessly that you wonder how sane or safe the situation is. I used to wonder if the latter case meant the universe is playing a trick on me.
I am not one for games and I don’t think the universe is either. It is my belief that we are led to where we need to be as long as we keep our eyes open. The signs are here amongst us but we need to know what to look for. Signals can be confusing, especially when our lives are oftentimes so busy, but that is why I find it essential to recognize how I feel.
I’m not frequently introspective but simply taking note of how things make me feel is a game-changer. It sounds obvious, like, of course I know how things make me feel. Though, I’m talking about on that deeper level of recognizing when a person, topic, or situation affects you.
People in your life that support and inspire you are worthwhile and necessary. People that don’t make you feel good don’t have to be in your life—adjust accordingly. Ideas that make you uncomfortable may be sore spots to work out. When the thought of something fills you with emotion, consider how that serves you. Life, months, weeks, and days are filled with situations. Short and longer term situations are experiences if we can only see the avenues for expansion.
I feel that, once you take the time to learn about yourself in that way, life just begins to flow. My life isn’t perfect but it is flowing right now. I’m not even close to where I am meant to be and there is still so much more I hope/plan to do but I’m thankful that I can see that.
This is a bit of a different and, perhaps, odd post but I hope sharing my thoughts can resonate with you if you wonder about how to tap into those universal signs. Check-in with yourself OFTEN and A LOT and there is no limit to the possibilities that may unfold.
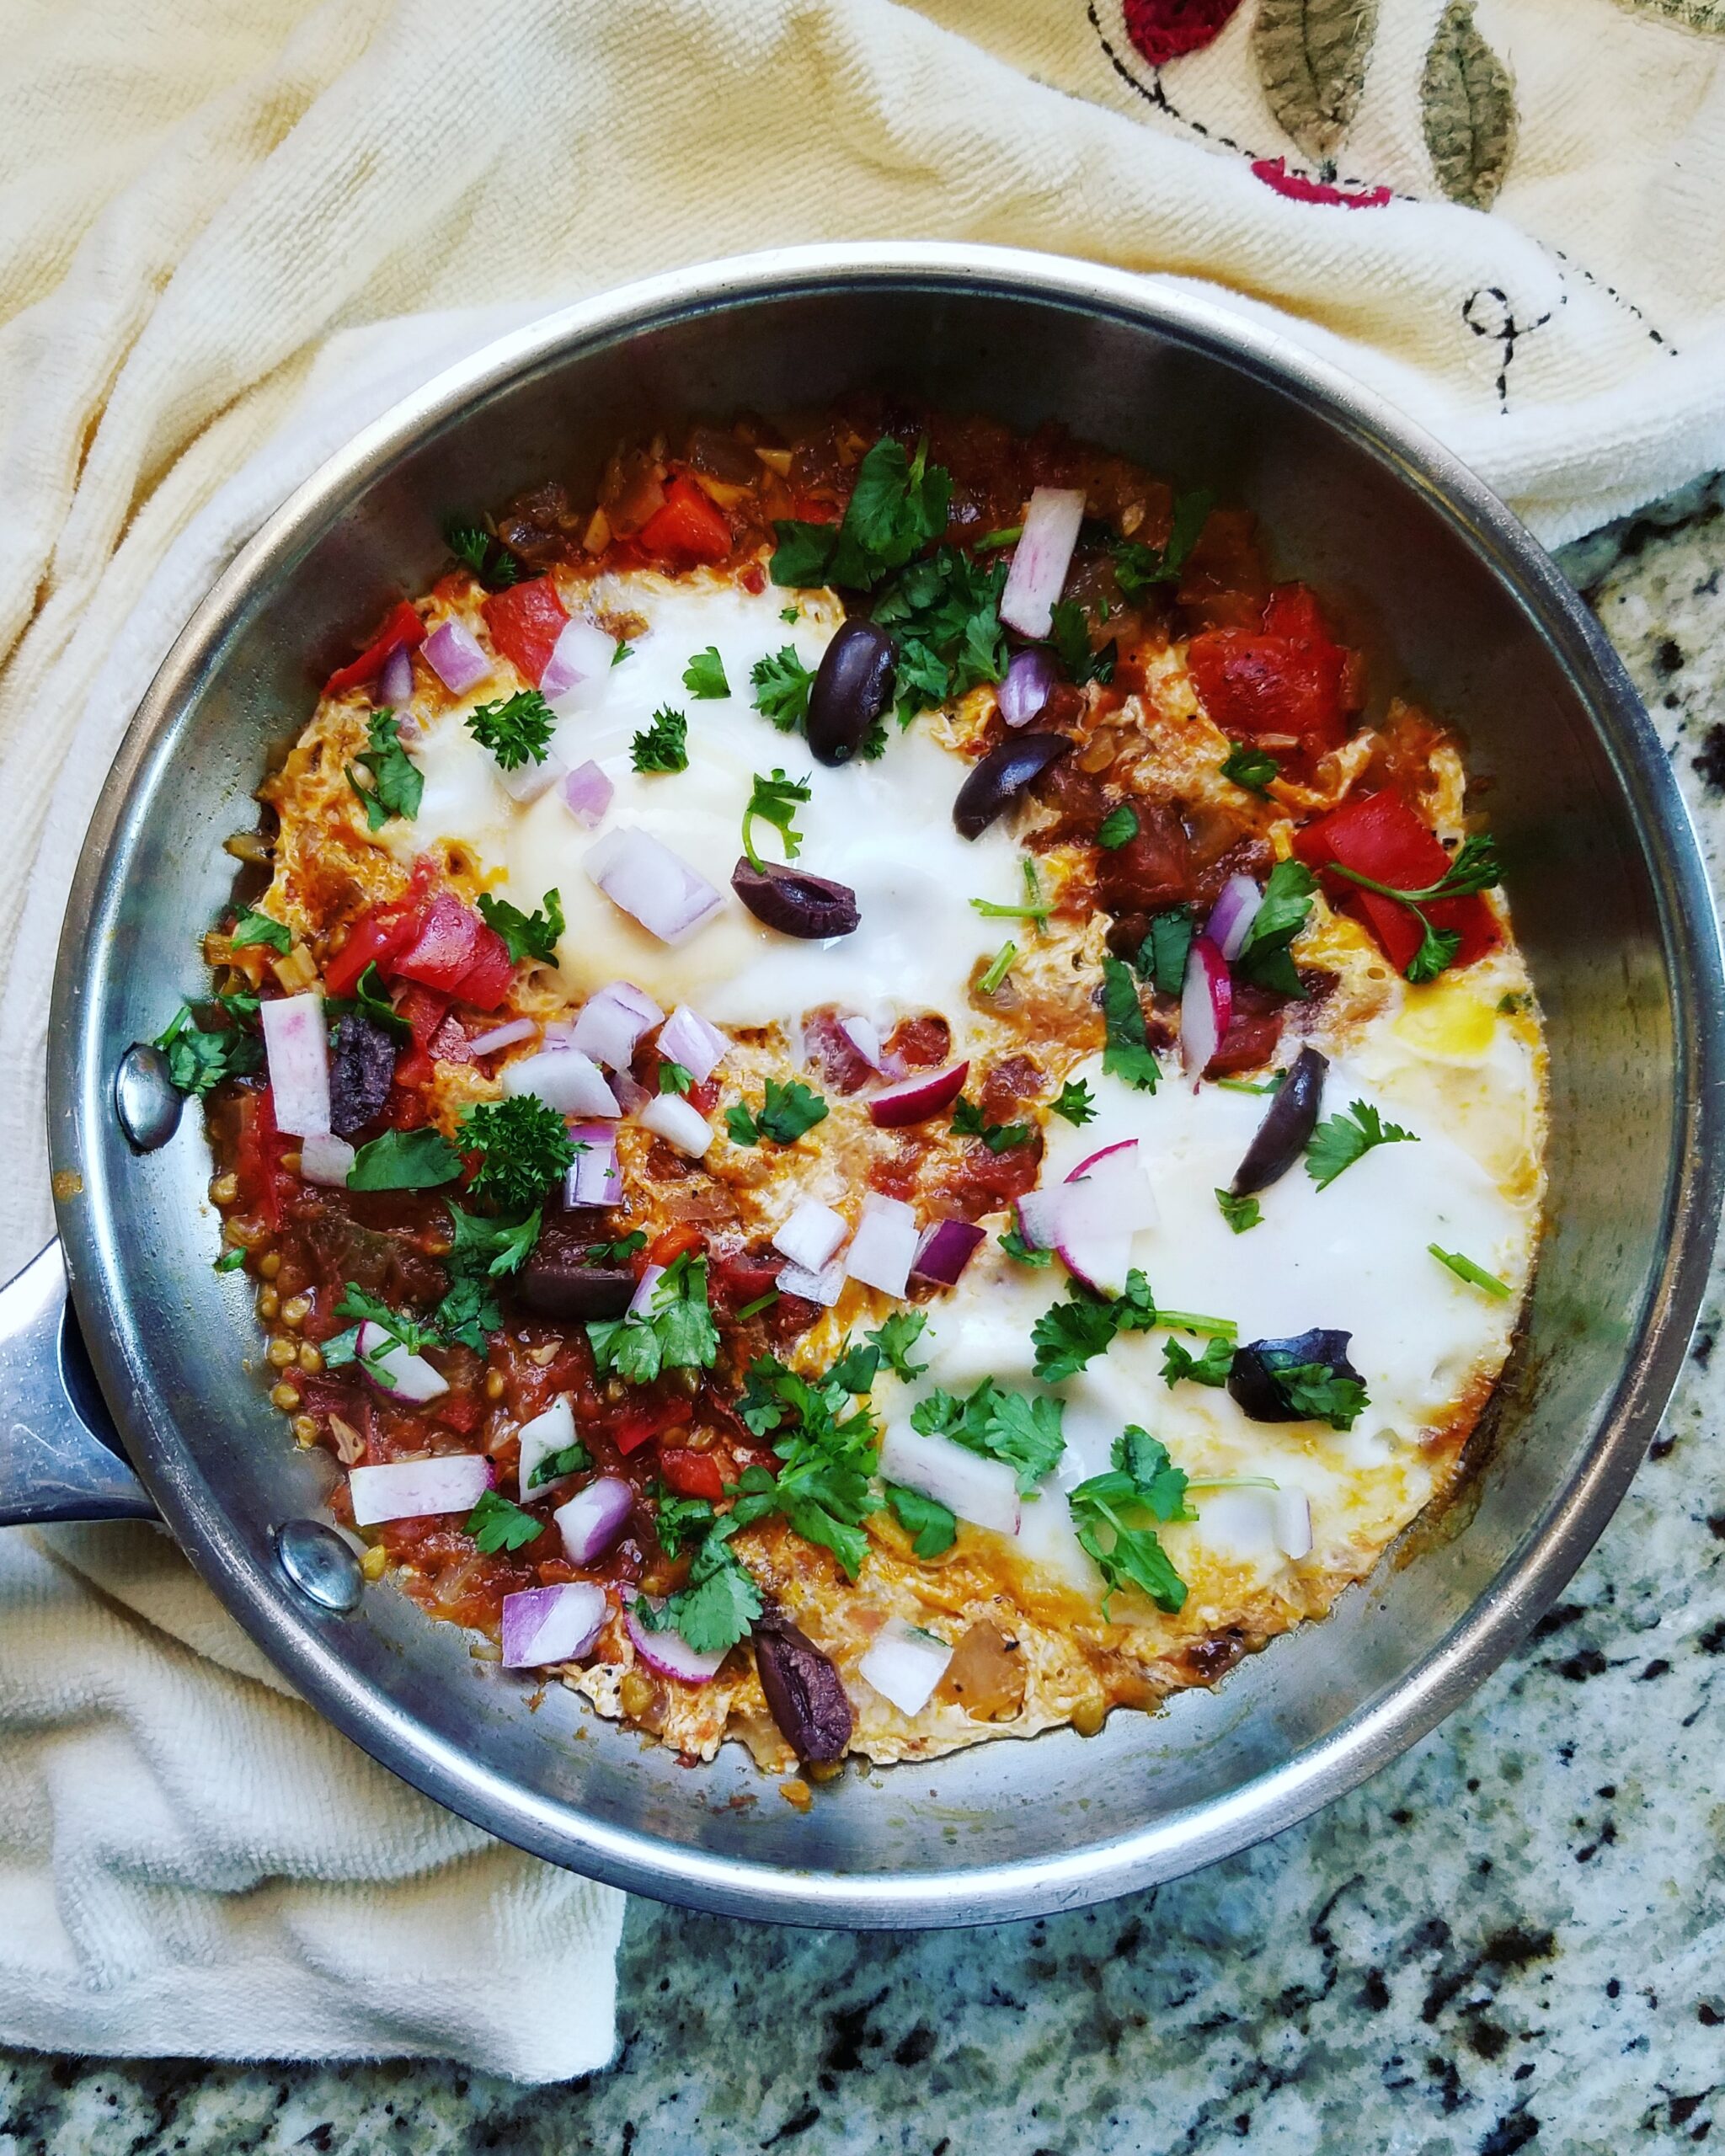
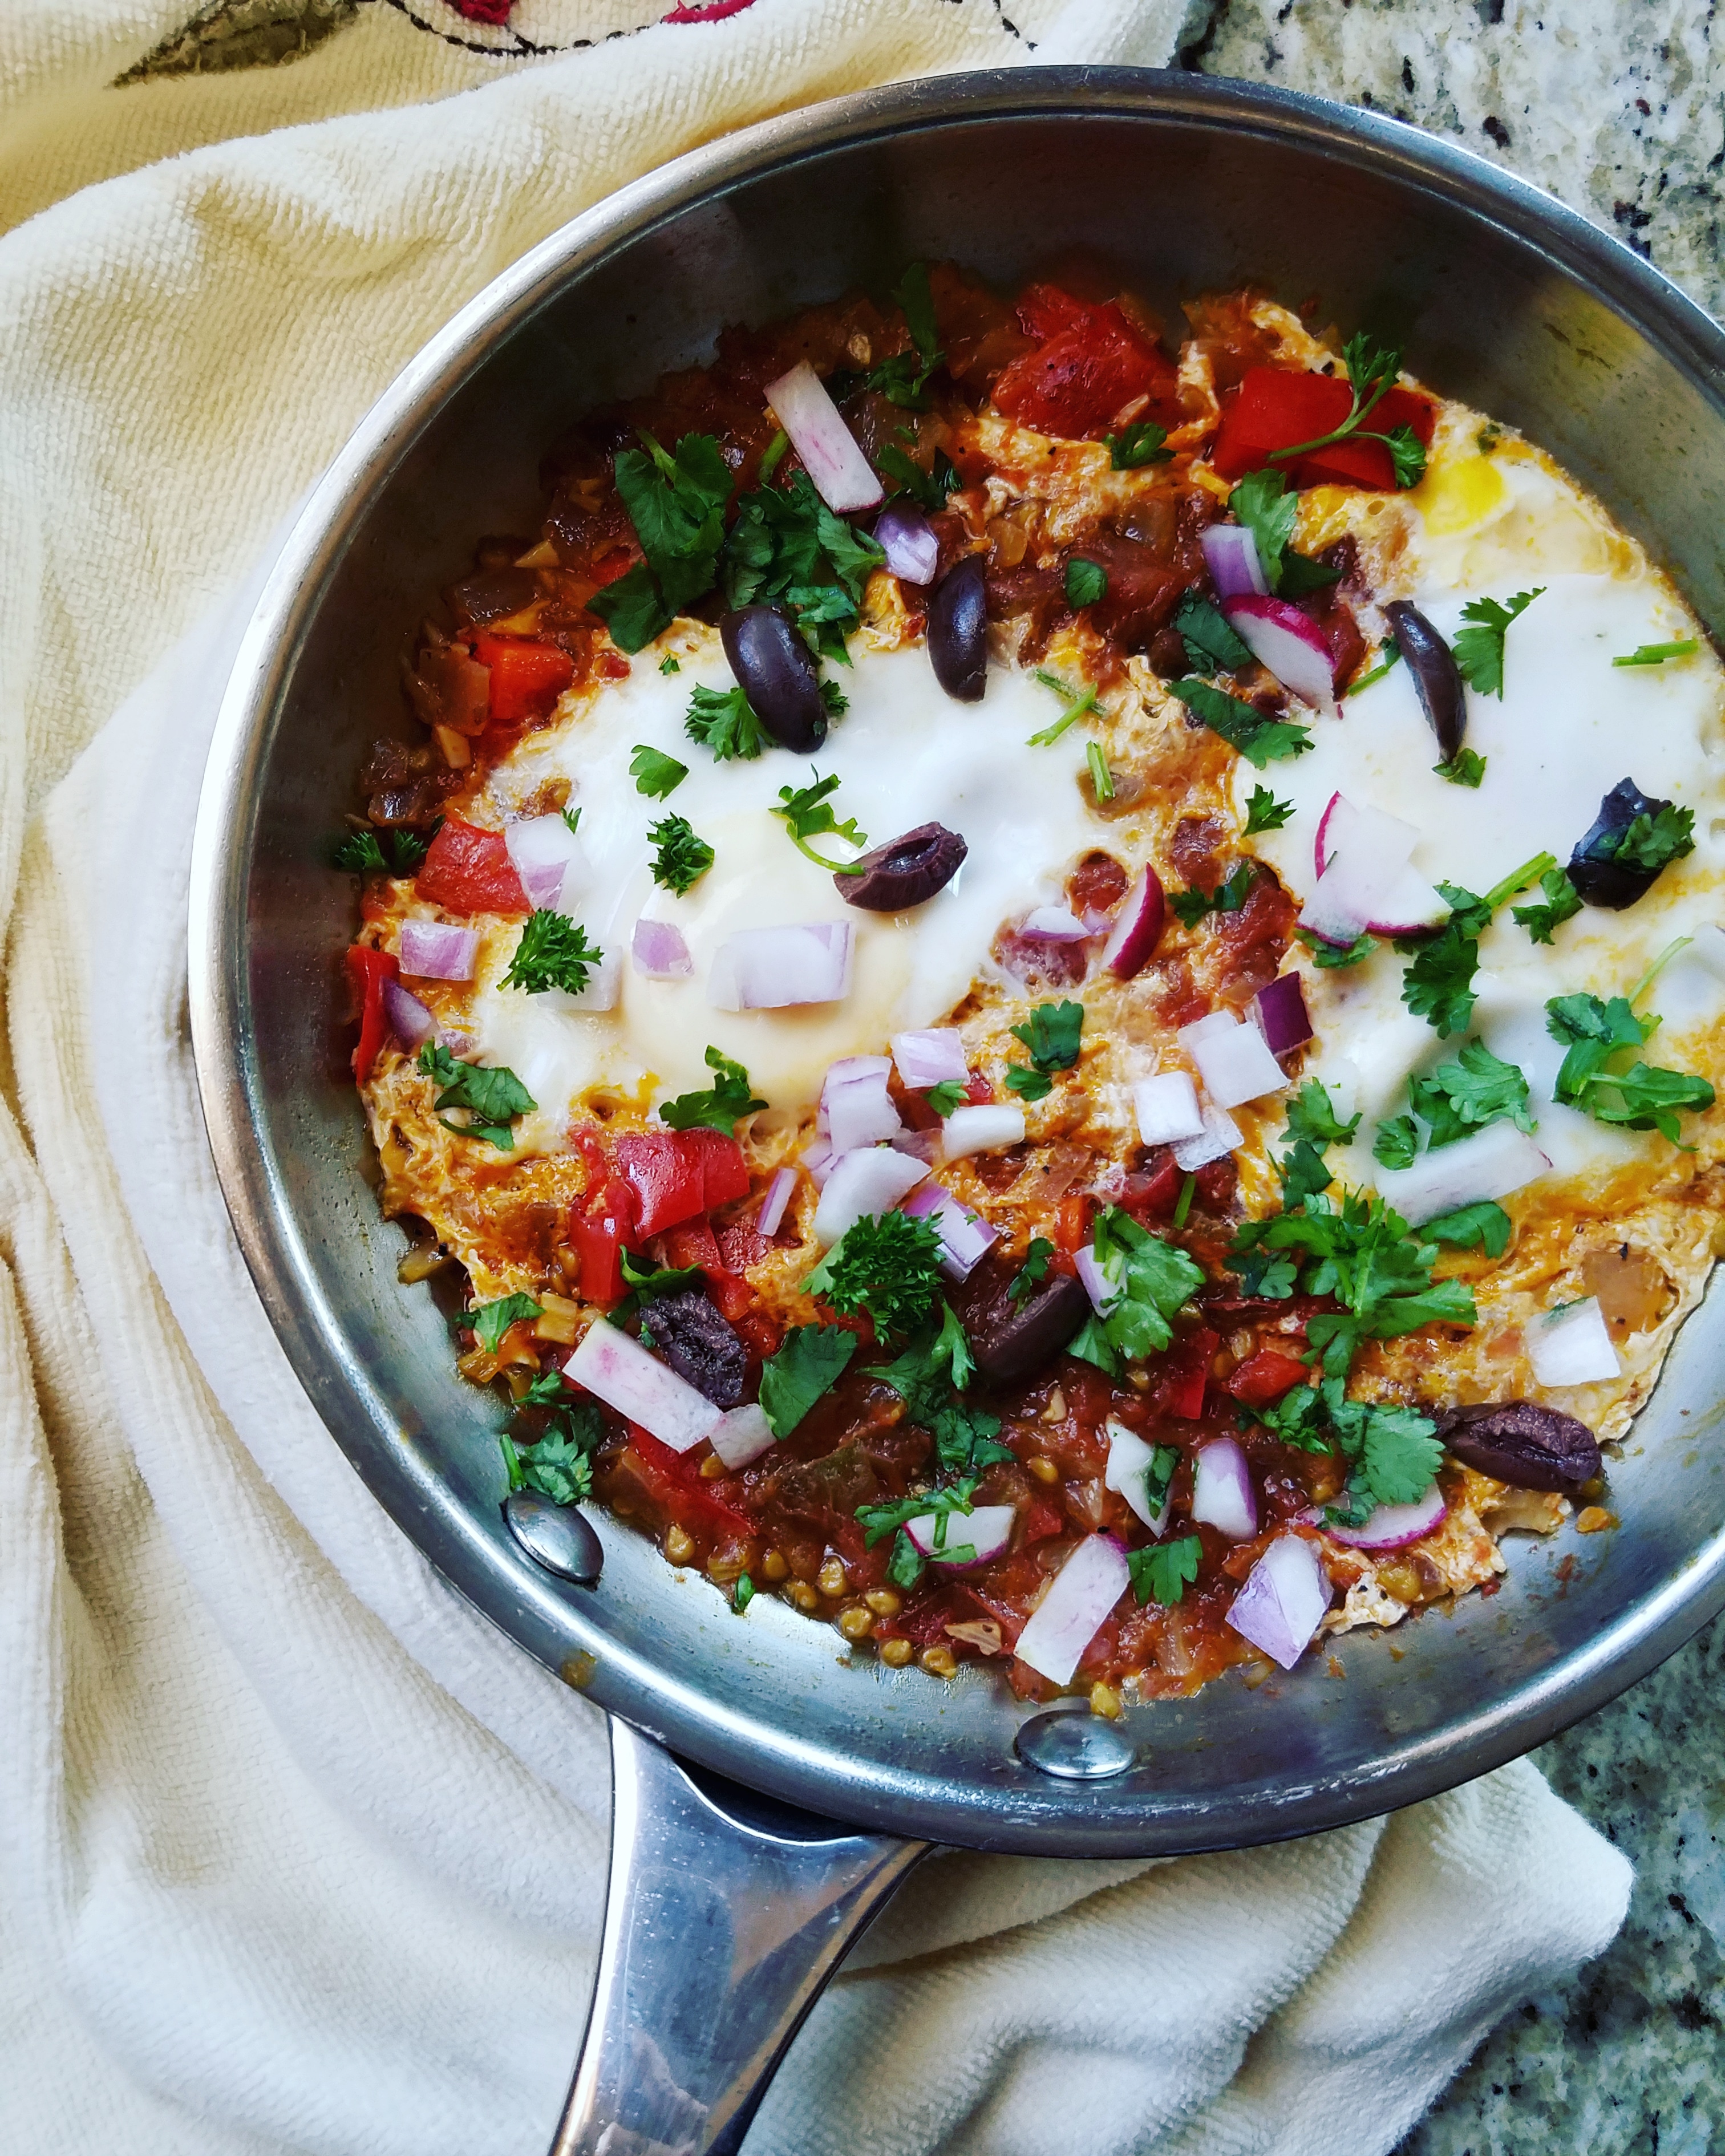
Have you ever tried Shakshuka? Basically, it is a sharing dish, usually served at breakfast or brunch with a slice of crusty bread if you know what’s good for ya.
I don’t have any Middle Eastern cuisine restaurants in my city but I have tried making variations of Shakshuka at home. Traditionally, Shakshuka involves tomatoes, chili peppers, onions, and cumin. I’ve seen recipes that call for anything and everything from potatoes to eggplant to bell peppers. The latter ingredient is how I first tried it. Bell peppers make for a zesty Shaksuka so I’m using them in today’s recipe!
As summer tomato season starts to roll in, you might also find yourself with extra tomatoes on hand. Typically, a can of diced or crushed tomatoes helps bring the ingredients together but I find this recipe to be an excellent use for those tomatoes that are past their prime.
#NoFoodWaste HOORAY!
I’m on an egg kick these days. If you missed my last post, click here to see my favorite Egg, Zucchini, and Pesto Tacos! It feels good to experiment in the kitchen so I hope you guys like these egg recipes as much as I do! Let me know if you give them a try! Comment below or tag me on Instagram @melaniemakesithappen!
Fresh Shakshuka for One
Recipe Type: Entree
Cuisine: Middle Eastern
Author: Melanie
Prep time:
Cook time:
Total time:
Serves: 1 serving
A fresher take on the classic Middle Eastern Shakshuka with ingredients you probably have in your fridge right now!
Ingredients
Olive oil
1 ripe medium-to-large heirloom tomato or two small romas, chopped*
¼ cup chopped red onion
¼ cup red bell pepper
1 clove of garlic
Salt and pepper
1 tbsp chopped parsley
1 tbsp cilantro (or more parsley)
5 Kalamata olives, sliced into fourths
2 eggs
Optional: tortillas or crusty bread, for serving
Instructions
In a stainless steel or metal pan, warm a tablespoon of olive oil over medium heat.
Add the onion, bell pepper, garlic, and a nice pinch of salt. Sauté until translucent and then add the chopped tomatoes. If your tomato/tomatoes are watery, go ahead and add that to the pan, too! Give the ingredients a good stir, mash, and another pinch of salt. Don’t skimp here! Cook for about 3 minutes until the ingredients thicken and combine.
When the mixture begins to boil, add in your eggs. If possible, try to create a little nest in the tomato sauce for the eggs to sit. Turn the heat to a medium-low temperature and cover with a lid.
The eggs are basically poaching in the tomato sauce so keep an eye on them! They cook to over-easy runniness in as little as two minutes.
When the eggs are done to your liking, use a spatula to slowly scoot or spoon the shakshuka into a serving bowl. Sprinkle with fresh herbs, Kalamata olives, and some freshly cracked black pepper.
Notes
*I haven’t tested this with firm tomatoes. Ripe tomatoes are juiciest and that extra liquid helps make the shakshuka sauce. Chop the tomato finely for best results.
3.5.3229
I feel like tomatoes are a staple in many dishes but few times do ripe tomatoes have value in recipes. How do you guys use tomatoes? I’d love to hear your recipe ideas in the comments 🙂
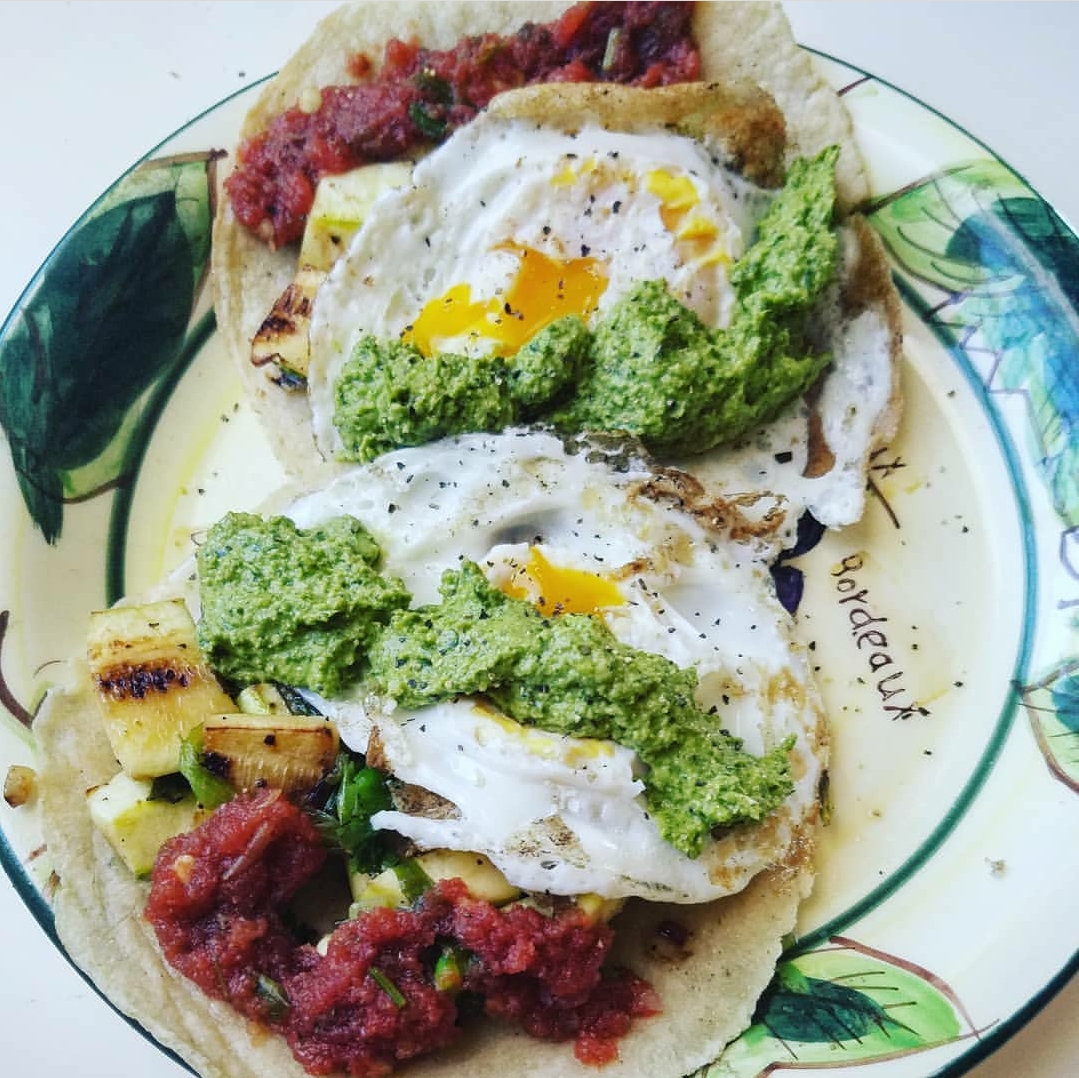
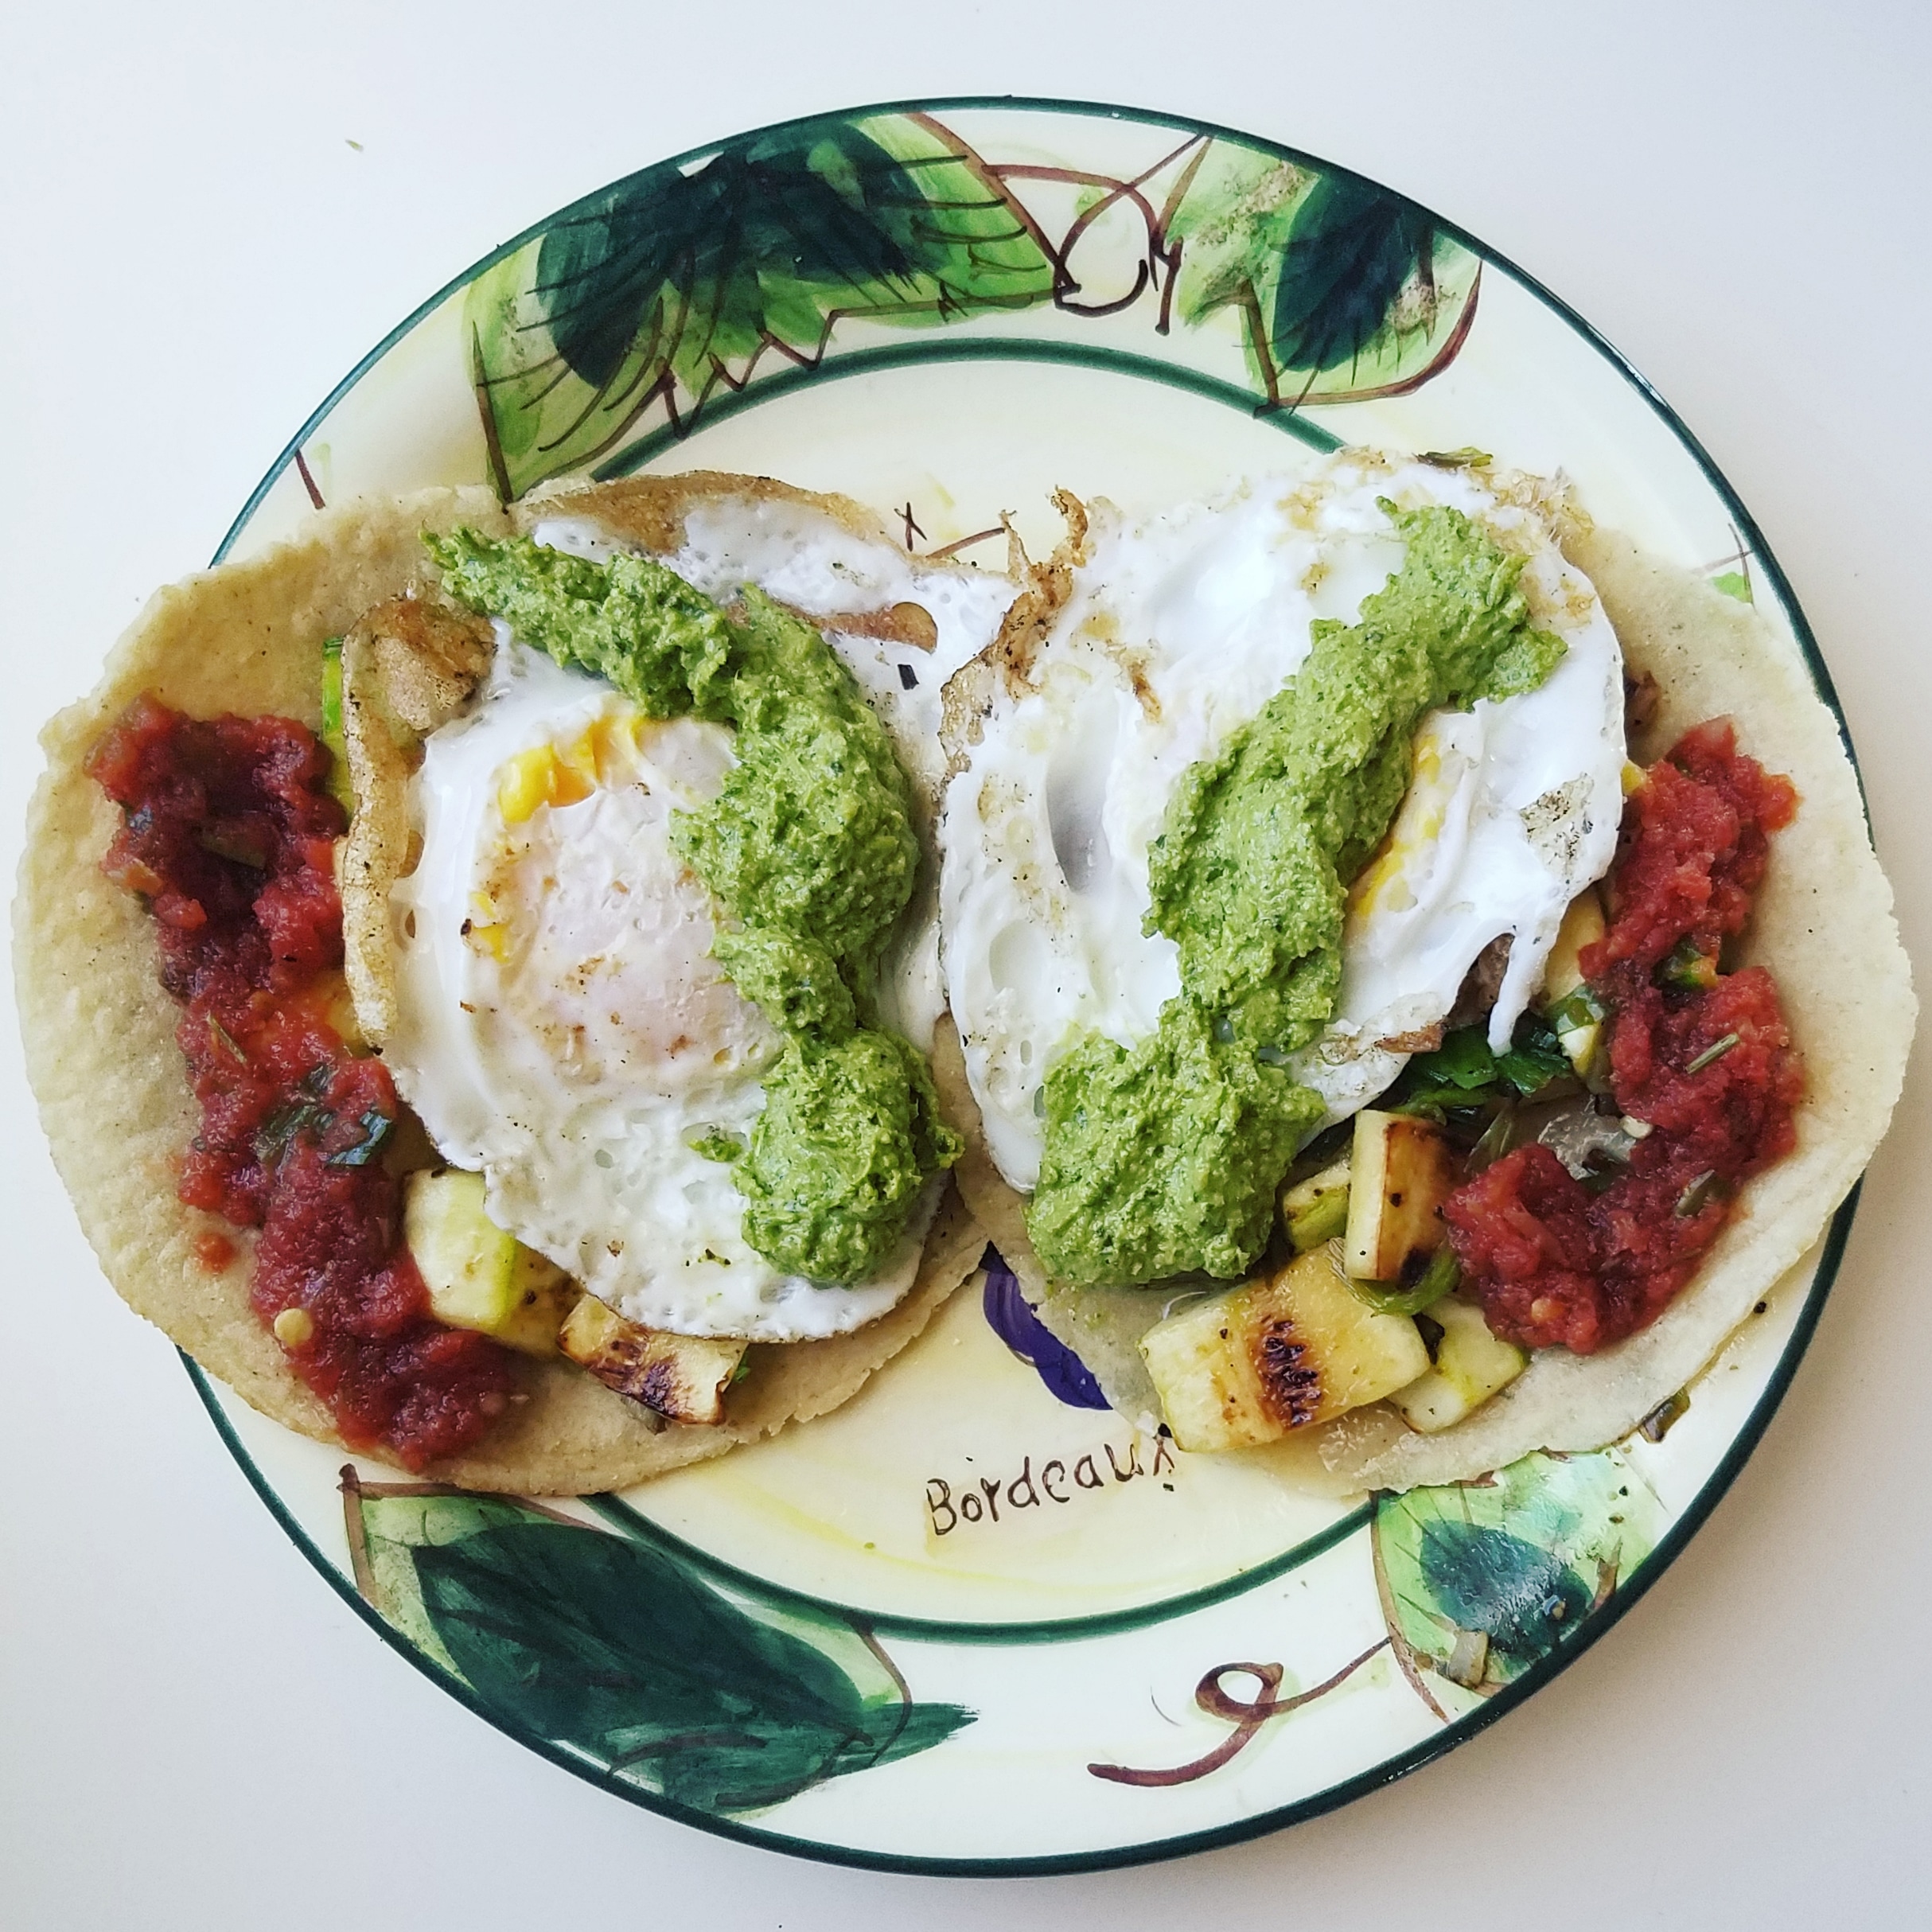
Eggs aren’t just for breakfast anymore! My very favorite way to eat eggs is with a light veggie sauté, pesto, and soft corn tortillas for a hearty lunch or anytime meal!
For anyone else who has pet chickens, you’ll know that eggs are in season! Did you know that just like the plant produce we buy, eggs are also affected by the seasons? Think of how a butternut squash isn’t as accessible in summertime and therefore it is nearly three times more expensive if you want to buy it outside of its usual fall season. The same is similar for chickens and their eggs. As the winter eases out and spring starts up, chickens have more energy to dedicate to laying versus just trying to keep warm during the cold temperatures!
As for these tacos, the ingredients are super simple:
Onion, garlic, zucchini, eggs, and tortillas (non-negotiable)! Oh, and pesto! I highly recommend my cilantro-parsley pesto which is what I use when I make these tacos. Alternatively, use another kind of pesto and sprinkle some cilantro onto your tacos to give it that Mex flair! 😉
Egg, Zucchini, and Pesto Tacos
Recipe Type: Entree
Cuisine: Mexican
Author: Melanie
Prep time:
Cook time:
Total time:
Serves: 2 tacos
If you’re looking for a tasty way to change up eggs, try them in these tacos! The veggie and pesto combo might sound strange but they make for some super flavorful tacos!
Ingredients
Avocado oil, for cooking
2 green onions, chopped OR ¼ cup chopped white onion
1 large clove of garlic, minced
1 small zucchini, sliced (about a heaping ½ cup worth)
Salt and pepper
2 eggs
Pesto
Salsa
Optional: cilantro, radishes, or Everything Bagel seasoning
Instructions
In a cast iron skillet, add a tablespoon or two of oil and turn the pan to medium heat. Sauté the chopped onion and garlic for a minute, then add in the zucchini. Make sure to add a generous sprinkle of salt and pepper for maximum flavor!
Once the veggies are cooked, after about 5 minutes, transfer to a plate.
In the same pan, wipe away any crumbs and add another tablespoon or two of oil. The pan should still be on medium heat and carefully crack two eggs into the pan. Cook the eggs to your liking. I like to flip mine once the egg white starts to solidify. I do about 3 minutes, flip, and then 2 more minutes.
While the eggs cook, warm up your tortillas in the microwave. I also like to add my tortillas to the cast iron pan after the eggs cook (set them aside) so that the tortillas crisp up and absorb the pan flavors! This is an extra step but worthwhile.
For assembly, gently place an egg into each tortilla and distribute the veggie sauté amongst the two tacos. Add a generous scoop of salsa and pesto—I’m talking a good two tablespoons each—and optional toppings, if desired. Finish with an extra sprinkle of black pepper and enjoy!
3.5.3229
I’m legit salivating over the thought of eating these tacos. As I write out the step-by-step details I’m reminded of how flavorful these tacos are! I really hope you guys can give them a try. Drop me a comment or tag me on Instagram if you do!
Thank you all for reading! And stay tuned for ANOTHER fun egg recipe (YAS!) coming later this week to the melmakesithappen blog! 🙂
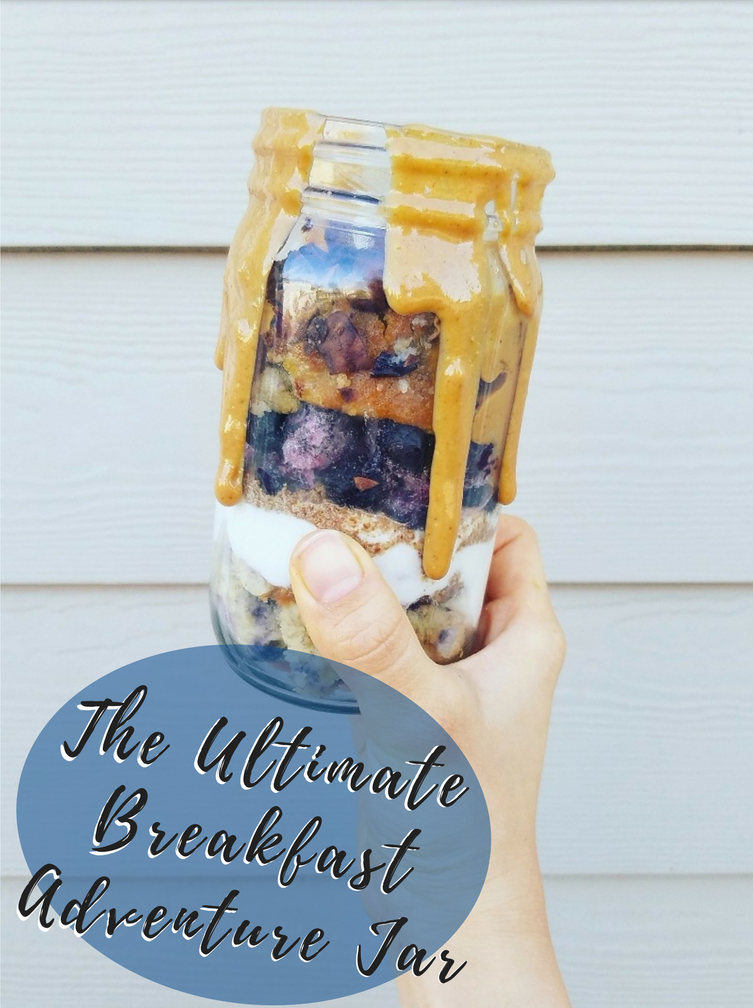
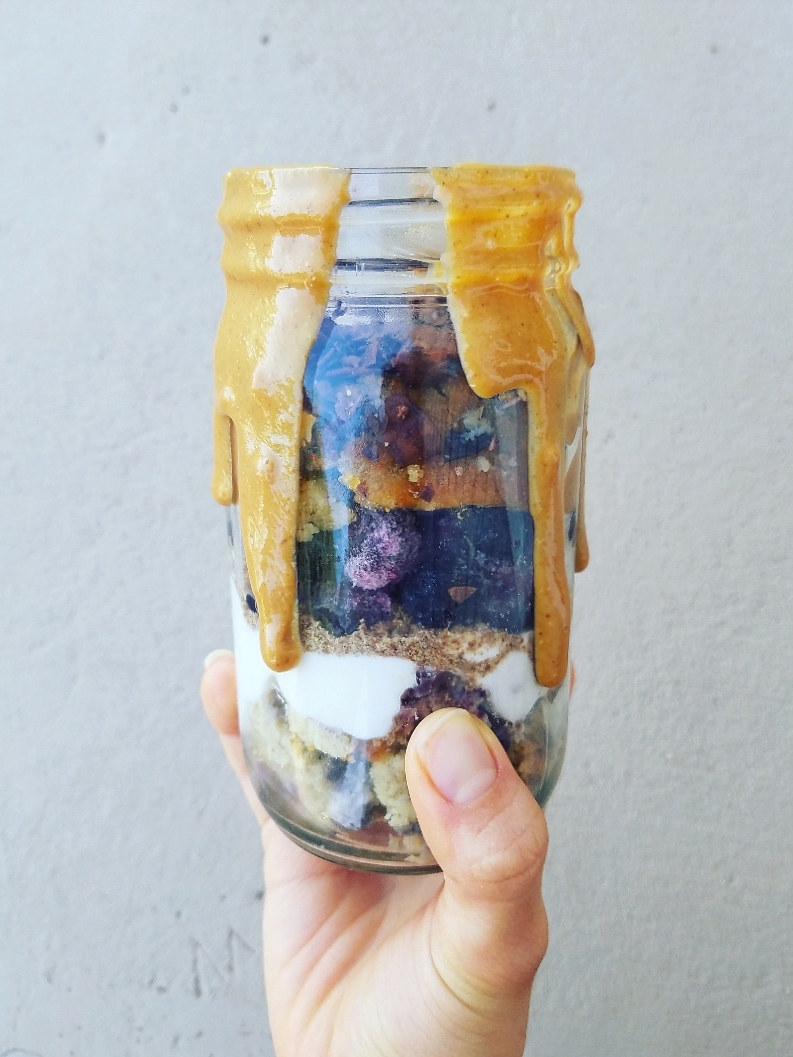
Hey, friends! How are you? Please tell me; I really want to know. Are you just here to see what the “Adventure” part of Breakfast Adventure Jar is? If so, that’s okay, too. See the recipe at the bottom of the page 🙂
I need to talk about some thoughts first. Just today, I was scrolling through Instagram and got to talking with a friend about passions. I started thinking of how we may dive into something as a follower but down the line it ignites a fire that motivates us to be a leader in that same field. For my friend, it was fitness. Following Tone it Up encouraged her to pursue personal training and nutrition coaching—both very different from her day job. Similarly, I started my fitness journey with Tone it Up and that transcended into an exploration of healthy eating and now I’m basically a nutrition fanatic.
I strongly believe in a whole foods way of eating. For me that is mostly vegan but, I recognize that for others, a whole foods way of eating could be varied. Plus, we all have to start somewhere. I try to keep my preferences to myself but the few times I do talk about food, I think it influences others. I get asked all sorts of things about what I eat, how to cook quinoa, and how to de-bloat.
Of course, I’m not a dietician so I can only offer my personal experience and knowledge from reading but I wish to do more. Here on the internet, especially in the health and wellness community, there isn’t a question about how to use kale. Though, offline, I need to remind myself that many people still have trouble formulating a plate of nutritious food.
I thought of a quote I’ve seen floating around but I haven’t ever resonated with until now:Right now, my ability to influence the community or public’s view of nutrition is limited as my day job is an office assistant. Though, I do hope that if someone has questions, they can have the courage to seek out answers. I enjoy helping steer people on the right path but fully want them to create their own healthy relationship with food. I don’t yet know how I can further advocate for this subject which I feel strongly about IRL but I know it isn’t going away soon.
In the meantime, let’s get to the Breakfast Adventure Jar.
The adventure part of the name comes from a few different places. One, it stems from the fact that your jar is never going to look or taste the same way twice. It is a complete mystery based on whatever fridge or pantry goods you’ve got to use up. The idea for the Breakfast Adventure Jar came one day when I had baked a gingerbread loaf that wasn’t terrible but just wasn’t that great for snacking. I turned it into a parfait with some chia pudding, peanut butter, sliced nectarine, and cocoa coconut chips. That was the moment I knew.
Second, the adventure comes from looking around for goodies to put in your jar. Half of an apple? Throw it in! Mostly empty coconut butter jar? Use that to build the mish-mash concoction!
So, I guess I should say, this isn’t so much of a recipe as it is a guideline to make a bomb, texture-filled, parfait! (Keep reading for my suggestions.) Lastly, the jar is the vehicle for a delicious set of ingredients that you may have otherwise lain out on a plate at home. Now the goods are all conveniently packed into a jar for the ease of portability for you to take on YOUR adventures. 🙂
The idea for the Breakfast Adventure Jar came one day when I had baked a gingerbread loaf that wasn’t terrible but just wasn’t that great for snacking. I turned it into a parfait with some chia pudding, peanut butter, sliced nectarine, and cocoa coconut chips. 👌
Be sure to tell me what adventures you go on with your delicious on-the-go breakfast parfait!
Breakfast Adventure Jar
Recipe Type: Breakfast
Cuisine: American
Author: Melanie
Prep time:
Total time:
Serves: 1 parfait
Ingredients
1-2 homemade loaf slices or muffins* (I use 2)
Chia pudding, yogurt of choice, or leftover protein smoothie
A bit of whatever fruit you like: berries, sliced stone fruit, or good ol’ banana
Granola, crushed up nuts, toasted coconut chips, and/or cacao nibs
Peanut butter or other nut butter for drizzling
Instructions
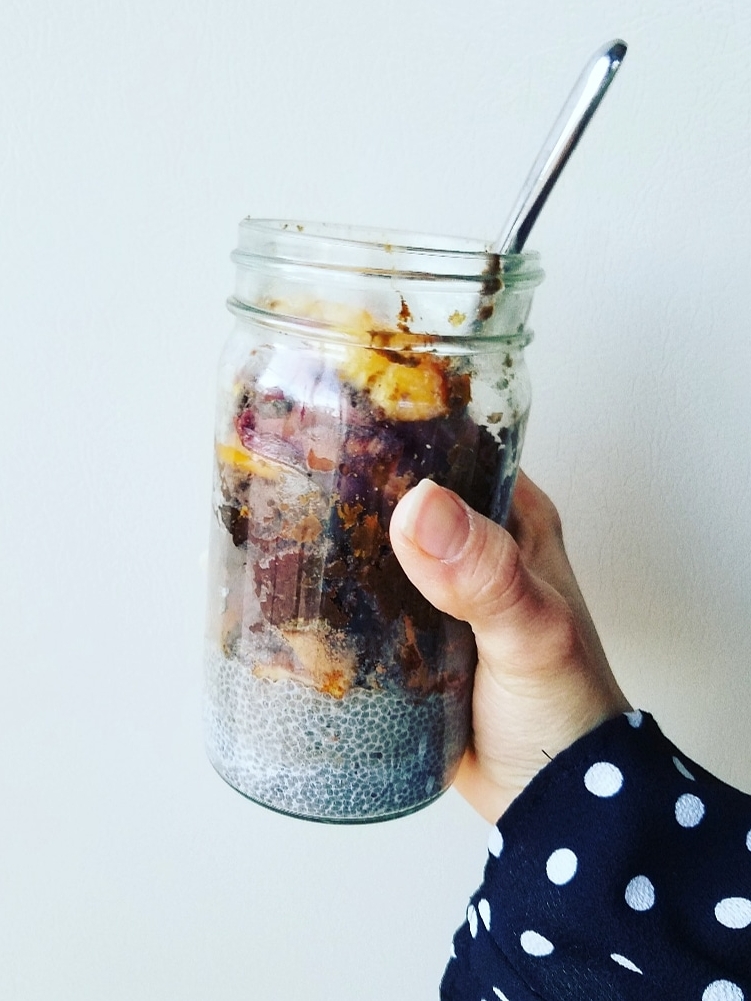
If making chia pudding for your Breakfast Adventure Jar, start with that. Add the chia seeds and milk to the jar and let set at room temperature for 10 minutes or so until thickened. If using yogurt or smoothie, save that for after the loaf/muffins.
Next, you can top the set chia pudding with crumbled up loaf slices or muffins OR, use them as the base of the parfait and top with yogurt/smoothie. Personally, I like adding the loaf to the base of the jar but the chia pudding wouldn’t be able to set properly that way—and we want to keep this a 1 jar recipe!
For the third layer, add chopped fruit or omit if your loaf, yogurt, smoothies, etc. have fruit already.
Finally, top it all off with crunchy goodies of choice and perhaps a hefty drizzle of nut butter.
Notes
*There is no science to this. Literally use whatever bread you have and just add flavor pairings that you like. Banana bread, zucchini bread, or protein muffins are just A FEW possibilities. I’ve even used brownies once before 😊
If you liked this post, then be sure to also check out my Yogurt Pro Bowl post where I share how to make a great yogurt bowl with unique topping ideas!
We use cookies on our website to give you the most relevant experience by remembering your preferences and repeat visits. By clicking “Accept”, you consent to the use of ALL the cookies.
This website uses cookies to improve your experience while you navigate through the website. Out of these, the cookies that are categorized as necessary are stored on your browser as they are essential for the working of basic functionalities of the website. We also use third-party cookies that help us analyze and understand how you use this website. These cookies will be stored in your browser only with your consent. You also have the option to opt-out of these cookies. But opting out of some of these cookies may affect your browsing experience.
Necessary cookies are absolutely essential for the website to function properly. These cookies ensure basic functionalities and security features of the website, anonymously.
Cookie
Duration
Description
cookielawinfo-checbox-analytics
11 months
This cookie is set by GDPR Cookie Consent plugin. The cookie is used to store the user consent for the cookies in the category "Analytics".
cookielawinfo-checbox-functional
11 months
The cookie is set by GDPR cookie consent to record the user consent for the cookies in the category "Functional".
cookielawinfo-checbox-others
11 months
This cookie is set by GDPR Cookie Consent plugin. The cookie is used to store the user consent for the cookies in the category "Other.
cookielawinfo-checkbox-necessary
11 months
This cookie is set by GDPR Cookie Consent plugin. The cookies is used to store the user consent for the cookies in the category "Necessary".
cookielawinfo-checkbox-performance
11 months
This cookie is set by GDPR Cookie Consent plugin. The cookie is used to store the user consent for the cookies in the category "Performance".
viewed_cookie_policy
11 months
The cookie is set by the GDPR Cookie Consent plugin and is used to store whether or not user has consented to the use of cookies. It does not store any personal data.
Functional cookies help to perform certain functionalities like sharing the content of the website on social media platforms, collect feedbacks, and other third-party features.
Performance cookies are used to understand and analyze the key performance indexes of the website which helps in delivering a better user experience for the visitors.
Analytical cookies are used to understand how visitors interact with the website. These cookies help provide information on metrics the number of visitors, bounce rate, traffic source, etc.
Advertisement cookies are used to provide visitors with relevant ads and marketing campaigns. These cookies track visitors across websites and collect information to provide customized ads.